What is the Grade Book?
Instructors can set up a Grade Book that reflects their approach to evaluation. You control the grading formula used to calculate grades and which projects, assignments, tests, etc. are graded; how grade items are associated with other tools, and when grades are released to users and what information they see.
You can use the Grades tool to:
- Control the grading formula used to calculate grades.
- Control what assignments, quizzes, discussions etc. are graded.
- Submit feedback and grades to students.
The following video provides an overall guide for the Grade Book including the Setup Wizard:
The first time you enter the Grades tool, you will be taken to the 'Setup Wizard'. You can return to the 'Setup Wizard' any time by selecting the 'Setup Wizard' link in the Grades tool.
Set up your grade book
- On the navbar, select Grades under the Assessments tab.
- On the Grades Setup Wizard page, click Start.
Step 1 Grading System:
The method of grading used for your course, select from Weighted, Points, or Formula.
Step 2 Final Grade Released:
Choose between Final Calculated Grade (automatically calculated), or Adjusted Final Grade (allows adjustment of final grade)
It is recommended that you do not select Automatically release final grades. Final grades should only be released once they have been approved in PeopleSoft.
Step 3 Grade Calculations:
Choose how you want to treat ungraded items. The Default Setting is to Treat ungraded items as 0.
- Drop ungraded items: Select this option to exclude ungraded grade items from the final grade calculation.
- Treat ungraded items as 0: Select this option to automatically assign a value of 0 to all ungraded grade items.
- Auto Update: If you want final grades to automatically adjust after changing a grade item or calculation option, select Automatically keep final grade updated.
Step 4: Choose Default Grade Scheme:
Select the grading scheme used for the Grade Book Percentages, Arts & Science Letter Grades, etc.
Step 5: Managing View Display Options:
In the Number of decimal places to display field, enter the number of decimal places to display to users who enter grades using the grade book.
Step 6: Student View Display Options:
Select what you would like your students to view:
- Grade Details: Select from Points, Weighted, Scheme Symbol, Scheme Colour
- Decimals Displayed:
- Characters Displayed: Number of characters to display for Text items (onQ will not accept more than 50 characters for text feedback).
- Final Grade Calculation: This setting determines whether users can see how their final grade was calculated in the student view of Grades (not recommended).
Step 7: Grades Setup Summary:
Review your selections and then do one of the following:
- To make changes to your grade book setup, click Go Back.
- Click Finish.
There are three Grading Systems you can choose from when setting up your Grade Book:
- Weighted: The weighted system calculates grade items as a percentage of a final grade worth 100%. The maximum points you assign to individual grade items can be any value, but their contribution towards the category they belong to and the final grade is the percentage value (weight) assigned to them. Grade items in a category count as a percentage of that category, not of the final grade. Therefore, grade items in a category should combine to a weight of 100%.
- Points: Use the points system when you want the maximum points assigned to a grade item to be equal to its contribution to the final grade. Final grades are calculated by adding a user’s score on all grade items together and dividing by the sum of the maximum points values. The sum of the maximum points values for all grade items does not need to equal 100. With the points system, you do not specify a category’s weight or total points. It is the maximum points assigned to an individual grade item that counts toward the final grade.
- Formula: Use the formula system when you want to calculate final grades using a custom formula that allows for conditions. The formula system is based on the points system but allows you to set conditions around grade items to determine the final grade. For example, you could require that users receive at least 50% on their midterm and final exam to pass a course.
There are four Grading Schemes you can choose from when setting up your Grade Book:
Percentage:
This grading scheme was provided by D2L (Desire2Learn), in which instructors grade using only numbers.
Arts & Science Letter Grades:
The official conversion used by PeopleSoft when submitting numerical marks, rather than letter grades. Approved by Senate for the purpose of translating historical percentage marks to Grade Point Averages.
Queen's Engineering Grade Point:
Comprised of letter grades, associated grade points, an equivalent percentage marks. If percentage marks are submitted by instructors, these will be converted to letter grades and grade points and will not be used in the evaluation of student progress or academic standing.
Queen's Senate Approved Grading Scheme:
The Senate approved an official grading system comprised of letter grades, with pluses and minuses, grade points, and grade descriptors.
The following video provides step by step instructions for how to create a Grade Scheme:
Note: Grade Schemes can be used if your course uses a different grading scale.
- In the navbar, select Grades under the Assessments tab.
- Select the Schemes page, click New Scheme.
- In the General area, enter the scheme Name.
- In the Ranges area, enter your scheme details.
- Under Symbol add the grading method you would like to use, this could be letter grades (A, B, C, D, etc.), or a description (below average, average etc.).
- Under Start % add the start of each grade range. (Lowest range should be at the top of the scheme).
If you do not assign a value in the Assigned Value % field, the Start % is used as the default.
- To add more levels to your scheme, click Add Ranges.
- Click Save and Close.
This is only available to the following roles Manager, Sub Administrator, and Administrator.
- On the navbar, select Grades under the Assessments tab.
- Select Settings.
- From the Personal Display Options page, select the Calculation Options tab.
- Under the Final Grade Release section, select either to Release Calculated Final Grade or Adjusted Final Grade.
- Check off Automatically release final grade.
Create a Grade Category
The following video provides step-by-step instructions for how to set up a Grade Category:
Note: Grade categories are used to group grade items and can be weighted for final grade calculation.
- In the navbar, select Grades under the Assessment tab. You will be redirected to the Manage Grades page.
- Click the blue New button and choose the Category option.
- You will be redirected to the New Category page. Enter the category name and the short name.
- Enter the category weight that will be used during final grade calculations.
- Once all the desired settings are defined, select the Save and Close button to create the category.
Create a Grade Item
The following video provides step-by-step instructions for how to create a Grade Item:
- In the navbar, select Grades under the Assessment tab. You will be redirected to the Manage Grades page.
- Click the Blue New button and choose the Item option.
- Select the desired grade item type. (typically Numerical grade item)
- Enter the name and select the grade category for the item to be put in (no category will create an independent grade item).
- Specify the maximum score available for this grade item and its weight value.
- Set any desired settings such as Display Options and Restrictions.
- Once all settings are defined, click the Save and Close button to create the Grade Item.
- In the navbar, select Grades under the Assessments tab.
- Under the Manage Grades tab, click New. Click Item.
- Select the Calculated option.
- Complete the General Information for your Grade Item.
- Under the Grade Item to Include list, select any grade items you want to include in the calculated Grade Item
- Under the Calculation method, select Milestone Grade. (Note: This option is not available when using a Points grading system)
- Click Save and Close.
Note: Release conditions allow you to associate grade items and grade book categories with other items in onQ. For example, you can require that users meet some other criteria, such as completing a quiz or submitting to an assignment submissions folder, before a specific grade item appears in their grade book.
- In the navbar, select Grades under the Assessments tab.
- On the Manage Grades page, click on the grade item you want to set release conditions for.
- In the Restrictions tab, in the Release Conditions area, do one of the following:
- Click Attach Existing, then select the check box for any condition you want to attach. Click Attach.
- Click Create and Attach, then select a Condition Type from the drop-down list. Complete any additional Condition Details that appear and click Create.
- From the drop-down list, select if All conditions must be met or Any condition must be met to access the grade item or category.
- Click Save and Close.
To hide the Grades in the Grade Book
The following video provides step-by-step instructions for how to configure Grade visibility:
Note: Grade categories may still display grades even if the grade items within have been hidden. please make sure to apply the override to grade categories as well.
- On the navbar, select Grades under the Assessments tab and click Manage Grades near the top.
- Select the drop-down arrow beside the grade item you wish to hide the grades and choose Edit Grade Item.
- In the Restrictions tab, select the Grade Item is Always Hidden check box to hide.
- Click Save and Close.
To hide the Grades in Assignments (Dropbox)
To hide an Assignment grade from students until you are ready to release all grades, you must:
- Hide the Grade Item in the Grade Book (instructions above)
This will hide the grade in the grade book, and will also stop students from receiving email notifications of the grade they have received.
AND
- Hide the Grade Item in Assignments
This will hide the grade from view in Assignments by overriding the Student View display options for the Assignment Submission Folder.
- On the navbar, select Grades under the Assessments tab and click Manage Grades near the top.
- Select the drop-down arrow beside the grade item you wish to hide the grades and choose Edit Grade Item.
- Scroll down the page until you see Display Options.
- Under Student View check the box Override display options for this item.
- Override display options for this item
- Now uncheck all the boxes: Points grade, Weighted grade, Grade scheme symbol, Grade scheme colour.
- Click Save and Close.
Editing Grades for Multiple Students
Note: When grades are saved by this method, they are automatically visible to students.
- In the navbar, select Grades under the Assessments tab and click Enter Grades.
- Select the Switch to Spreadsheet View button at the top right of the page. The grade book will change to a series of cells where the grade can be manually assigned.
- Adjust the desired grades within the spreadsheet view.
- Select the Save button to complete adjustments.
- To return to the standard view select the Switch to Standard View button near the top right.
Editing an Individual Student's Grades
Note: When grades are saved by this method, they are shared with students.
- On the navbar, select Grades under the Assessment tab and click Enter Grades near the top.
- Select the name of the student and you will be redirected to a list of the student’s grades.
- Adjust the desired grade item(s) for the learner in the text boxes.
- Feedback and Private comments can be entered by selecting Show Comments
- Select the Save and Close to complete adjustments.
The following video provides step-by-step instructions for how to delete grade items:
Deleting a Grade Category
Note: Deleting a Category does not delete the Grade Items within, they will become Independent Grade Items.
- On the navbar, select Grades under the Assessment tab. You will be redirected to the Manage Grades page.
- Select the More Actions drop-down menu and choose the Delete option.
- You will be redirected to the Delete Grade Items and Categories page.
- Check the boxes for the desired categories you wish to delete.
- Select the Delete button.
- You will be prompted by a warning message, select the Delete button.
Deleting a Grade Item
Note: You cannot delete a grade item that is connected to another activity such as a Dropbox or Quiz. You will first need to remove the connection. This is done through the activity the grade item is connected to.
- In the navbar, select Grades under the Assessment tab. You will be redirected to the Manage Grades page.
- Check If the Grade Item you wish to delete is associated with an activity under the Association column. If there is an association, watch the video Delete Grade Items with Associations.
- Select the More Actions drop-down menu and choose the Delete option.
- You will be redirected to the Delete Grade Items and Categories page.
- Check the boxes for the desired item you wish to delete.
- Select the Delete button.
- You will be prompted by a warning message, select the Delete button.
Note: Grade items cannot be moved out of categories with this method. Refer to: Moving Grade Items out of Categories.
- On the navbar, select Grades under the Assessment tab and navigate to the Manage Grades page.
- Select the More Actions drop-down menu and choose the Reorder icon.
- You will be redirected to the Reorder Grade Items and Categories page with a list of the categories and grade items.
- The order of Grade Items and Categories are displayed on the right side.
- Select the drop-down menu and choose the number that corresponds to the desired position.
- Categories and standalone Grade Items are numbered separately from Grade Items within Categories.
- Once the order has been set, select the blue Save button to confirm the changes.
Moving Grade Items out of Categories
- On the navbar, select Grades under the Assessment tab and navigate to the Manage Grades page.
- Select the desired Grade Item you wish to move. You will be redirected to the Edit Item page.
- Under Category, select the drop-down menu and choose the None option.
- Select the Save and Close button to confirm.
Note: If a grade item has been accidentally deleted, you can restore it along with any participant grades and comments that may have already been entered.
- On the navbar, select Grades from the Assessments tab.
- On the Manage Grades page, or the Enter Grades page, click More Actions at the top of the screen, and select Event log.
- Find the Grade Item you would like to restore, and click the Restore link to the right of the Grade Item's name.
- The screen will then refresh, and display the date and time stamp for the restore.
If you would like to review or manage the setting you initially chose in your Grade Book setup, you can do this through Settings, or through the Setup Wizard.
Through Settings
- On the navbar, select Grades from the Assessments tab.
- On the Manage Grades page, in the upper, right-hand corner click Settings.
- Personal Display Options - View and adjust the current settings for what is displayed for you in the Grade Book.
- Org Unit (Student) Display Options - View and adjust the current settings for what is displayed for the Students in the Grade Book.
- Calculation Options - View and adjust the methods of calculation, including your Grading System, the Final Grade released, and calculation options.
Through the Setup Wizard
- On the navbar, select Grades from the Assessments tab, and navigate to the Setup Wizard page.
- You will be presented with your current Grade Book settings. If you need to make adjustments, click Start and navigate through the 7 steps making any necessary adjustments.
- Once all changes have been made (if any), make sure to click Finish in the final step to ensure that the changes will be saved.
There are several different ways to assign grades in onQ Grade Book:
- Enter grades by Student.
- Enter grades by Grade Item.
- Enter grades by Grade Category.
- Import Grades.
Instructions on how to grade in other onQ tools are located under the tool:
The following video provides step-by-step instructions for how to enter grades:
Note: For all grading make sure you have switched to Spreadsheet View by clicking the button located on the top right-hand corner of the spreadsheet.
Enter Grades by Student
- In the navbar, select Grades under the Assessment tab and click Enter Grades near the top.
- On the Enter Grades page click on the student's name you would like to grade.
- Enter your grades.
- Click Save and Close.
Enter Grades by Grade Item
- In the navbar, select Grades under the Assessment tab and click Enter Grades near the top.
- To manually enter grades for a grade item, click the black drop down arrow to the right of the the grade item, and select Grade All.
- Enter your grades.
- Click Save and Close.
Enter Grade by Grades Category
- In the navbar, select Grades under the Assessment tab and click Enter Grades near the top.
- To manually enter grades for a grade category, click the black drop down arrow to the right of the the grade category, and select Grade All.
- Enter your grades.
- Click Save and Close.
PLEASE NOTE: The recommended way to import grades into onQ is to first export a CSV file (Not Excel) with the grade item(s) you require. This means creating the grade item in onQ so that it exists in the CSV file you export. This will give you a correctly formatted spreadsheet to add the grades.
Importing Arts and Science Letter Grades
If you are importing Arts and Science Letter Grades into onQ using a CSV or Excel file, any student receiving an F grade should have the F grade amended to one of the following options:
- F (48)
- F (24)
- F (0)
Failure to do so will result in an error on import to onQ.
Import Grades into the Grade Book
These are the steps you will need to follow using the instructions available for download below:
1. Create new grade Item.
2. Export CSV with new grade item.
3. Add grades to exported CSV.
4. Import CSV with grades.
Download Instructions to Import Grades into onQ
Note: Once the grades have been uploaded, you must Recalculate the Final Adjusted Grade and release the grades.
The following video provides step-by-step instructions for how to export grades:
- Select Grades from the Assessments drop-down.
- Click on Enter Grades at the top of the page.
- Click the Export button at the top left, you will be re-directed to the Export Grades page.
- Select the Key Field, Grade Values, and User Details you wish to include.
- Check the boxes corresponding to the Grade Items you wish to export.
- Click the Export to CSV button for a Comma Separated Values file (Do Not Use Excel).
- A pop-up will appear with a link to download the file.
- Click Close once you have downloaded the file.
The following video provides step-by-step instructions for how to set grade exemptions:
Grade exemptions allow Instructors to mark students exempt from certain grades in the course. An exempt grade will be ignored in all grade calculations and will be flagged as exempt in both the student and instructor views.
To Exempt a Grade
- In the navbar, select Grades under the Assessment tab and click Enter Grades near the top.
- Select the drop-down arrow beside the Grade Item or Activity you wish to grade and choose Grade all.
- If a grade has been entered for a student you wish to exempt, clear the grade and save before continuing with the exemption.
- Then, click the checkboxes next to the student(s) you wish to exempt.
- Click the Exempt button at the top of the table.
- If you accidentally selected the wrong student or need to clear an exemption for other reasons, you can repeat this process and click Unexempt to reverse the exemption.
- Click Save.
Viewing Exempt Grades
The exemption will completely replace the students' grade with the word Exempt in most cases.
About Event Logs
Event Logs maintain a record of changes made in the Grades tool. The logs can be useful when auditing a grade book, managing updates made by teaching assistants, and discussing grades with learners.
Access the Event Log for a User
- On the Enter Grades page, click the name of the user you want to access the event log for.
- Select the drop-down arrow next to user’s name, select Event Log.
Access the Event Log for an Individual Grade Item
- On the Enter Grades page, select the drop-down arrow next to the grade item you want to access the event log for, select Event Log.
Access the Event Log for a Users' Final Grades
- On the Enter Grades page, select the drop-down arrow next to the Final Calculated Grade or Final Adjusted Grade item, select Grade All.
- In the Event Log column for the desired user, select the Event Log icon.
Access the Event Log for Changes to a Grade Item's Properties or Restrictions
- On the Manage Grades page, select the drop-down arrow next to the category or grade item you want to view, select Event Log.
Access the Event Log for Restoring Grade Items
- On the Manage Grades page, from the More Actions button select Event Log.
- If you want to restore Numeric, Selectbox, Pass/Fail, or Text grade items that were removed, beside the item's name, click Restore.
Grade by Selecting Letter Grades in the Grade Book
Note: The Arts & Science Letter Grades scheme must be copied into your course to enable this option.
- On the navbar, select Grades under the Assessment tab and click Manage Grades near the top.
- Select the New button at the top left and click Item.
- Choose the Selectbox option.
- Enter the name and select the grade category for the item to be put in (no category will create an independent grade item).
- Specify the maximum score available for this grade item and its weight value.
- Under Grade Scheme, select the Arts & Science Letter Grades option.
- Define any additional settings such as display options and restrictions.
- Select Save and Close to confirm changes.
Copying The Arts & Science Letter Grade Scheme Into Your Course Schemes
Note: The Arts & Science Letter Grade Scheme must be copied into your course schemes for use in Selectbox Grade Items.
- On the navbar, select Grades under the Assessment tab and click Schemes near the top.
- Select the More Actions button at the top left and click Copy
- Under Queen's University select the Arts & Science Letter Grades option.
- Adjust the Grade Scheme name as desired.
- Select the Copy button to confirm.
Note: The Quiz Grades must be published for any grades to be sent to the Grade Book.
- On the navbar, select Quizzes under the Assessment tab.
- Select the drop-down beside the Quiz and select Edit.
- Select the Assessments Tab.
- Under the Auto Export To Grades, check the box for Allow automatic export to grades.
- Select the Save and Close button to confirm.
The following video provides step-by-step instructions for how to release your final grades:
IMPORTANT:
- Depending on your choice in the initial Grade Book set up, you must either release the Final Calculated Grade, or the Final Adjusted Grade. If you are unsure of your selection, you can check by going through your Setup Wizard, or through your Grade Book Settings.
- All grade rounding should be done by the instructor in onQ before sending the grades to Peoplesoft. Only whole numbers will be sent to Peoplesoft, everything after the decimal point will be removed. (There is no automatic grade rounding in the Grade Export Tool).
- Before Releasing the Final Grades to students in onQ, grades should be approved by the Head of Department or Department Chair in PeopleSoft. If you are unsure of the procedure, please consult with your departmental administrator.
IMPORTANT: If you want to view the grade statistics before releasing the grades to your students make sure that you hide the grade item in the Gradebook (before entering the grade). If Assignments were used you must also hide the grade before transferring the grade to the Gradebook.
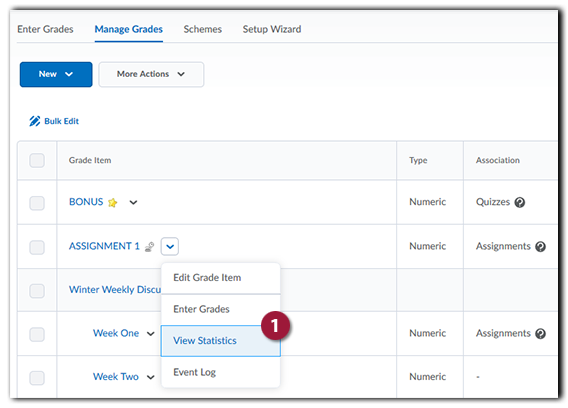
Viewing grade item or category statistics
Grade item or category statistics lets you view details about a class, group, or section’s overall performance in an individual grade or category of grade items. Statistics include the average, median, mode, standard deviation for a population, minimum grade, maximum grade, and a graph showing the distribution of grades. You can also view users’ individual grades in the category.
- On the Manage Grades page, click View Statistics from the action menu beside the grade item or category you want to view statistics for.
Viewing final grade statistics
Final grade statistics lets you view details about a class, group, or section’s overall grades for a course. Statistics include the average, median, mode, standard deviation for a population, minimum grade, maximum grade, and a graph showing the distribution of grades. You can also view users’ individual final grades.
Do one of the following:
- On the Manage Grades page, click View Statistics from the action menu beside the Final Calculated or Final Adjusted grade category.
- On the Enter Grades page, click Statistics from the action menu beside the Final Calculated or Final Adjusted grade category.
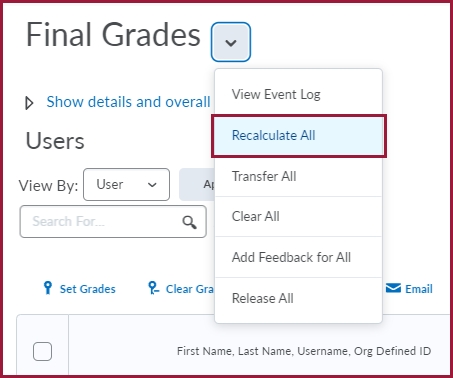
IMPORTANT: If you have not selected the Automatically keep final grades updated option, you may have to manually recalculate final grades at some point during your course.
- In the navbar, select Grades under the Assessments tab.
- Select the Enter Grades tab.
- To recalculate all grades, from the Final Calculated Grade drop-down menu, click Enter Grades. On the Final Grades page, from the Final Grades drop-down menu, select Recalculate All.
IMPORTANT: All grade rounding should be done by the instructor in onQ before sending the grades to Peoplesoft. Only whole numbers will be sent to Peoplesoft, everything after the decimal point will be removed. (There is no automatic grade rounding in the Grade Export Tool).
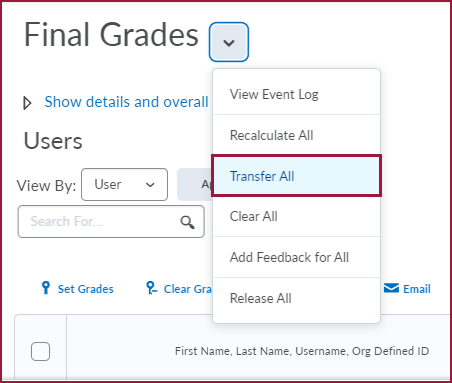
- In the navbar, select Grades under the Assessments tab.
- Select the Enter Grades tab.
- Click the drop-down arrow next to Final Adjusted Grade and select Enter Grades.
You will now go to the Final Grades page. - Click the drop-down arrow next to the Final Grades heading at the top of the page and select Transfer All.
- You can then edit the Final Adjusted Grade values.
To make adjustments to the Final Adjusted Grade:
- Use the Final Adjusted Grade column to make any adjustments to the grades.
- Save your changes.
IMPORTANT: Before Releasing the Final Grades to students in onQ, grades should be approved by the Head of Department or Department Chair in PeopleSoft. If you are unsure of the procedure, please consult with your departmental administrator.
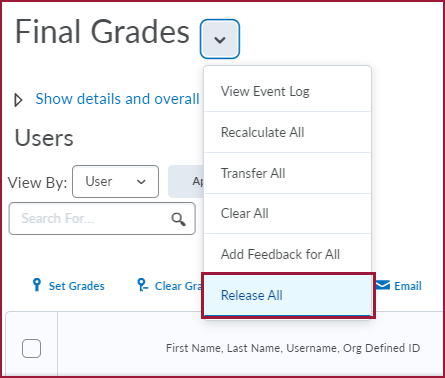
- In the navbar, select Grades under the Assessments tab.
- Click on Enter Grades at the top of the page.
- On the Enter Grades page, from the Final Calculated Grade or Final Adjusted Grade context menu, click Grade All.
- To release grades for all users, on the Final Grades page, from the Final Grades dropdown, click Release All. To release final grades for a specific user, do one of the following:
- Select the check box by the username and click the Release/Unrelease link.
- Select the check box in the Release Final Calculated Grade or Release Adjusted Final Grade column.
-
Click Save.
The
 Final grade is released icon displays in the Final Calculated Grade or Final Adjusted Grade column for any user who has their final grade released.
The
 Final grade is not released icon displays in the Final Calculated Grade or Final Adjusted Grade column for any user who does not have their final grade released.
 -
The date and time a grade is released or unreleased is displayed in a student's Grades Event Log.
IMPORTANT: All grade rounding should be done by the instructor in onQ before sending the grades to Peoplesoft. Only whole numbers will be sent to Peoplesoft, everything after the decimal point will be removed. (There is no automatic grade rounding in the Grade Export Tool).
Using the Send to PeopleSoft button, Primary Instructors can now send their Grades directly from onQ to PeopleSoft!
Note: The tool will retrieve Final Grades in onQ from the Final Adjusted Grade column in the Grade Book. If empty grades exist in this column, the tool will pull Grades from the Final Calculated Grade column.
Please follow the instructions on Sending your onQ Grades to PeopleSoft.