The difference between Groups and Sections?
Sections are used for large courses when the instructor needs the class broken down into tutorial/lab sections. Sections allow for graders to be restricted to see only their tutorial/lab students.
Groups are used for a specific project or activity and are a means of organizing learners within a course into a smaller unit for collaborative activities. Groups can be used to interact with the Discussions and Assignments tools. Graders see all groups but have the option to filter by group.
The following video provides step-by-step instructions for how to create Groups:
Note: Groups are contained in Categories. You must create a Category to create groups.
- On the navbar, select Groups from the Communications tab.
- Select the blue New Category button. You will be redirected to the New Category Page.
- Enter the Category Name and Description.
- Set the desired Enrollment Type (view enrolment types document).
- Enter the Number of Groups or the Number of Users depending on the Enrollment Type.
- Enter a Group Prefix if required.
- Under Advanced Properties check the Set up discussion areas or Set up assignment submission folders box if required.
- Select the Save button to create groups.
The following video provides step-by-step instructions for how to create groups from enrollment sections:
Note: Instructors can now create Groups, based on Section enrollment. This is useful for large multiple-section courses that require tutorial or lab groups created from each section.
- On the navbar, select Groups from the Communications tab.
- Select the blue New Category button. You will be redirected to the New Category Page.
- Enter the Category Name and Description.
- Set the desired Enrollment Type (view enrolment types document).
- Enter the Number of Groups or the Number of Users depending on the Enrollment Type.
- Under Enrollment Type select the Section or Group you want to create sub-groups from.
- The Group Prefix will populate with the Section or Group name and then append the name with tutorial or lab groups.
- Under Advanced Properties check the Set up discussion areas or Set up assignment submission folders box if required.
- Select the Save button to create groups.
The following video provides instructions and warnings regarding group deletion:
Note: All associated Assignments will be deleted. Discussions will be saved for reference.
- On the navbar, select Groups from the Communications tab.
- Select the check box beside the Group or Category you wish to delete.
- Click the Delete button.
- Click Delete Groups/Categories to confirm.
The following video provides step-by-step instructions for how to modify group enrollment:
Note: If "Auto-enrol new users" is enabled, any learners that are removed will automatically be enrolled into another group.
- On the navbar, select Groups from the Communications tab.
- Select the drop-down arrow beside the Category containing your groups.
- Click the Enrol Users option.
- To enrol a learner into a group, simply find their name in the list and check the box under the corresponding group column.
- To remove a learner from a group, find their name and remove the checkmark under the group they are enrolled in.
- Scroll to the bottom and select the Save button to confirm changes.
The following video provides a guide for how to manually manage learners in sections:
- On the navbar, click Course Admin.
- Click Sections from the Course Administration page.
- On the Manage Sections page, click Enroll Users.
- From the Display drop-down list, select a section.
- To find a specific user or do a blank search to view all users, use the Search For field. To find users that still need a section, select the Not Enrolled check box.
- Modify users' section assignments as needed.
- Click Save.
The following video provides step-by-step instructions to create new groups and restricted discussion topics:
Note: The recommended method is to create the restricted Discussion topics through the Groups tool.
Groups are contained in Categories. You must create a Category to create groups.
- On the navbar, select Groups from the Communications tab.
- Select the blue New Category button. You will be redirected to the New Category Page.
- Enter the Category Name and Description.
- Set the desired Enrollment Type.
- Enter the Number of Groups or the Number of Users depending on the Enrollment Type.
- Enter a Group Prefix if required.
- Under Additional Options check the Set up discussion areas box.
- Select the Save button to create groups.
You will now be taken to the Create Restricted Discussion Areas page. - Under Forum select (New Forum).
- Choose either:
-
Create one topic per group
Instructors must manage each topic individually. Students only see the topic assigned to their group.
Each topic must have its own grade item. -
Create one topic with threads separated by group (Recommended)
Instructors can manage all activities and assessments from one topic. Students only see threads from their own group.
One grade item for the discussion topic is used to mark all group threads.
-
- Under Title give the topic(s) a name.
- Add a Description if required.
- Click the Create and Next button.
- The Workspace Summary will now appear and confirm the number of groups and discussion topics created.
The following video provides step-by-step instructions for how to add restrictions to a discussion forum:
Use this method if you have already created your Discussion Forum and now want to restrict them to groups that have already been created.
- On the navbar, select Discussions under the Communications tab.
- Click Group and Section Restrictions tab at the top of the page.
- Select the Group or Section Category you would like to restrict the forum to.
- Select the Forum that requires the group or section restrictions.
- Click the Automatically create restricted topics link.
- Click Create and Save.
The following video provides step-by-step instructions for how to create a group-restricted assignment folder:
Note: The recommended method is to create the restricted Assignment submission folders through the Groups tool.
Groups are contained in Categories. You must create a Category to create groups.
- On the navbar, select Groups from the Communications tab.
- Select the blue New Category button. You will be redirected to the New Category Page.
- Enter the Category Name and Description.
- Set the desired Enrollment Type (view enrolment types document).
- Enter the Number of Groups or the Number of Users depending on the Enrollment Type.
- Enter a Group Prefix if required.
- Under Additional Options check the Set up assignment submission folders box.
- Select the Save button to create groups.
- You will now be taken to the Create Assignment Submission Folders page.
- Enter the folder Name.
- Folder Type provides you with information about the folder type and the group category assigned to it.
- To associate the assignment submission folder with a category, select a Category or click New Category.
- To associate the assignment submission folder with a grade item in your grade book, select a Grade Item, or click New Grade Item.
Note: only numeric grade items can be associated with assignment submission folders. - To assign a score, enter a value in the Out Of field. If there's also an associated grade item, maintain consistency by matching the value of the Out Of field to the grade item's Max. Points value.
- To change the display settings for the folder's grade item, click the Learner View Preview context menu, then Edit Display Settings.
- To associate a rubric to the folder, click Add Rubric, or Create Rubric in New Window.
- Or select an existing rubric and set it as the Default Scoring Rubric.
- To provide instructions to users, in the Instructions rich text field, enter your instructions.
- To allow learners to add the folder to their ePortfolio as artifacts, select Allow users to add this folder to their ePortfolio.
- To add attachments, in the Attached Files area, click any of the buttons.
- To change submission options, expand Show Submission Options and select the appropriate settings.
- To receive an email message when a new submission is uploaded to this folder, enter your email address, or a comma-separated list of email addresses in the Notification Email field.
- Click Save.
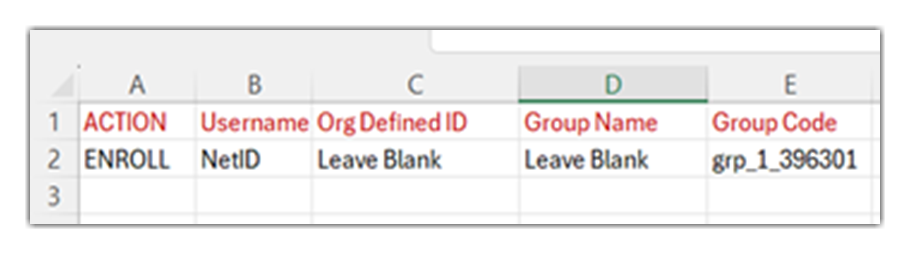
You can now bulk enrol users into groups using a CSV file through the Groups tool.
Create a CSV file to import users into groups:
- The format of the CSV file is very specific. It must include the Action, NetID, Group Code as well as columns C and D even though they are blank. Click to download a sample file. .
- The NetID can be found by exporting a list from the grade book. Go to Grades - Enter Grades - Export - Select Username under Key Field.
- The Group Code can be found by navigating to the groups tool, choosing a group category, then selecting a group name.
- You do not need to include row one of the example below.
To enrol users into a group through a CSV file:
- Select Groups from the Communications tab in the Navbar.
- Click the Import button.
- Select a group category from the Select Category drop-down.
- Click Choose File to browse to the location of your CSV file.
- Click Import File.
Note: The system checks your file and provides feedback. If the file is valid, the actions are applied and a summary displays. If errors are detected, the process halts and an error list appears. - After the process completes, click Exit.
- Click See Import Results.