The Zoom integration supports the ability to schedule, join, and manage meetings within onQ. Instructors can use Zoom to schedule and host Zoom meetings to support remote teaching, hold office hours, host study groups, capture lectures, and access cloud recordings. Students can use Zoom to join Zoom meetings to remotely attend classes, attend office hours, participate in study groups, and view recordings of previous classes.
300 Maximum Participants
For larger courses contact IT Services using the help form.
Add a Zoom link to your course in onQ
- Navigate to Content, and select an existing module or create a new module to add Zoom.
- In your module click the Existing Activities button
- Select External Learning Tools from the drop-down list.
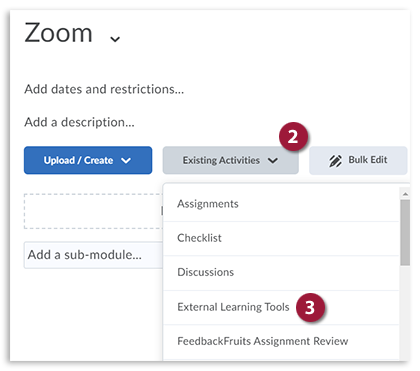
- Next, scroll down until you see the Zoom link and click on it to add it to your module.
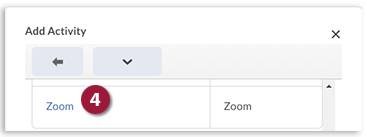
- You have now added Zoom to your course.
It is important to make sure that Zoom opens in a new window in onQ. To do this:
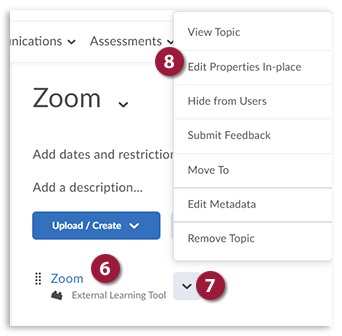
- Locate your Zoom link in the Content module.
- Click on the drop-down menu to the right of External Learning Tool.
- Choose Edit Properties In-place.
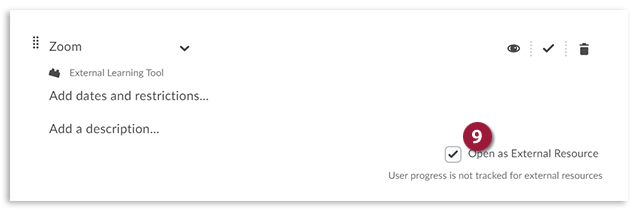
- Check the Open as External Resource checkbox.
- Click the Zoom link to set up your Zoom sessions.
Students will be able to access your scheduled Zoom sessions using this link from your course.
- Click on the Zoom link to enter Zoom.
- Click on the Schedule a New Meeting button.
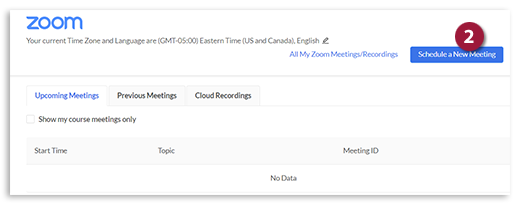
- You will be taken to the Schedule a New Meeting page where you can fill out the meeting options. (See descriptions of each item below)
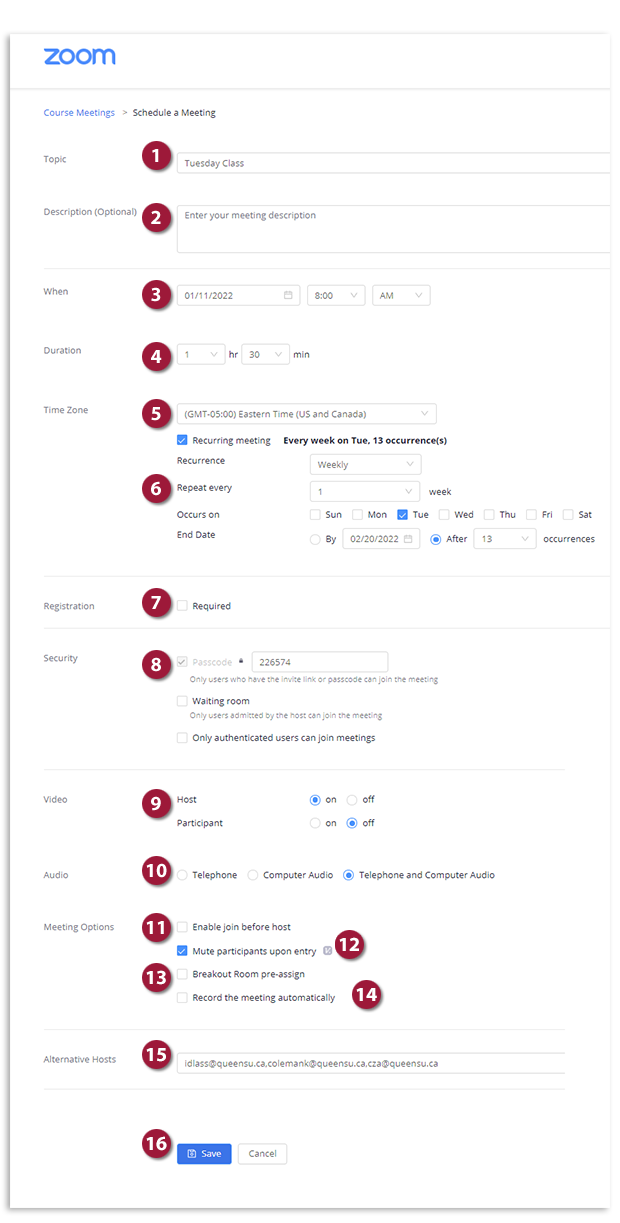
- Topic: Enter in the name (or title) of the meeting.
Note: Be very descriptive with the name of your meeting as it will stand out and be easier to notice in the Event Calendar widget within onQ.
- Description: Enter a description of the meeting. (This is optional)
- When: Choose the date and time for the meeting. You can start your meeting at any time before the scheduled time.
- Duration: Choose the approximate duration of the meeting.
Note: This is only for scheduling purposes. The meeting will NOT end after this length of time.
- Time Zone: By default, Zoom will use your computer's time zone. Click on the drop-down to choose a different time zone.
- Recurring Meeting: Choose if you would like a recurring meeting, i.e. the meeting ID will remain the same for each session. If checked, you will then have the options for Recurrence (Daily, Weekly, Monthly, no Fixed Time), Repeat every (Days/Weeks/Months), and End date (Specific date or 1-20 occurrences).
- Registration: This allows you to have your participants register with their e-mail, name, other questions, and custom questions.
- Security: Participants joining the meeting via typing in your meeting ID will be required to input this password before joining your scheduled meeting. Those joining via the "join meeting URL" will not be required to enter the password as it is included in the link.
Waiting Room: This allows the host to control when participants join the meeting by placing them in a waiting room.
- Host Video: Choose if you would like the host video on or off when joining the meeting. Even if you choose off, the host will have the option to start their video after joining the meeting.
Participant Video: Choose if you would like the participants' video on or off when joining the meeting. Even if you choose off, the participant will have the option to start their video after joining the meeting.
- Audio Options: Choose what audio options you want to allow for the meeting (Telephone, Computer Audio, or Both)
- Enable Join Before Host: Allow participants to join the meeting without you (host) or before you (host) join.
- Mute Participants Upon Entry: If "join before host" is not enabled, this will mute all participants as they join the meeting.
- Breakout Room pre-assign: Assign participants to breakout rooms by adding their email or by importing them using the downloadable template. You can create up to 50 breakout rooms and assign up to a total of 200 participants.
- Record the meeting automatically: Check this if you want the meeting to be automatically recorded when you join the meeting as the host. You will have the option to record the meeting locally on your computer or in the cloud.
- Alternative Hosts: Enter the email address of anyone in your onQ course you want to allow host privileges. This could be another instructor, teaching assistant, or staff. (The email must match their Zoom account)
- When you are done setting all of your meeting options, click the Save button.
- Topic: Enter in the name (or title) of the meeting.
You can notify your students of your scheduled class by either emailing them the "Join URL" or you can "Copy the invitation". From this screen is where you can also delete, edit, or start the meeting.
NOTE: onQ will automatically generate a calendar event for your Zoom meeting and put it in your onQ Course Calendar.
To start your Zoom meeting:
- Click on the Zoom link in your Course Content.
- Click on the Course Meetings.
- On the Course Meetings page, your meeting will be listed under the Upcoming Meetings tab.
- Click Start.
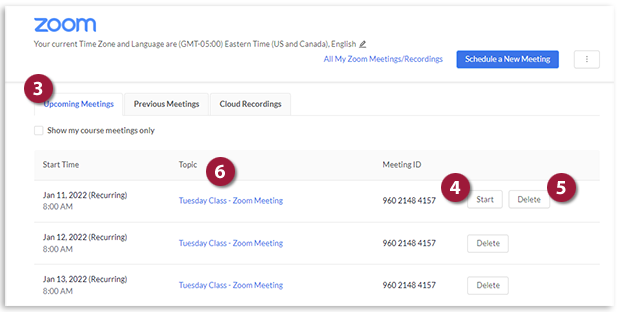
You also have the option to:
- Delete the meeting.
- Return to the meeting information page to view or edit the meeting options, click on the "Topic" of the meeting.
There are several ways a student can join a Zoom meeting:
Zoom link in content
To help students locate the Zoom link it is recommended to have a Zoom module with the Zoom link located at the top of the Table of Contents.
If you are not sending students to the Content page you could give them access to Zoom via a course homepage widget.
Give students instructions to help them locate the Zoom link in the Content module.
Instructions for students:
- Click Content on the onQ navbar.
- Locate the module that contains the Zoom link under the Table of Contents.
- Click the Zoom link to open it.
- Find the relevant meeting from the list and click Join. (Enter the password provided if required)
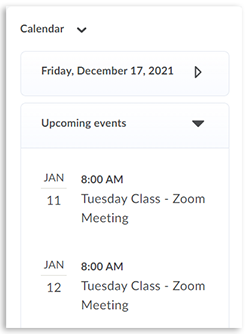
Calendar event in onQ course calendar
Students can join the meeting either by clicking on the Calendar event on the onQ course homepage.
Email invitation
If you sent a meeting invitation by copying the invitation code and sending it to students via email.
After you end a meeting that was cloud recorded, your recording will process on Zoom's server. Zoom cloud recordings can be made available to students through the Cloud Recordings tab by clicking on the Zoom link.
Please also remember that cloud recordings are only kept on the Zoom Cloud for 150 days. It is therefore recommended that you also download a copy of the recording if required for future use.
If you want students to be able to view the recording, you must select the Publish button. This will allow the students to see and select the recording in onQ.
Cloud recording instructor view
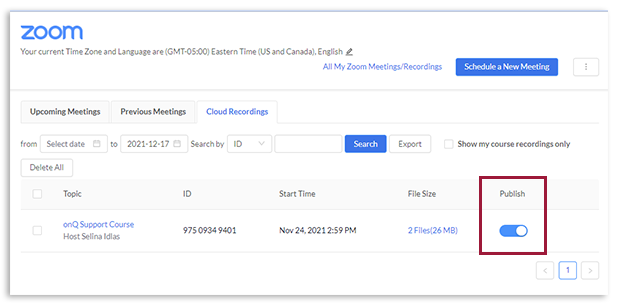
By default, students are not able to download recordings.
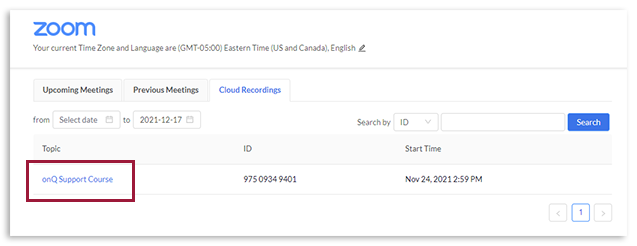
Give students instructions to help them locate Zoom recordings in the Content module.
Instructions for students:
- Click Content on the onQ navbar.
- Locate the module that contains the Zoom link under the Table of Contents.
- Click the Zoom link to open it.
- Click the Cloud Recordings tab.
- Click the meeting link you wish to view.
Click the video or audio recording. (Enter the password provided if required)
Cloud recording student view
If you are not sending students to the Content page you could give them access to Zoom via a course homepage widget.