Why use the Content Tool?
The Content tool is where you build your course by creating a table of contents, adding modules and topics, uploading and creating course materials, and URL links.
You can add release conditions, grade items, and checklists to topics to ensure students navigate through course materials while fulfilling specific course requirements.
You can also monitor class and user progress as students work through course content by setting automatic (determined by the system) or manual (determined by the student) completion tracking.
Course materials you can post include:
- Documents (Word, PDFs, etc.)
- PowerPoint presentations
- Images
- Media Files (video, audio)
- Existing Activities (previously uploaded or created files, activities, or other tools integrated with onQ)
If you have any further questions, please visit the Content Frequently Asked Questions for more details.
When courses are created in onQ, a number of pre-loaded modules are available in the Table of Contents which you may use to organize your material. These include: Course Description and Requirements, Course Readings and Resources, Weekly Schedule, Lecture Slides, Assignments, and For Instructors Only.
Please note: if you choose not to use the pre-loaded modules, you may delete the modules (see Adding or Deleting a Module or Sub Module in Build a Table of Contents).
For a basic 12 week course, you can create a module for each week of the course. Within each module, you can include all material which the students are required to complete in the given week.
For courses which separate material by subject, or modules, you may choose to organize the table contents based on each subject. For example, a particular course subject could be spread over 2-3 weeks, in which all material related to that subject can be contained within one module.
The following video provides step-by-step instructions for how to add and delete modules, respectively:
Adding a Module or Sub Module
Note: To set Availability or Release Conditions go to the module and select Add dates and restrictions...
- Click the Content link in the navbar.
- Under Table of Contents on the left side, select the Add a module textbox.
- Enter the desired title for the module and press enter.
- You will be redirected to the newly created module.
- The module description can be added by selecting Add a description...
Deleting a Module or Sub Module
- Click the Content link in the navbar.
- Under Table of Contents on the left side, select the module you would like to delete.
- Select the drop-down menu next to name of the module.
- At the bottom of the list, select Delete Module.
Note: Any activity or resource in onQ is considered a topic. It is recommended that topic activities are created before assigning to a module.
Adding a Topic
- Select the Content link in the navbar.
- Select the module you wish to insert a topic item.
- You can choose to either add an existing topic or create a new topic.
- If you have created a topic beforehand, select the "Add Existing Activities" button and choose the desired topic activity to add to the module.
- If you wish to create a new topic, select the Upload/Create button and select from the following:
- Upload Files
- Create a File
- Create a Link
- Add from Manage Files
Go to Add New Content for instruction.
- The topic will appear at the bottom of the module.
Deleting a Topic
- Click the Content link in the navbar.
- Under Table of Contents on the left side, select the module containing you would like to delete.
- Select the drop-down menu next to name of the Topic.
- At the bottom of the list, select Delete Topic.
The following video provides step-by-step instructions for how to rearrange content:
Note: Sub-modules become modules if moved out of a module and into the Table of Contents.
- Select the Content link in the navbar.
- Click and hold the handle (three lines) on the left of any topic or module title, a move cursor will appear.
- Drag the topic/module to the desired position. (To move the topic into a different module, Drag into the module using the Table of Contents).
The following video shows how to add restrictions to a module:
Content topics will inherit the restrictions of the Content they belong to.
Select the Content link on the navbar and navigate to the module or sub-module you wish to apply a restriction.
Add Date Restrictions
Note: It is recommended that you only add Due Dates.
- Select Add dates and restrictions.
- Click the appropriate Add date... field and either manually enter the desired date(s) and time(s) or select the date/time from the calendar and time drop-down menus.
- Click Update.
The following video provides step-by-step instructions for how to set up release conditions for a module:
Content topics will inherit the restrictions of the Content they belong to.
Release conditions hide the topic from students until the conditions are met.
Select the Content link on the navbar and navigate to the module or sub-module you wish to apply a restriction.
Add Release Conditions
- Under Release Conditions, select the Create button to make a new release condition.
- A pop-up will appear with a drop-down list with various Condition Types. Select the desired condition.
- Condition Details will vary with respect to condition types. Enter the required settings.
- Click the Create button.
|
Condition Type |
Description |
|---|---|
|
Awards - Awards |
The user must have earned a specific award in order to fulfill the release condition |
|
Checklist - Completed checklist |
The user must complete all items on the selected checklist in order to fulfill the release condition |
|
Checklist - Incomplete checklist |
The user must not complete one or more items on the selected checklist in order to fulfill the release condition |
|
Checklist - Completed checklist item |
The user must complete a specific item on the selected checklist in order to fulfill the release condition |
|
Checklist - Incomplete checklist item |
The user must not complete the specific item on the selected checklist to fulfill the release condition |
|
Classlist - Group enrollment |
The user must be enrolled in a specific group in order to fulfill the release condition |
|
Classlist - Org unit enrollment |
The user must be enrolled in a specific org unit in order to fulfill the release condition |
|
Classlist - Section enrollment |
The user must be enrolled in a specific section in order to fulfill the release condition |
|
Classlist - Role in current org unit |
The user must either:
in order to fulfill the release condition |
|
Classlist - Date of enrollment in current org unit |
The user must be enrolled in the current org unit for a specified number of days in order to fulfill the release condition |
|
Competencies - Competency achieved |
The user must complete a specific competency in order to fulfill the release condition |
|
Competencies - Competency not yet achieved |
The user must not complete a specific competency in order to fulfill the release condition |
|
Competencies - Learning objective achieved |
The user must complete a specific learning objective in order to fulfill the release condition |
|
Competencies - Learning objective not yet achieved |
The user must not complete a specific learning objective in order to fulfill the release conditions |
|
Competencies - Score on associated rubric |
The user must achieve a specified Score and Threshold level on a learning objective, based on an associated rubric, in order to fulfill the release condition |
|
Content - visited content topic |
The user must visit a specific content topic in order to fulfill the release condition |
|
Content - Not visited content topic |
The user must not visit the specified content topic in order to fulfill the release condition. Depending on your organization's security configurations, especially if the d2l.Tools.ManageFiles.UseContentRestrictedSecurityconfiguration variable is set to ON, users may not be able to access specified content topics at all when this release condition is set |
|
Content - Visited all content topics |
The user must visit all content topics in the course offering in order to fulfill the release condition |
|
Discussions - Posts authored in topic |
The user must author a specified number and type of posts in a designated module or topic in order to fulfill the release condition |
|
Discussions - No posts authored in topic |
The user must not author any number or type of post in a designated module or topic in order to fulfill the release condition |
|
Discussions - Score on associated rubric |
The user must achieve a specified Score and Threshold level on a discussion module or topic, based on an associated rubric, in order to fulfill the release condition |
|
Assignments - Submission to Assignment submission folder |
The user must make a submission to a specified assignment submissions folder in order to fulfill the release condition |
|
Assignments - No submission to Assignment submission folder |
The user must not make a submission to a specified assignment submissions folder in order to fulfill the release condition |
|
Assignments - Receive feedback on Assignment submission |
The user must receive feedback on a submission to a specified assignment submissions folder in order to fulfill the release condition |
|
Assignments - Score on associated rubric |
The user must achieve a specified Score and Threshold level on an assignment submissions folder submission, based on an associated rubric, in order to fulfill the release condition |
|
Grades - Grade value on a grade item |
The user must achieve a specified grade value on a grade item in order to fulfill the release condition |
|
Grades - No grade received |
The user must not receive a specified grade value on a grade item in order to fulfill the release condition |
|
Grades - Score on associated rubric |
The user must achieve a specified Score and Threshold level on a grade item, based on an associated rubric, in order to fulfill the release condition |
|
Quizzes - Score on a quiz |
The user must achieve a specified score on a quiz in order to fulfill the release condition |
|
Quizzes - Completed quiz attempt |
The user must achieve a specified number of attempts of a quiz in order to fulfill the release condition |
|
Quizzes - Score on selected questions |
When a quiz has a learning objective with associated questions and an assessment method attached to it, the user must achieve a specified grade value on the learning objective in order to fulfill the release condition |
|
Quizzes - Score on associated rubric |
The user must achieve a specified Score and Threshold level on a quiz, based on an associated rubric, in order to fulfill the release condition |
|
Quizzes - No completed quiz attempt |
The user must not complete any attempt on a quiz in order to fulfill the release condition |
|
Surveys - Completed survey attempt |
The user must achieve a specified number of attempts of a survey in order to fulfill the release condition |
|
Surveys - No completed survey attempt |
The user must not complete any attempt on a survey in order to fulfill the release condition |
The following video provides step-by-step instructions on how to add restrictions to topics:
Content topics will inherit the restrictions of the Content module or sub-module they belong to.
Release conditions hide the topic from students until the conditions are met.
- Select the Content link on the navbar.
- Navigate to the topic you wish to apply a release condition, select the drop-down arrow and choose Edit Properties In-place.
- A number of settings are displayed below the topic, select Add dates and restrictions. Click the appropriate Add date... field and either manually enter the desired date(s) and time(s) or select the date/time from the calendar and time drop down menus.
- Under Release Conditions, select the Create button to make a new release condition.
- A pop up will appear with a drop down list with various Condition Types. Select the desired condition.
- Condition Details will vary with respect to condition types. Enter the required settings and select the Create button.
- If you have set multiple release conditions, you can set whether all or any conditions must be met in the drop down list under Release Conditions.
- Select the Update button to apply the release conditions.
The following video provides step-by-step instructions to upload files to onQ:
- Select the Content link in the navbar.
- Find the module you wish to upload the file.
- Select the blue Upload/Create button, and choose the Upload Files option.
- A pop-up will appear prompting you to upload the file.
- Once you selected the file to upload, click the Add button.
- The file will appear at the bottom of the module.
The following video provides step-by-step instructions for how to create files and insert items into a module:
Note: Creating a file using the HTML editor allows you to edit the file in onQ at any time.
- Select the Content link in the navbar.
- In the menu on the left,under Table of Contents, click the module where you want to create the topic.
- Click the Upload/Create button
- Select Create a File.
- Enter the Title of the new topic.
- Use the HTML editor to enter the desired information. The HTML editor allows you to enter text, images, media, tables, lists, links and more.
- Once you are done, you have two options:
- Click the Publish button to make the file available to Students immediately
- Click Save as Draft if you still need to make changes to the document before it becomes visible.
- Select the Content link in the navbar.
- Find the module you want to add the link.
- Select the blue Upload/Create button, and choose the Create a Link option.
- Enter a title for the link and the URL for the website (must include "https://" before link).
- To set the link to open in a new window select the Open as External Resource checkbox.
- Select the blue Create button to confirm.
- The Link will appear at the bottom of the module.
Note: This applies to a video (i.e. .mp4) and audio (i.e. .mp3)
1 Select the Content link in the navbar.
2. Find the module to which you want to add the video.
3. Select the blue Upload/Create button, and choose the Video or Audio option.
4. Select the Upload tab. (transcoding process starts at 70% and may result in a pause)
5. Drag or drop the file into the upload area or click Browse to search your computer.
6. Click the blue Save button to insert content into a module.
- Select the Content link in the navbar.
- Find the module where the video is located.
- Select the drop-down arrow next to the video and choose the Edit Video option.
- Click the blue Change File link located below the video.
- Drag or drop the file into the upload area or click Browse to search your computer.
- Enter a title for the video.
- You can choose to select the Notify students that the content has changed option or not.
- Click the Update button.
Note: You must save the video within a module before captioning is available
- Select the Content link in the navbar.
- Find the module where the video is located.
- Select the drop-down arrow next to the video and choose the Edit Video option.
- Click the Advanced Editing link.
- Select the Closed Captions tab.
- Click the Auto-Generate or Upload link to add captions.
- Select the X to close the window.
- Click Update to complete.
- Select the Content link in the navbar.
- Find the module where the video is located.
- Select the drop-down arrow next to the video and choose the Edit Video option.
- Click the Advanced Video link.
- Select the Table of Contents tab.
- Use the Seek tool (arrow) to select a space on the timeline where you want your chapter to start.
- Enter your chapter title and click the + button.
- For the next chapter, select the next spot on the timeline, enter the chapter title, and click +.
- If you add an incorrect time, you can update it by selecting a spot in the timeline and clicking the clock beside that chapter in the Table of Contents.
- Click X to remove the entry.
- Select the Content link in the navbar.
- Find the module where the video is located.
- Select the drop-down arrow next to the video and choose the Edit Video option.
- Click the Advanced Video link.
- Select the Mark tool (line) and click on the timeline at the starting and ending point of the part you wish to remove.
- Select the Cut tool (scissors) and click between the two marks to cut it out. The selected section will turn red and will not be shown in the playback.
When done editing, you can:
- Save Draft - keeps changes, but doesn’t publish updates or
- Finish – saves the changes and publishes a new version of the file.
Note:
- To restore a cut section simply click on the cut section a second time between the two marks.
- To remove a mark on the timeline, click it again with the Mark tool.
The following video provides step-by-step instructions for adding an Ensemble video to onQ:
- Select the Content link in the navbar.
- Find the module you want to add the video to.
- Select the blue New button, and choose Create a File.
- Add a title for your video(s).
- Click Insert Stuff icon.
- From the Insert Stuff window, choose the Streaming Service (Ensemble) link.
- Enter your NetId and Password into the Ensemble Video Login page.
- From the Choose Media window, select the Add button beneath the video to embed.
- To change the display settings, select the Embed Media Options link (gear/cog icon).
- After configuring the video, select the Submit button to save changes.
- Select Save.
- Select the Insert button to add the video to the content area.
The following video provides step-by-step instructions on how to upload files using the Manage Files Tool:
Note: The Manage Files Tool allows you to upload multiple files simultaneously.
- Select the Course Admin link in the navbar.
- Under the Site Resources section, select the Manage Files button.
- You will be redirected to the Manage Files page where all the files in the course are displayed.
- To upload content, select the Upload button and a pop-up will appear.
- Browse for the content you wish to add by selecting the Upload button within the pop-up.
- Click the blue Save button to complete the upload.
- The uploaded files will now be displayed within the file browser on the Manage Files page.
- Go to the Content page and within the desired module click the blue New button.
- Select Add from Manage Files to open the file browser, choose the uploaded files.
- Click the blue Save button to insert content into a module.
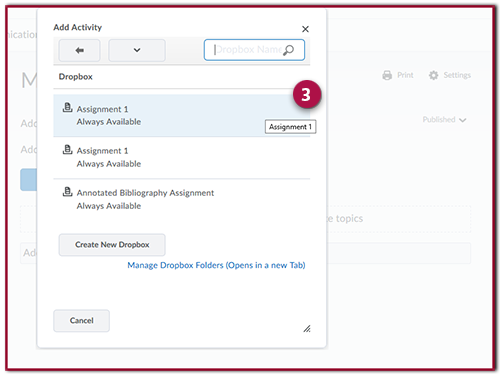
To add course activities (Assignments, Discussion, Quiz, etc.) that you have already created in your course to a module or sub-module:
- Click the Existing Activities dropdown.
- Select the type of activity you'd like to link to: Chat, Checklist, Discussions, Assignments (Dropbox), ePortfolio Item, External Learning Tools, Quizzes, Self Assessments, or Surveys.
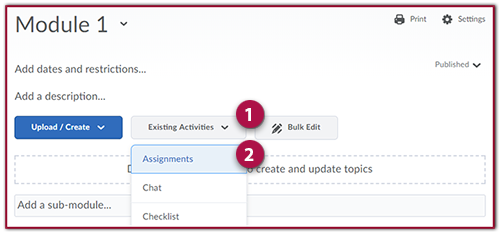
- Select the name of the activity from the list, or create a new one (in this example Assignment 1).
If you have questions about adding existing activities to your course, please visit the Content Frequently Asked Questions page.