Primary Instructor
- Has full developing/grading permissions.
- Cannot enrol Students
- Can enrol Instructor and below.
- Can impersonate Test Student.
- Appears in Classlist as Primary Instructor.
- Can email Classlist.
- Can post Announcements.
Instructor
- Has full developing/grading permissions.
- Can enrol below Instructor.
- Can impersonate Test Student.
- Appears in Classlist as Instructor.
- Can email Classlist.
- Can post Announcements.
Instructor (No SN)
- Same as Instructor role, but cannot see student numbers (org defined IDs).
- Can post Announcements.
Instructor NoEditing
- Has full grading permissions, but no developing permissions.
- Has no enrolment permissions.
- Can impersonate Test Student.
- Appears in Classlist as Instructor.
- Can email Classlist.
- Can post Announcements.
Super Grader/Dev
- Cascading (can see all sections/groups).
- Has full developing/grading permissions.
- Has no enrolment permissions.
- Can impersonate Test Student.
- Appears in Classlist as Grader/Dev (TA-S).
- Can email Classlist.
- Can post Announcements.
Super Grader/Dev NCL
- Same as Super Grader/Dev role, but does not appear in the Classlist.
- Can post Announcements.
Grader/Dev
- Same as above role but not cascading (can only see a single section by default).
- Can see all groups.
- Appears in Classlist as Grader/Dev (TA).
- Can post Announcements.
Grader/Dev NCL
- Same as Grader/Dev role, but does not appear in the Classlist.
- Can post Announcements.
Super Grader
- Cascading (can see all sections and groups).
- Has full grading permissions, but no developing permissions.
- Has no enrolment permissions.
- Can impersonate Test Student.
- Appears in Classlist as Grader (TA-S).
- Can email Classlist.
- Cannot post Announcements.
Grader
- Same as above role but not cascading (can only see a single section by default).
- Can see all groups.
- Appears in Classlist as Grader (TA).
- Cannot post Announcements.
Grader NCL
- Same as Grader role, but does not appear in the Classlist
- Cannot post Announcements.
Grader plus Announcements
- Same as Grader role, but also has permission to post Announcement Items in the course.
Super Developer
- Cascading (can see all sections and groups).
- Has full developing permissions, but no grading permissions.
- Has no enrolment permissions.
- Cannot see students in Classlist.
- Appears in Classlist as Developer (TA-S).
- Cannot email Classlist.
- Can post Announcements.
Developer
- Same as Super Developer role, but is not cascading (can only see a single section by default).
- Can see all groups.
- Appears in Classlist as Developer (TA).
- Can post Announcements.
Student Role-Staff
- Assign to Faculty/Staff to allow participation in a course, from a student’s perspective.
- Can email Classlist. (Important: Student email visibility in the Classlist has been reviewed by the Privacy Officer)
Student
- Default student role
- Can email Classlist. (Important: Student email visibility in the Classlist has been reviewed by the Privacy Officer)
Student-Hidden CL
- Default student role
- Cannot view Classlist.
- Appears in Classlist as Student (HCL).
Test Student
- Can be enrolled in a course by Admin, Sub Admin and Manager.
- Can be impersonated in a course by: Administrator, Sub Administrator, Manager, Primary Instructor, Instructor, Instructor (No SN), Instructor NoEditing, Grader/Developer, and Grader
- Can email Classlist. (Important: Student email visibility in the Classlist has been reviewed by the Privacy Officer)
Administrator (Up to 2 per Faculty)
- Cascading (Enrolment in all courses in a Faculty, Department or Program).
- Has full developing/grading permissions.
- Can enrol Faculty, Staff, Students, and Test Students.
- Can enrol Manager and below.
- Can Impersonate Faculty and Staff members.
- Can impersonate Students – users enrolled in a course under the role of Student.
- Does not appear in Classlist.
- Can email Classlist.
Sub Administrator
- Cascading (Enrolment in all courses in a Faculty, Department or Program).
- Has full developing/grading permissions.
- Can enrol Students.
- Can enrol Manager and below.
- Can impersonate Test Student.
- Does not appear in Classlist.
- Can email Classlist.
Manager
- Cascading (Enrolment in all courses in a Faculty, Department or Program).
- Has full developing/grading permissions.
- Can enrol Test Students but not Students
- Can enrol Primary Instructor and below.
- Can impersonate Test Student.
- Does not appear in Classlist.
- Can email Classlist.
Visitor
- Can be enrolled in a course by Primary Instructor or above.
Note: If a Primary Instructor wants to enrol a student as a visitor they must submit a ticket through the ITS Help Form. - This is a ‘read-only’ role; user can see but not participate in course content, assignments, discussions, quizzes, etc.
- Does not appear in Classlist.
- Can only be un-enrolled in a course by an ITS Administrator.
- Cannot email Classlist.
Requesting the Sub Administrator Role
Users who require a Sub Administrator role must provide ITS with written consent from their Department Head. To request the role, please submit a ticket through the general ITS Help Form.
Requesting the Administrator Role
Once students and faculty/staff members have been enrolled into an onQ course and are using the system, there are times when a specific user may experience an issue within onQ that other users are not experiencing. In these cases, support staff may wish to "impersonate" this user to view exactly what he or she is seeing. For this reason, Administrators have been granted the "impersonate" permission within onQ.
Due to the level of permissions granted to an Administrator, onQ governance has decided that each faculty will only be permitted 1 or 2 onQ Administrators. To request a faculty Administrator, please follow these steps:
- Administrative staff should contact their Dean or Delegate to request the onQ Impersonate permission on their behalf.
- The Dean or Delegate should then request the permission be granted to the administrative staff member by submitting a request via the general ITS Help Form. In addition to requesting the permission, the Dean or Delegate should also confirm that the staff member has signed the Queen's University "Confidentiality and Non-Disclosure Agreement - Staff" document.
- ITS will grant the staff member the appropriate permission to impersonate the user in question.
- ITS will contact the staff member to inform them of their elevated permission and to inform them of the standard impersonation procedure to be used.
Standard Impersonation Procedure
Due to the nature of the Impersonate feature, care must be taken when the functionality is used. The following procedure should be followed every time an Administrator impersonates a student or faculty/staff member in onQ:
- Authorization and Notice: A request for support that requires the impersonate feature constitutes permission. With this in mind, ITS and the CTL highly recommends written/email authorization from the user in advance. In extenuating circumstances, if an administrator feels they need to impersonate a user to help resolve an issue prior to receiving authorization (written, email, or verbal), they can do so. In these cases, the administrator will inform the user that they were impersonated after the fact.
- Documentation: Administrators must keep a log of when they've used the impersonate feature. This log should include, at a minimum, the following information for each time the impersonate feature was used:
- Date and time
- The name of the individual they impersonated
- The reason for impersonation
- Upon request, the Administrator must be prepared to send the log to ITS. ITS will perform audits from time to time. This will involve comparing Administrator logs with onQ logs.
Cascading Roles
Several of the roles in onQ are cascading, in that enrolment to the role at a departmental level will result in the user being automatically enrolled with the same role and permissions in all sub-units and course offerings beneath it. Someone in a cascading role is able to see all sections/groups within a course.
For instance, if a user is enrolled as Sub Administrator in the Engineering department, they will automatically become Sub Administrator for all sub-units (e.g., Chemical Engineering, Civil Engineering, etc.) and course offerings contained therein.
Cascading TA roles enrol the TA into all sections within a course, whereas non-cascading TA roles allow a TA to be enrolled to a specific section (the TA will see only that section).
Please see the Course Creation Tool+(CCT+) Documentation for detailed instructions on accessing CCT+, and Adding Enrolments to an Existing onQ Course.
Submitting a request
You can use Course Creation Tool+ (CCT+) to create your course in onQ. However, student enrolments will need to be added by setting the course up for Self-Registration (see the instructions below) or submit a ticket to ITS Help Desk including:
- Student First Name
- Student Last Name
- NetID
Setup your Course for Discover
IMPORTANT:
- onQ Discover is replacing the existing self-registration tool in onQ.
In order to enable Discover, first navigate to the appropriate course, then
- In the Navbar, click Course Admin
- Locate and click Course Offering Information
- Scroll down to the Discover section and select Make this course available in Discover so Learners can self-enrol.
- Click Save
- Your course is now available in Discover search results

NOTE: After making a course available in Discover for self-enrollment, it may take a time before the course appears in Discover search results.
- In the Navbar, click Course Admin.
- Locate and click Course Offering Information.
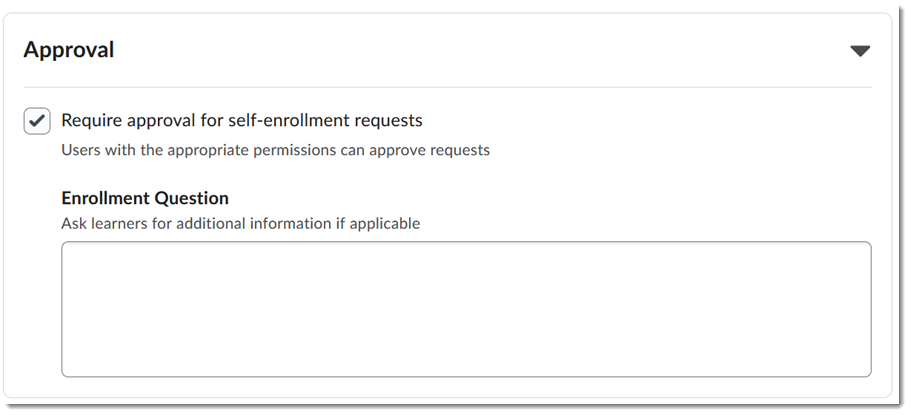
- Scroll down to the Discover section.
- Under approval, select Require approval for self-enrolment requests.
- If desired, enter an Enrolment Question to ask learners for additional information when they request enrolment.
- Click Save.
- On the onQ homepage, locate the Browse Self-Registration Courses widget.
- Click the blue Browse Now button.
- Located on the right of the Discover search field is a Manage Requests link.
- Click Manage Requests.
- The Manage Requests page displays a table with all user requests.
Users will be displayed with one of the following statuses: Pending, Approved, Declined
Pending: The user requires your approval to self-enroll in the course.
Approved: The user is approved and is self-enrolled in the course.
Declined: The user's request is declined, and they are not enrolled in the course.
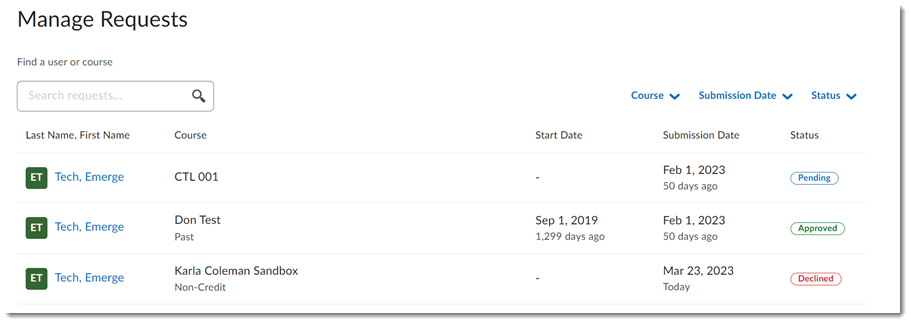
Click a user's name and either Approve & Next or Decline
Approve & Next: The user's request is approved, and they are notified
Decline: The Decline Request window opens. If desired, enter a Comment and click Decline & Next
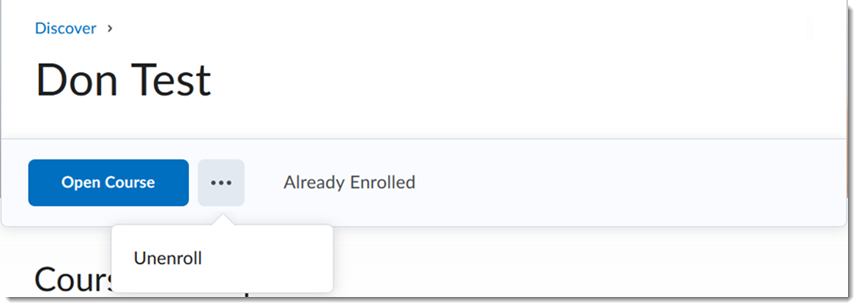
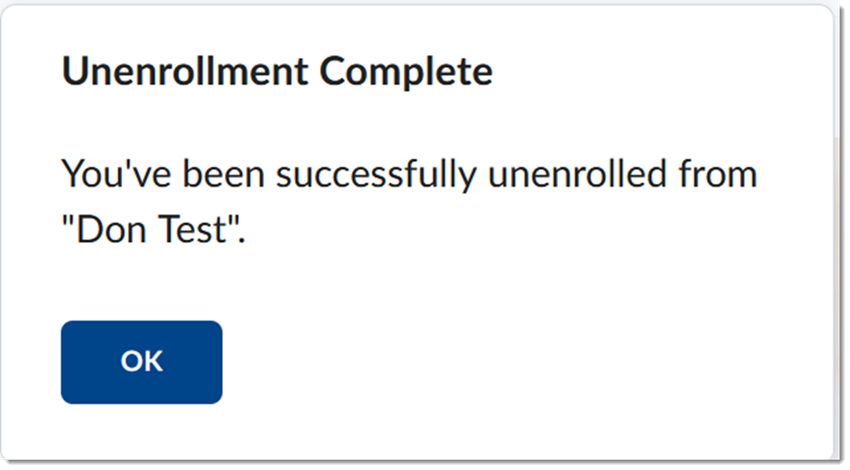
- On the onQ homepage, locate the Browse Self-Registration Courses widget.
- Click the blue Browse Now button.
- Navigate to the course you want to un-enrol from.
- Click the ellipsis [...] next to the Open Course button.
- Select Unenroll from the drop-down menu.
- Click OK on the Unenrolment Complete pop-up window.
The following video provides a guide for how to enrol a participant to your course:
- On the navbar, select the Classlist option under the Communications menu.
- From the Add Participants button, select Add Existing User.
- In the Search For field enter the NetID, then click the magnifying class to search.
- If the user is in onQ you should then see the Name and NetID listed.
- To enrol check the box next to the name, and select the correct role from the dropdown menu.
Roles available:
Primary Instructor (Instructor of Record in PeopleSoft) - Has full developing/grading permissions.
Instructor - Has full developing/grading permissions.
Instructor Auditor - Has limited developing permissions. - Click the Enrol Selected Users button.
The following video provides a guide for how to add participants to your course:
- On the navbar, select the Classlist option under the Communications menu.
- From the Add Participants button, select Add Existing User.
- In the Search For field enter the TA NetID (note: NOT their Student Netid), then click the magnifying class to search.
- If the TA is in onQ you should then see the Name and NetID listed.
- To enrol check the box next to the name, and select the correct role from the dropdown menu.
There are several TA roles available:
Grader - Has full grading permissions, but no developing permissions. This will enrol the TA in ONE section.
Super Grader - Has full grading permissions, but no developing permissions. This will enrol the TA in ALL sections.
Grader/Dev - Has full developing/grading permissions. This will enrol the TA in ONE section.
Super GraderDev - Has full developing/grading permissions. This will enrol the TA in ALL sections.
- Select the section from the section dropdown menu. If you are selecting the Super Grader or Super Grader/Dev roles select anyone of the sections, the TA will automatically be enrolled in all of the other sections.
- Click the Enrol Selected Users button.
- On the navbar, select Edit Course.
- Select Sections, under the Learner Management heading.
- Click Enrol Users at the top of the page. To enrol users, select the check box for the sections you wish to enrol them in.
- Click Save
- On the navbar, select Groups from the Communications tab.
- Select the drop-down arrow beside the Category containing your groups.
- Click the Enrol Users option.
- To enrol a TA into a group, simply find their name in the list and check the box under the corresponding group column.
- To remove a TA from a group, find their name and remove the check mark under the group they are enrolled in.
- Scroll to the bottom and select the Save button to confirm changes.
- On the navbar, select the Classlist option under the Communications menu.
- Check the box next to the name in the Classlist, and click the Enrolment button at the top of the list.
- Select the new role you wish to assign the TA from the dropdown menu.
- Click Save.