|
|
PEARLPaleoecologicalEnvironmentalAssessment andResearchLaboratory |

|
- Home
- People
- Research
- Outreach
- Blog
|
|
PEARLPaleoecologicalEnvironmentalAssessment andResearchLaboratory |
|
Invertebrate Preparation Methods
Methods for processing and isolating midge remains from lake sediments
By J Kurek and K Griffiths, Dec 10, 2010
Overview
The processing of sediments for midges (e.g. chironomids and chaoborids) is an important component of paleolimnological studies examining midge communities. Processing samples correctly is essential for reproducibility and reliability of results, and will allow for improved taxonomic resolution and increased efficiency of identifications. This stage however, is very time consuming, and it generally takes several hours to complete one sample. We will follow methods from Walker (2001). There are four general stages to processing: digesting, sieving, picking, and mounting.
I. Safety
Queen’s University requires that all students or staff using chemicals in a laboratory setting have WHMIS certification. Students are expected to use proper safety gear, including Latex gloves (in red box), protective eyewear, lab coat and appropriate footwear. Please ensure that the fumehood is cleaned both before and after use. Also, the fumehood should be used by only one person at a time because of potentially incompatible chemicals.
II. Equipment
Digesting: 80 mL beaker, KOH pellets, deionized water, glass stirring rods, weigh scale or volumetric sampler, scupula, and hot plate.
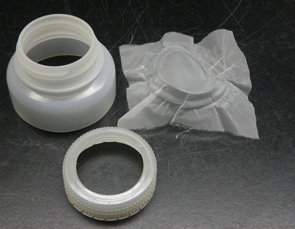
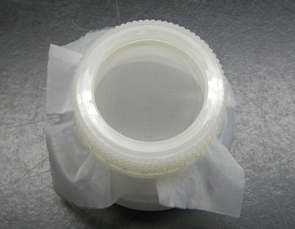
Sieving: 100-µm Nitex® mesh, modified Nalgene® bottle and top (i.e. sieve), Nalgene® squirt bottle filled with deionized water, and 500 mL beaker to collect waste KOH. If samples are to be left for several days before picking, then you will also need a few drops of 95% ethanol and Parafilm®.
Picking: 1 high-quality dissecting scope, 1 lesser quality dissecting scope to view transfers, Bogorov tray, Tupperware® container, size 5 INOX® straight forceps, extra forcep, pipette with deionized water, slides, 12 mm round coverslips, and storage area for unmounted slides and coverslips.
Mounting: Entellan®, glass pipette and rubber bulb, forceps, Kimwipes®, tray for overnight drying, and MSDS label.
III. Methods
DIGESTING:
1. Add 4 g of KOH pellets to 80 mL of deionized water in a beaker. Stir to dissolve pellets.
2. Tare the scale. Weigh out your wet sediment into the beaker of 5% KOH. We recommend starting with approximately 1 to 2 g, which can be adjusted according to the midge concentrations from your sediments.
3. Using a hotplate, gently warm the sediment-5% KOH solution in the fumehood for ~20 minutes. Stir occasionally. Watch for excessive heat as it may degrade the chitinous remains. A boil is not OK. When condensation appears on the upper surface of the beaker, the sample is likely ready for the next step.
SIEVING:
4. Pour the entire sample onto the 100-µm mesh sieve (see images below) and collect the waste KOH for disposal. Waste KOH can be added to the disposal container for bases located under the fumehood.
 |
 |
5. Next, gently rinse the sediments retained on the sieve using deionized water and a squirt bottle. Generally, if the bottom of the mesh feels “slimy” and if the rinse water coming through the sieve is unclear, then continue rinsing. It is important to fully rinse your sample because this process removes KOH and smaller sediment particles; therefore, making picking more efficient. Expect to rinse most samples for at least 5 minutes.
6. Next, transfer the sediments retained on the sieve into a small beaker using deionized water. To accomplish this, first concentrate the sediments in the center of the sieve. Unscrew the sieve, rinsing the edges of the modified Nalgene bottle (i.e. sieve) over the mesh. This ensures that all sediments are captured. Finally, rinse all sediments from the mesh into a small beaker. When you become proficient, the beaker should have ~20 mL of liquid in it. If you plan on leaving the sample for a few days, add several drops of 95% ethanol and cover with Parafilm®.
PICKING:
7. Pour liquid from the beaker into the Bogorov tray, filling to capacity. You will need to complete this step several times as most samples have a greater volume than the tray can accommodate. Break the surface tension of the liquid in the tray by running forceps through the sample and spreading liquid evenly across the channel.
8. Search for head capsules (or chaoborid mandibles) making a total of 4 passes through each tray: 1 pass focused on the surface of the liquid, 1 pass focused on the bottom of the tray. Then, stir the entire sample and wait a few minutes for remains to settle. Next, make a 2 nd pass across the surface and a 2nd pass on the bottom of the tray. You generally find most of the remains during the first pass of the tray. The entire width of the Bogorov channel should fill the field of view (setting of about 2.5X) of the dissecting scope.
9. Place a coverslip on a slide under the lesser quality dissecting scope. Place a drop of deionized water on the center of the coverslip. Pick out remains using fine forceps and transfer to the coverslip by releasing the head capsule into the drop of water. When you are proficient, you will not need this drop of water. Ensure you made the transfer from the forceps to the coverslip by observing that the remain falls into the water droplet. Often, head capsules will stick to the forceps. Keep track of the number of remains with a counter. Use one click for a half head capsule, and two clicks for a whole.
10. Just before the drop of water evaporates, spread out head capsules evenly on the coverslip and flip over larger head capsules so that the mentum is against the coverslip. This is VERY important as it is difficult to ID overlapping remains. Aim for no more than 50 head capsules per coverslip.
11. After 4 passes have been completed on a tray and you are confident that you have recovered all remains, rinse the tray and repeat steps 7 to 10 until there is no longer liquid (i.e. your digested sample) in the beaker.
12. A sediment sample is considered completed when you have picked all remains from the digested sediment. The recommended minimum count is 50 whole head capsules (Quinlan and Smol, 2001; Heiri and Lotter, 2001; Larocque, 2001); however, you should aim to exceed this recommendation. All sediment digested should be picked because of a sorting bias.
** Picking is a learned skill. In our experience, it takes about 2 weeks to establish an accurate search image and become proficient at recovering all remains. Therefore, it is highly recommended that students beginning with midge analysis seek the help of a senior student to check through the majority of their trays during their first 2 weeks of picking.
MOUNTING:
13. After the water has evaporated from the coverslip, you are now ready to permanently mount your coverslips. Unmounted coverslips can be stored in the wooden storage box near the freeze drier on metal slide trays. Coverslips can then be permanently mounted when 1 or more trays are filled with slides
14. Locate mounting equipment and put on safety gear. Place a paper towel in the fumehood, taping down the corners. This helps you see your coverslips and catches any mess.
15. Break the tip off a glass pipette slightly below the widening point. Use a folded paper towel to prevent injury.
16. In the fumehood, use the pipette to extract several mL of Entellan®. Entellan® is viscous so it may take tens of seconds to fill the pipette. The pipette should always remain vertical to prevent spillage.
17. Take 1 slide and coverslip/s from your metal tray. Move coverslip/s to overhang half way off the edge of your slide- this helps you to grab the coverslip with the forceps.
18. Add 1 or 2 drops of Entellan® to each coverslip and quickly flip over the coverslip onto the slide. Place the slide on a flat surface. Usually the weight of the coverslip is sufficient to distribute the Entellan® evenly, but if needed, tap the coverslip with the forceps. Air bubbles can also be removed by tapping the coverslip. Once the coverslip is turned over, do not try to adjust or re-mount the coverslip. If too little or too much Entellan was applied, adjust the number of drops to suit.
19. Mounted slides should remain in the fumehood overnight. Trays of mounted slides should be labelled with MSDS labels when in fumehood.
20. Dried, mounted samples can now be examined under a compound scope using brightfield illumination.
Helpful tips
- Some head capsules may be filled with sediments. Use forceps to remove debris before placing the head capsule on coverslip.
- Frequent cleaning of forceps with Kimwipes® is recommended to reduce stickiness.
- Trays left overnight can be covered with a Tupperware® container and topped up with deionized water when picking is resumed the next morning.
- Forceps are expensive, treat them with care. Once dropped they are almost useless. Sometimes John Glew can re-sharpen the tips.
- If you are unsure about a remain, pick it from the sediment and place on the coverslip. However, do not include this specimen in your estimated count. Ultimately, your decision will be made using the compound scope. Remember...”When in doubt, pick it out”.
- When transferring sediments from the sieve mesh to the beaker, blot the underside of the mesh with a Kimwipe®. This makes it easier to concentrate your sample.
References
Heiri O, Lotter AF. 2001. Effect of low count sums on quantitative environmental reconstructions: an example using subfossil chironomids. Journal of Paleolimnology 26: 343-350.
Larocque I. 2001. How many chironomid head capsules are enough? A statistical approach to determine sample size for palaeoclimatic reconstructions. Palaeogeography, Palaeoclimatology, Palaeoecology 172: 133-142.
Quinlan R, Smol JP. 2001. Setting minimum head capsule abundance and taxa deletion criteria in chironomid-based inference models. Journal of Paleolimnology 26: 327-342.
Walker IR. 2001. Midges: Chironomidae and related Diptera. In Smol, J. P., H. J. B. Birks & W. M. Last (eds),Tracking Environmental Change using Lake Sediments, Vol. 4, Zoological Indicators. Kluwer Academic Publishers, Dordrecht: 43–66.
Taxonomic References
Brooks SJ, Langdon PG, Heiri O. 2007. The Identification and Use of Palaearctic Chironomidae Larvae in Palaeoecology. QRA Technical Guide no. 10, London, 276 pp.
Oliver DR, Roussel ME. 1983. The Insects and Arachnids of Canada part 11: The Genera of larval midges of Canada-Diptera: Chironomidae. Agriculture Canada Publication 1746, 253 pp.
Rieradevall M, Brooks SJ. 2001. An identification guide to subfossil Tanypodinae larvae based on cephalic setation. Journal of Paleolimnology 25: 81-99.
Walker IR. 2007. The WWW Field Guide to Fossil Midges. http://www.paleolab.ca/wwwguide/
Wiederholm T. 1983. Chironomidae of the Holarctic region. Keys and Diagnoses Part I. Larvae. Ent. Scand. Suppl (19), 457 pp.
|
|