 Student Affairs
Grade Entry
Queen's University uses PeopleSoft information systems to manage student records.
The following information will assist you in submitting and approving student grades. Please be sure to follow the appropriate links below so that the correct process is being used.
To submit grades from onQ, there are two requirements:
- You must be listed as the primary instructor on the class; and
- You must have the “Grader Role” assigned to you in PeopleSoft
To check to see if you have the “Grader Role,” go to:
Self-Service > Faculty Centre > Grade Roster
If you are able to see this component, then you have the necessary access.
If you are listed as the primary instructor but cannot access this component, check out the PeopleSoft Student System Support section below and submit an online support form.
Department Head or Department Chair
Department Heads are responsible for grade approval online through PeopleSoft. Access to grade rosters for departmental approval will NOT be restricted to courses in a single department, so Department Heads must take care to approve only grades for which they are responsible.
Department Heads can refer to the following training materials:
Course Instructors
Course Instructors are responsible for entering grades for students. This can be done by one of two methods: entering the grades directly into PeopleSoft through the Faculty Centre using "Grade Roster," or by uploading the grades to PeopleSoft from a spreadsheet.
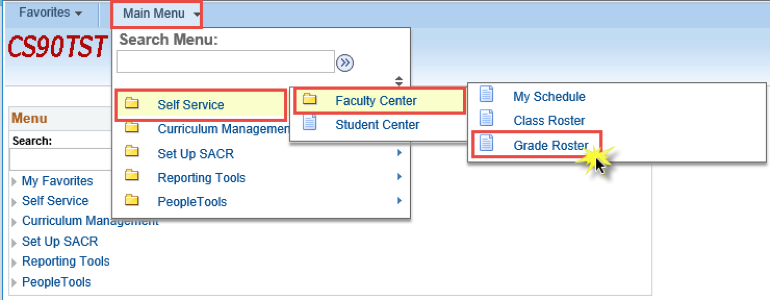
In order to access the "Grade Roster" in PeopleSoft, follow this navigation:
Self-Service > Faculty Centre > Grade Roster
Course Instructors can refer to the following training materials:
- Grade Entry using Self-Service
- Grade Entry using Spreadsheet Upload
- Run Grade Roster Status Report
- Viewing Student Grades
- How to Upload Grades using onQ
Department Assistants (or Other)
Department Assistants are responsible for a number of tasks related to grading in PeopleSoft. The tasks that you are responsible for will vary by department, but may include grade entry (done either through Grade Roster or Spreadsheet Upload), processing changes in grading, running a Grade Roster Status Report, and viewing student grades.
In order to access the "Grading" section in PeopleSoft, follow this navigation:
Curriculum Management > Grading
Department Assistants can refer to the following training materials:
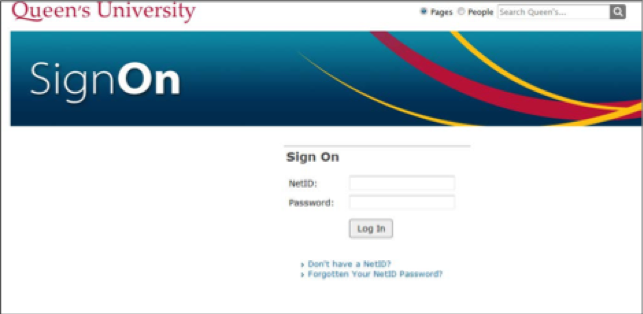
- Go to queensu.ca and select “SEARCH AND SIGN IN” located in the top right hand corner of the screen

- From the menu selections, click on ‘MyQueensU – SOLUS, MYHR and more’ (1st item in the left hand column)

- Under Admin Applications, select PeopleSoft Student Admin
4. Sign in with your NetID and password
- Under Admin Applications, select PeopleSoft Student Admin
- Instructors can find their Student Class List for the current Term by navigating to the Power BI web service at:
- Learn tips and tricks on how to best use the tool, please (Link to updated training doc)
- If you’d like to understand how to interpret the data presented through Power BI, please first visit the help and info sections provided in Power BI. If you continue to require support, please submit a Support Request below.
- If you would like to request access to the Student Class list please follow these steps to make a request (PDF, 116.4 KB)
2. To view your Class Schedule sign into PeopleSoft and select Faculty Centre
3. You can find information about other courses using the Search function
4. Choose the term for the search from the drop down menu
5. Choose the Department from the drop down menu. You can enter a course number to look at a specific course or view an entire department at once
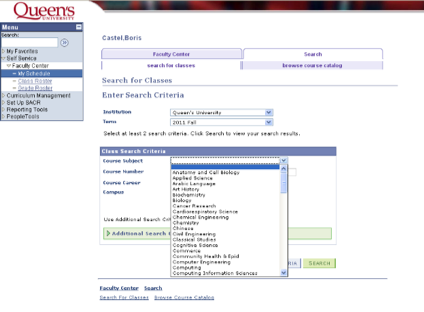
6. Only 3 sections display at once. If you are looking at a course with multiple sections, choose View all sections
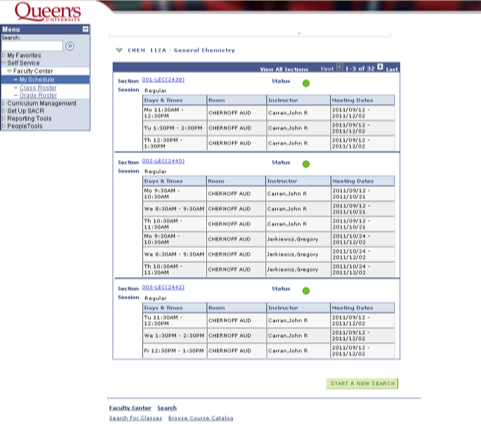
Note: When viewing a class list, duplicate names show if a student is either in a dual degree program or a MJM, Medial, etc.
- To view the class list without duplicates, save the report as an Excel file, and then remove duplicates by student ID number
1. Create Grade Rosters in Batch
The Office of the University Registrar (OUR) creates Grade Rosters for all classes to allow submission of grades.
- Grade Rosters act as online grade entry sheets; they are used to record, approve, and post grades in classes for students
- Grade Rosters will be produced just prior to the grading period so that all add/drops are reflected on the roster
2. Grade Entry
Instructors will enter grades directly using the Grade Roster by navigating to Self-Service, Faculty Centre, Grade Roster component pages or, by uploading grades from a spreadsheet.
3. Grade Approval
Approval of grades will be done by Department Heads online.
- Access to Grade Rosters for departmental approval will not be restricted to courses in a single department so Department Heads must take care to approve only grades in classes for which they are responsible
4. Mid-Year Grades
Multi-term (A/B) courses are offered over two consecutive terms, typically fall and winter. In order to help first year students gauge how they are doing in a multi-term course, mid-year grade rosters will be created for all 100-level multi-term courses and instructors will be asked to submit grades for year 1 students only.
- Mid-year grades will be entered in the mid-year grade roster created for the fall term portion of the course. This grade does NOT appear on the student’s transcript
- A grade of NG (Not Graded) will be entered in batch by the OUR on the fall term portion of the course. This is what will appear on the student’s transcript
- The final grade for the multi-term course will be entered on the winter term portion of the course
5. Non-Evaluative Grades
The range of grades, as follows, will be assigned in a consistent manner across faculties.
Incomplete Grade (IN) – A single Incomplete Grade of IN will be assigned only in cases where the student would otherwise receive a failing grade if the outstanding work is not completed, or a deferred examination is not written. If the outstanding work is not submitted or the exam is not written, this grade will automatically lapse to an F at the end of the following term, unless the student successfully appeals (usually to the Faculty Office) for an extension or to drop the course. Some faculties may recommend, or require, the instructor to fill in a separate form outlining the conditions under which the IN is being submitted and send it to the Faculty Office for the student’s records before an IN grade is approved.
If the student would otherwise still receive a passing grade in the course, the actual grade earned will be submitted. A change of grade will then be submitted when the outstanding work has been completed or, the exam has been written. Again, some faculties may recommend, or require, the instructor to fill in a separate form outlining the conditions under which such a grade is being submitted.
Grade Deferred (GD) - The Grade Deferred (GD) use is limited under faculty regulations (usually to those cases where an academic integrity investigation is outstanding) and it will not lapse automatically.
Credit (CR) – Credit standing (CR) in a course is available only upon appeal by the student to the Faculty Office, so individual instructors will not be able to enter this grade.
Mark Condition: Aegrotat (AG) Standing – The Aegrotat (estimated) standing in a course is available only upon appeal by the student to the Faculty Office.
6. Grade Changes
Changes of grade are initiated by instructors to correct an error or to update the grade of a student with an “Incomplete” grade.
- Grade changes may be submitted through the Change of Grade module in PeopleSoft or by using the Change of Grade Form. Grade changes are approved by the Department Head and Faculty Office
- In cases where students experience extenuating circumstances that may justify a grade adjustment, students may submit an appeal to the Faculty Office for review
Grades may be uploaded from an Excel spreadsheet by both instructors and administrative staff directly to the Grade Roster.
When complete, the Grade Roster will need to be marked as “Ready for Review.”
Accessing the Excel Spreadsheet Template for its Intended Use
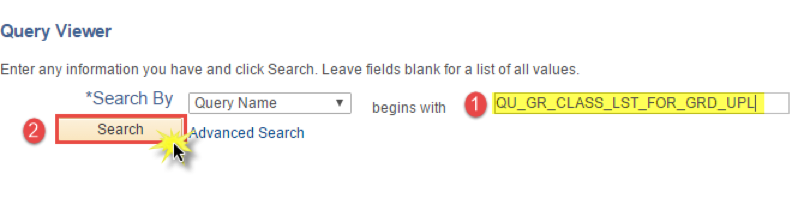
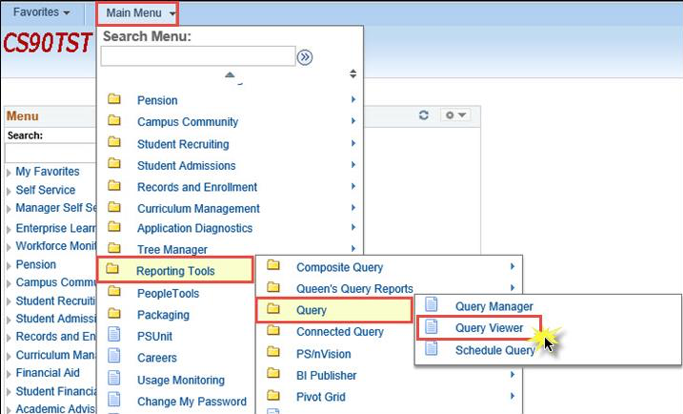
- Begin by clicking on the Main Menu and follow the navigation:
Reporting Tools > Query > Query Viewer

- On the Query Viewer page, enter the Query Name or partial name in the search field
- Enter QU_GR_CLASS_LST_FOR_GRD_UPL
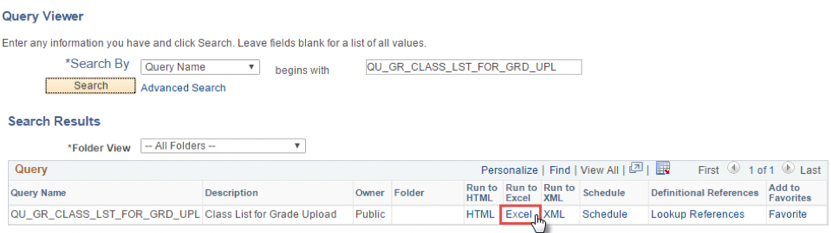
- Click the Search button
- Select the Excel link. This will bring you to the next screen where you will enter the specifics of the class that you want to grade
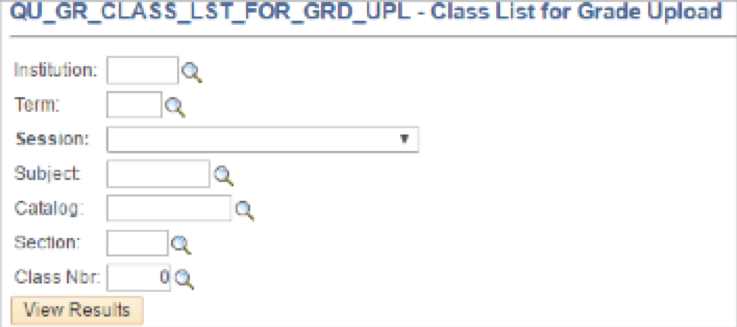
- The Class List for Grade Upload page will display; this page works based on Prompts. You are required to enter information into each field in order for the correct class list to be produced:
- Institution: QUNIV
- Term: Use the Look Up Tool or, enter the Term code if known
- Session: Select the session using the drop-down list of valid values
- Subject: Use the Look Up Tool to see the list of valid values for the term selected
- Catalog: Use the Look Up Tool to see the list of valid class offerings for the specified term and subject
- Selection: Select the Section number for the subject and catalog number you have selected. Select the section number of the graded component (usually the lecture) to ensure that you capture all the students
- Class Nbr: This is a PeopleSoft generated number and is specific to the Subject, Catalog Number, Section, and Term of the class. Use the Look Up Tool to retrieve the valid Class number
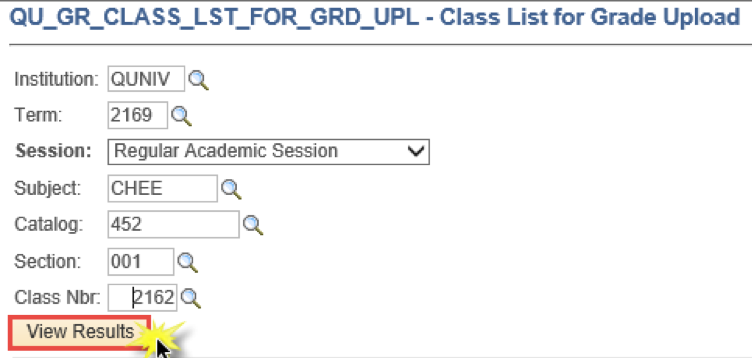
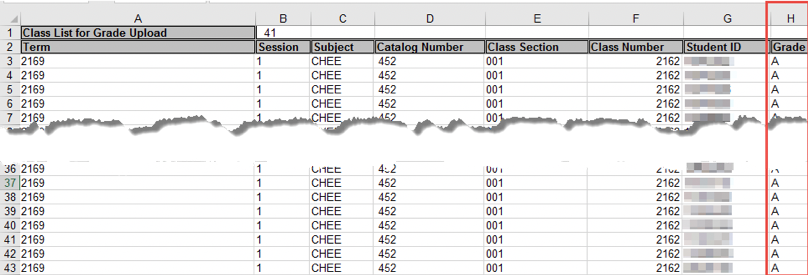
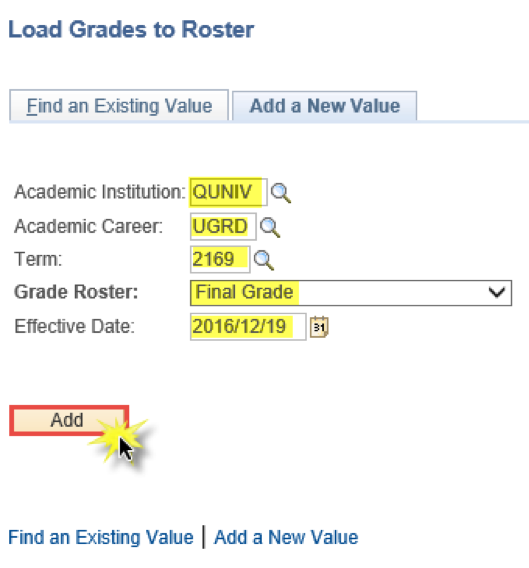
- For our example, we have entered the following information:
- Institution – QUNIV Term – 2169
- Session – Regular Academic Session
- Subject – CHEE Catalog – 452 Section – 001 Class Nbr – 2162
Click the View Results button.
- After clicking the View Results button, choose the option of:
- Opening the Excel spreadsheet for immediate viewing and/or entering of grades, or
- Saving the spreadsheet to a preferred drive for later use

Modify the Excel Spreadsheet Template for its Intended Use
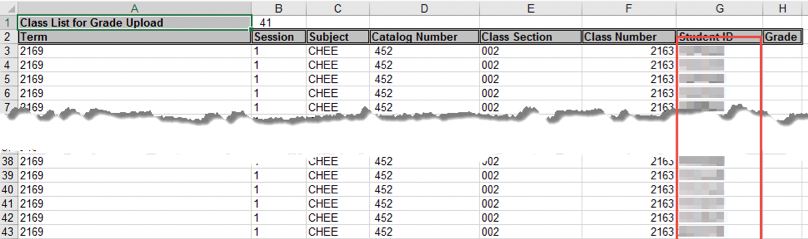
In the Excel spreadsheet, Columns A through to H are required for the Grades Spreadsheet Upload process.
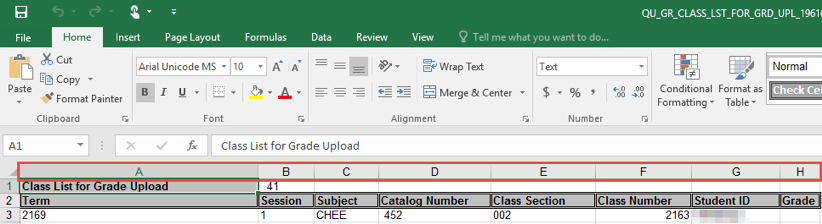
- Sort the file so that all Students ID’s are in Ascending order. Compare this list with your list or file. There should be a one- to-one match on Student ID’s between both files
- Use Column H – Grade to enter your marks. You can enter either a letter or numeric mark on this spreadsheet
- Note: Letter grades must be entered in upper case
Save the file.
Once you have completed entering the marks, into the Excel spreadsheet and have reviewed the data entry to ensure it is final, you are ready to upload the marks.
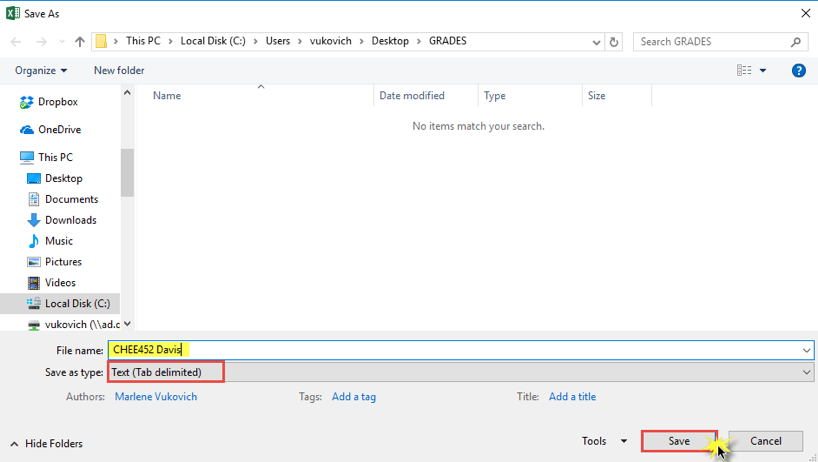
Prepare the Excel Spreadsheet Template for Loading
- Delete the header rows on the spreadsheet; there should be no column headings
- Note: To use this process, you must delete any values in columns I onwards; if the columns are not blank, your upload will not work

- Save the file as a Text (Tab- delimited) file for uploading into PeopleSoft
- Give the file a meaningful name. We suggest a combination of Subject, Course Number, and Instructor Name i.e. CHEE452 Davis
- Note for Mac Users: To save as a Text (Tab delimited) file, open the file using Text Wrangler, and save the file as per the naming convention above. Remember to select the option for line breaks to Windows
Prepare the Grade Roster for the Upload
- Next, navigate back to Faculty Centre – Grade Roster to prepare the Grade Roster for the upload
- The Student ID’s must be in Ascending order. On the Grade Roster tab, to sort the Grade Roster so that the Student ID’s are in ascending order, click on ID heading
Spreadsheet Upload Process
- You can upload the grades while on the Grade Roster tab by clicking on the Upload Grades link. This will bring you to the Load Grades to Roster page
- Note: To upload the grades you can also use the navigation: Curriculum Management > Grading > Load Grades to Roster
- This navigation will also bring you to the Load Grades to Roster page
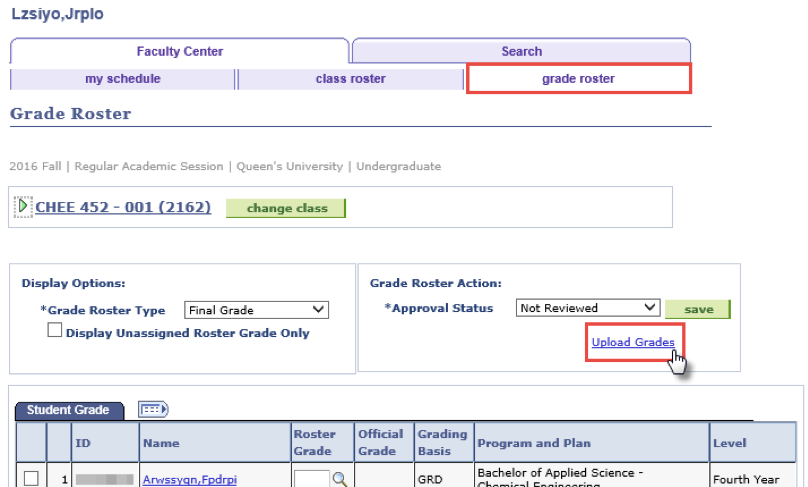
- On the Load Grades to Roster page Add a New Value tab, enter information in the following fields:
- Academic Institution – QUNIV
- Academic Career – Select the correct Career using the Look Up Tool
- Term – Select the correct Term Code using the Look Up Tool
- Grade Roster Type – Select the Type from the dropdown list
- Effective Date – Select the current date as the effective date
Click the Add button.
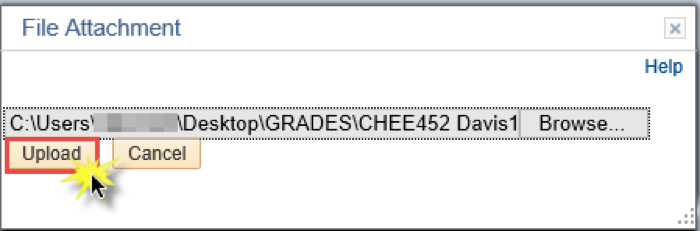
- On the Load Grades to Roster tab, click the Upload button
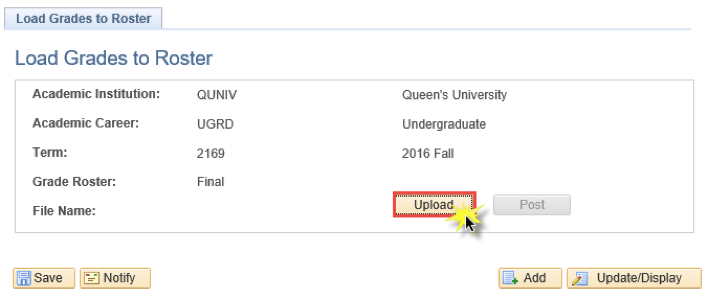
- Select the Browse button. Navigate to where you saved the Text (Tab delimited) file
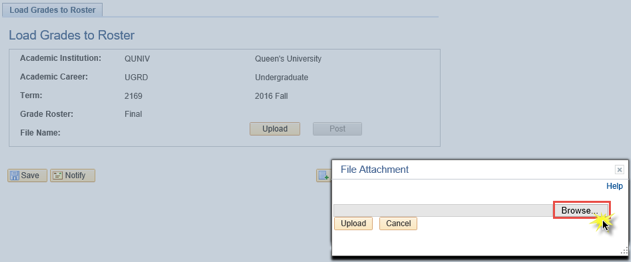
- Click on the file
- In this example, we click on CHEE452 Davis
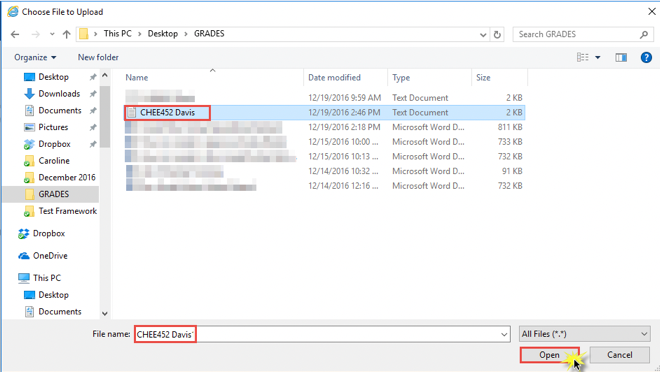
- Click the Upload button
- The text file will display beside File Name. Click the Post button
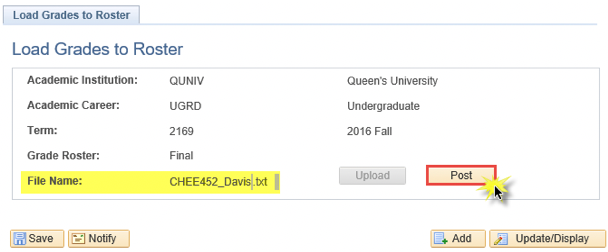
- The process may take a few minutes. If there are no errors, a Message box will display informing you that "No errors found. All grades uploaded"
- Note: If there are errors, a report will display. You will have to go back to the spreadsheet, to ensure that the previous steps have been followed accurately, or that the grades have been entered correctly

- Navigate back to the Faculty Centre. Click on the My Schedule tab to go back to the course selection screen
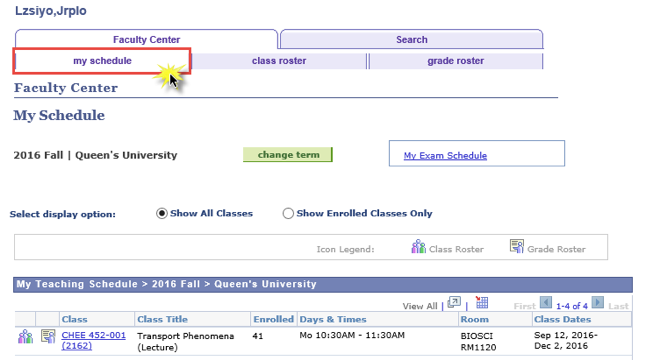
- Click on the Grade Roster icon to the left of the Class (Course Catalog Code, Section Number and Class Number) to refresh your course selection and access the Grade Roster
- The marks will now appear on the Grade Roster sheet
- Click on the Display Unassigned Roster Graded Entry check box to ensure all students have marks assigned to them
- Note: If marks have not been assigned to a student then assign the mark manually
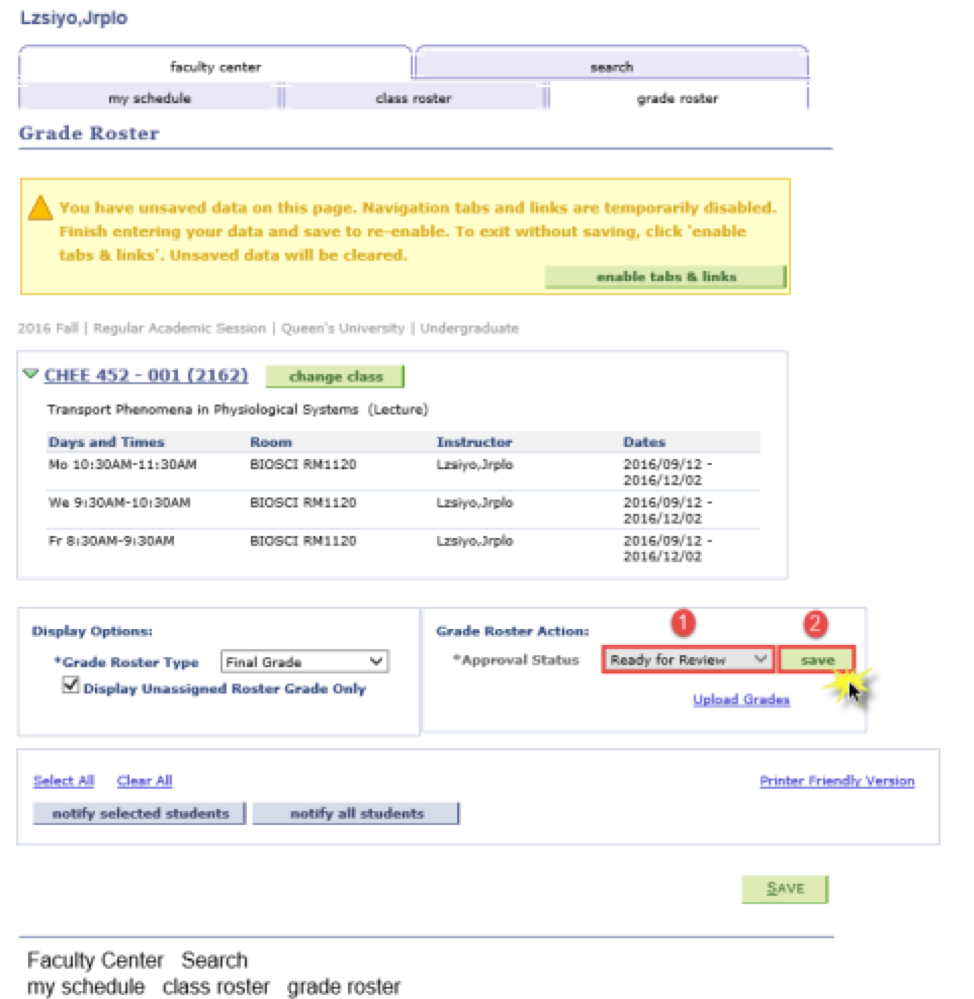
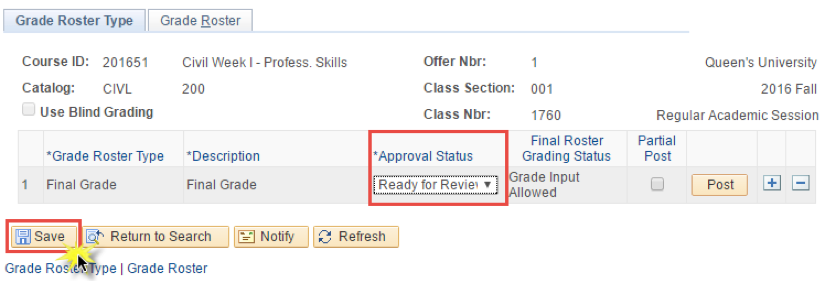
- If all mark entries are complete, set the Approval Status to Ready for Review
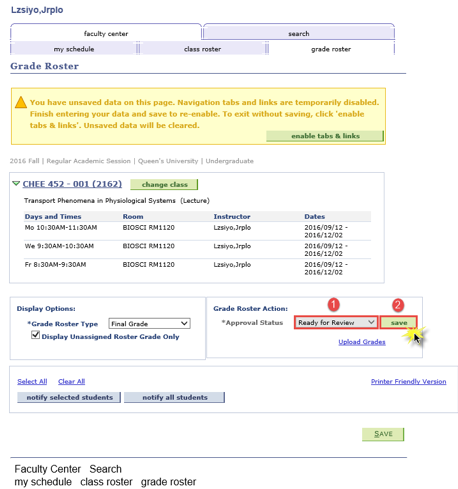
- Note: Once any data is entered in the Roster Grade column, a message will now display at the top of the page. Only click on the enable tabs & links button to clear any data entered that has not been previously saved. Disregard this message unless you want to delete any grade entries you have made that have not been saved
Click the Save button to move the class to the Grade Approval Process
- Once saved, the grades will appear in the Roster Grade column
Instructors will enter grades using the Faculty Centre.
Administrative Staff will enter grades on the Administrative Grade Roster page.
The grades will then be marked as “Ready for Review.”
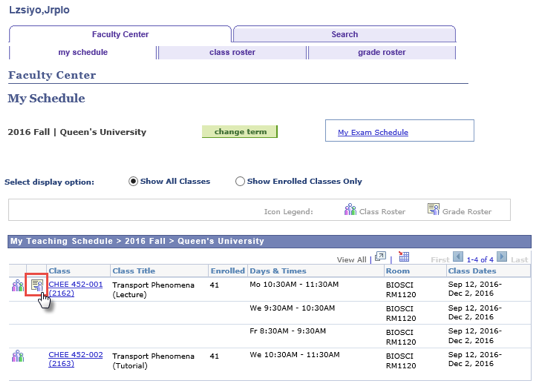
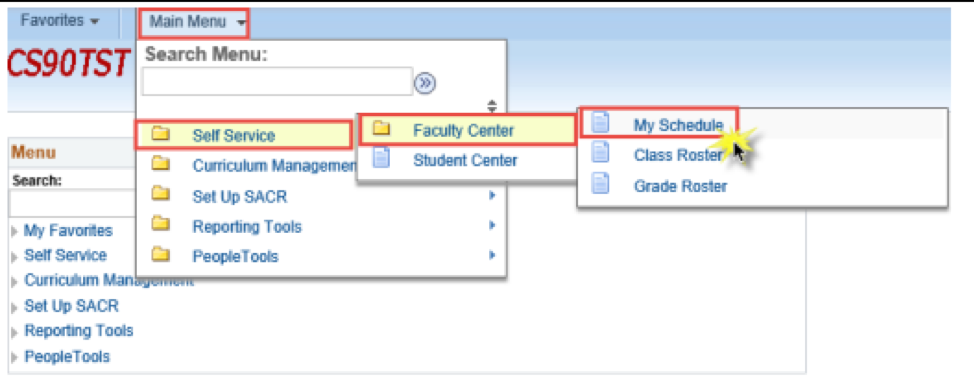
- Begin by clicking on the Main Menu and follow the navigation: Self Service > Faculty Center > My Schedule
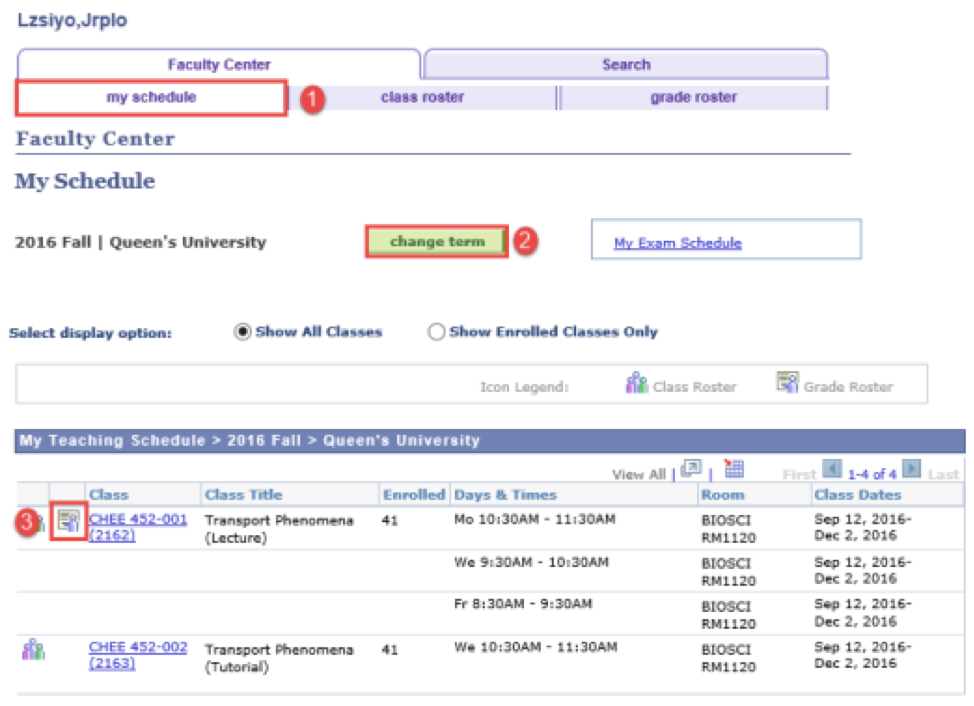
- Click on the My Schedule tab to see the list of classes assigned to you for grading
- Ensure that the Term is correct. If it is not, click the Change Term button
- To select a class, click on the Grade Roster icon next to the class that you want to enter marks for. Clicking the Grade Roster icon will display the grade roster for that particular course
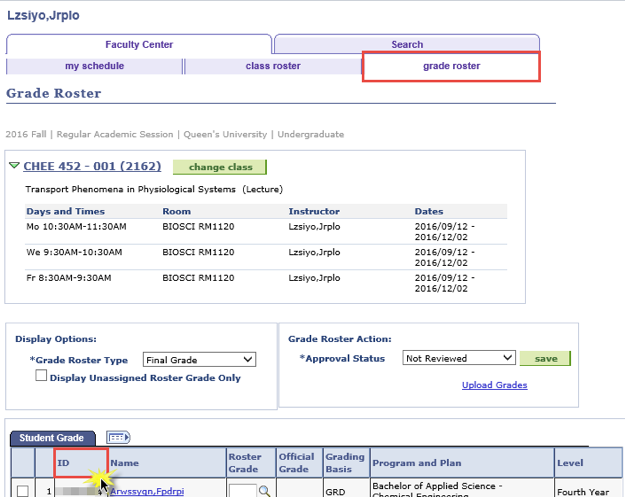
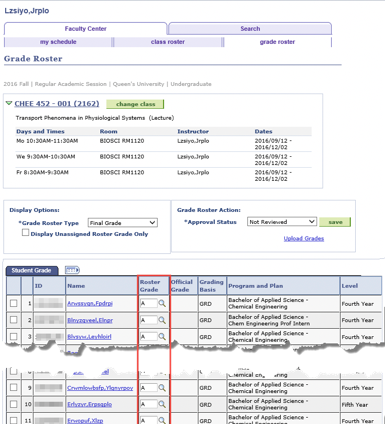
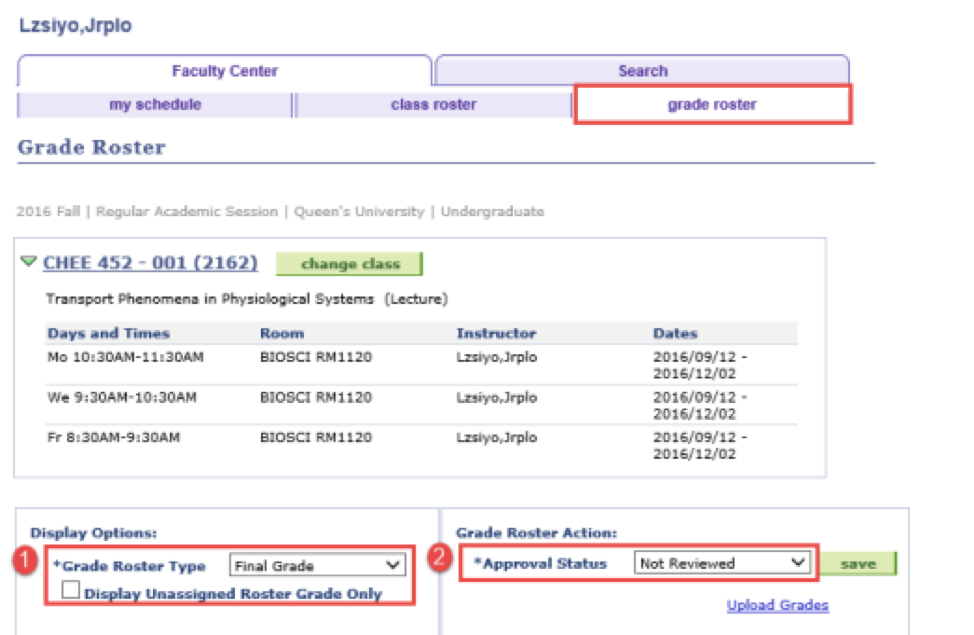
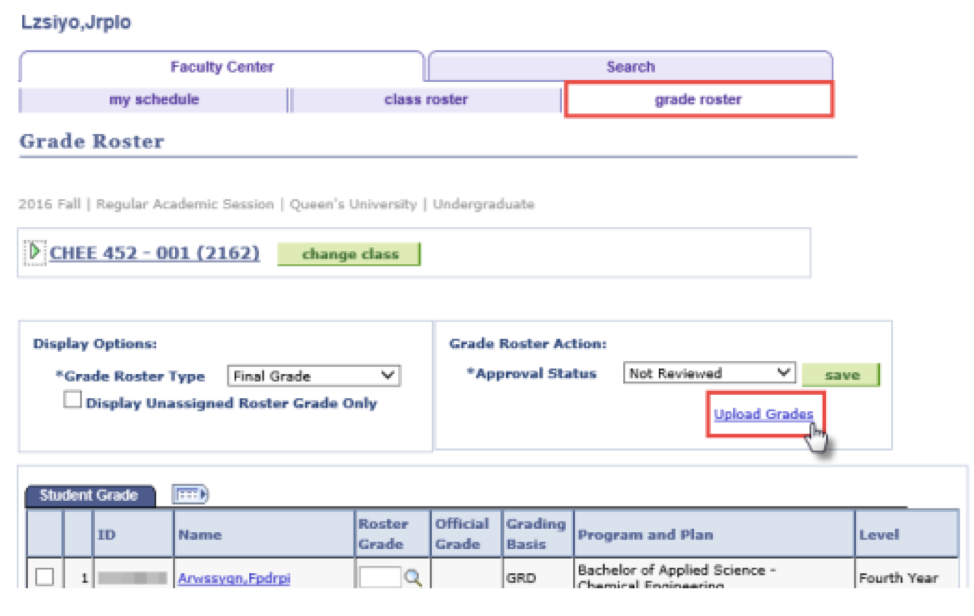
- On the Grade Roster page, you will see the Grade Roster Type which is set by the process of creating the Grade Roster. In this example it is Final Grade
- In the Grade Roster Action section, you will see the Approval Status. When you receive your Grade Roster, the status will display as Not Reviewed. It will remain as this until you set it to Ready for Review, which will indicate to the system that your part in the process is complete
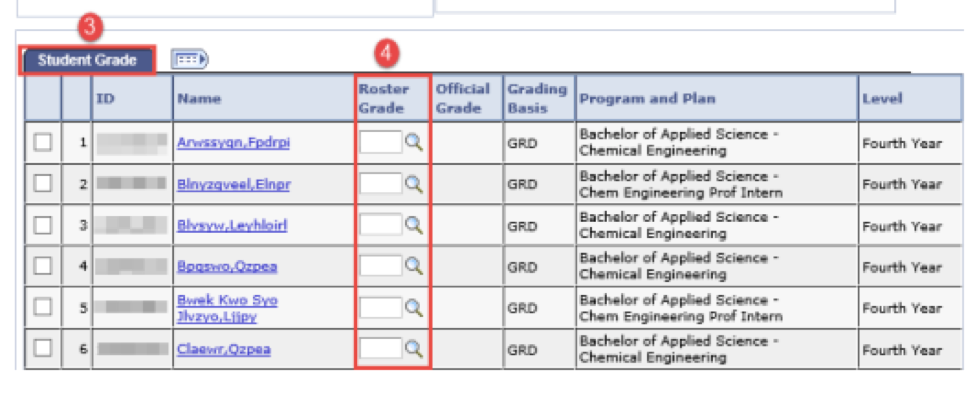
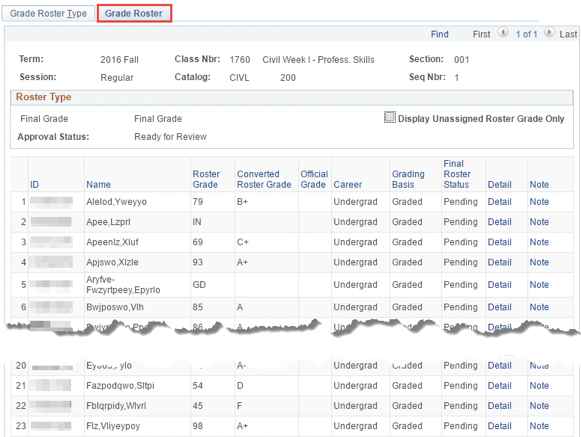
- The Student Grade tab is where you will see the list of students enrolled in the class and assigned for you to grade
- Note: Before proceeding, verify this list with your class list to ensure that all active students are captured. If not, you should advise the Faculty Grade Manager and have them re-run the Grade Roster process to update the list of students
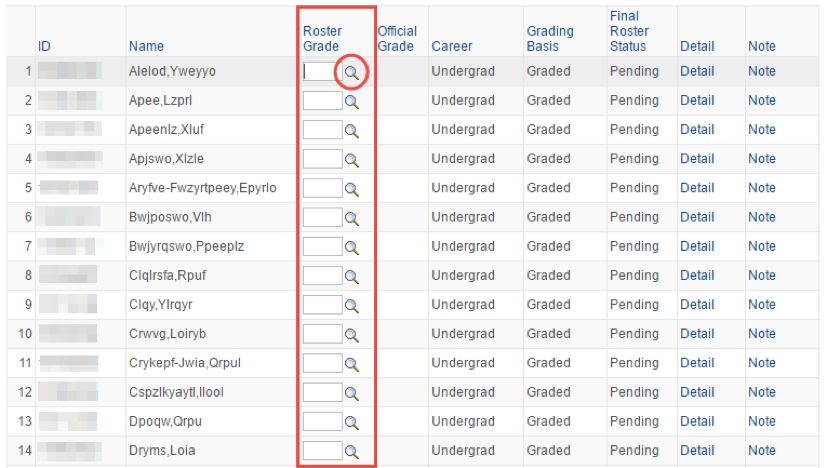
- Enter grades directly into the Roster Grade field next to the student name in the Student Grade section
- Note: To view all marks available to you, click on the Look Up Tool to the right of the grade field. This is where you can enter IN for incomplete status. DR grades will already be displayed for students who have dropped the class
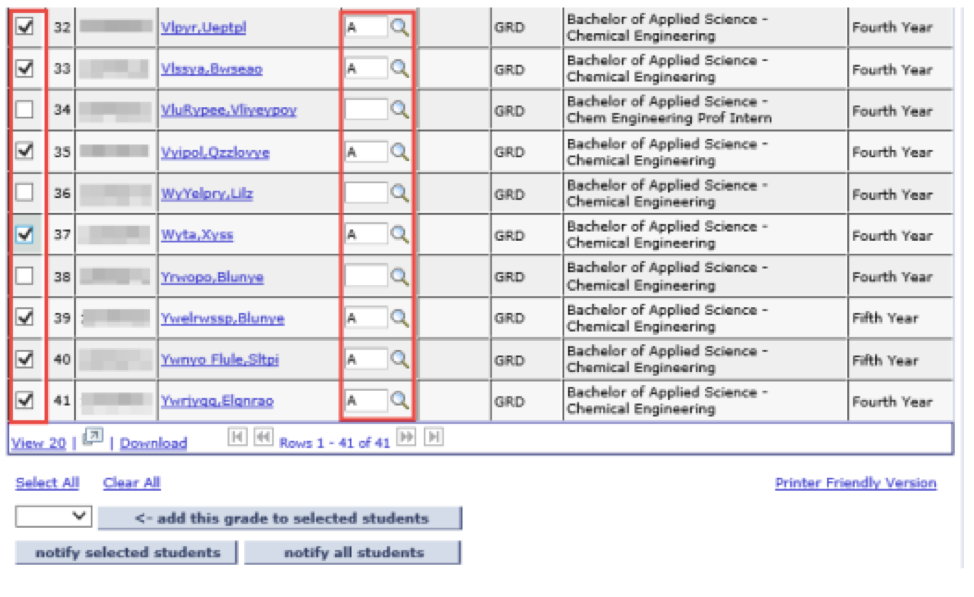
- If you have a number of students with the same mark, you can enter the mark to the selected students by:
- Checking the box to the left of the Student ID’s
- Selecting the mark from the drop down list
- Clicking on the add this grade to the selected students button
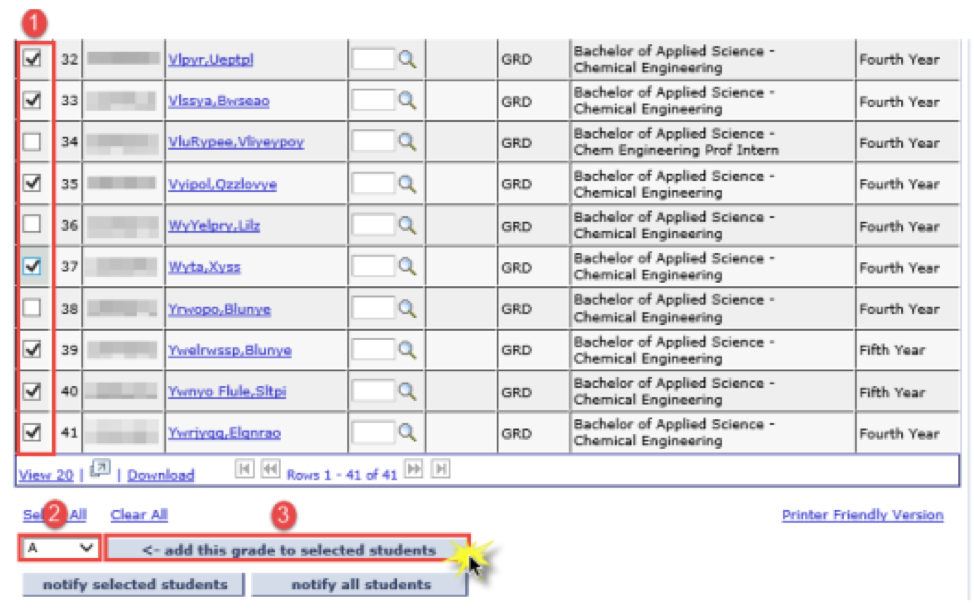
- The selected grade (in this example the Grade A) is added to the selected students
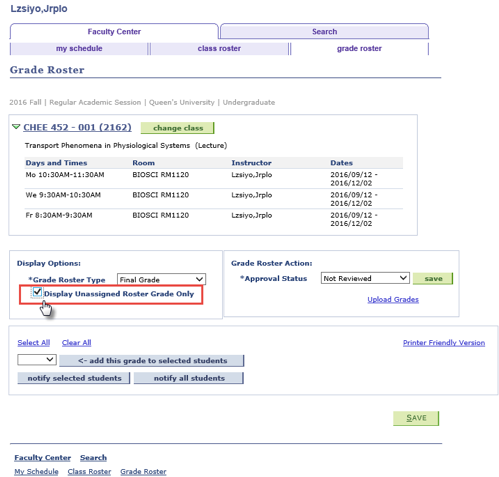
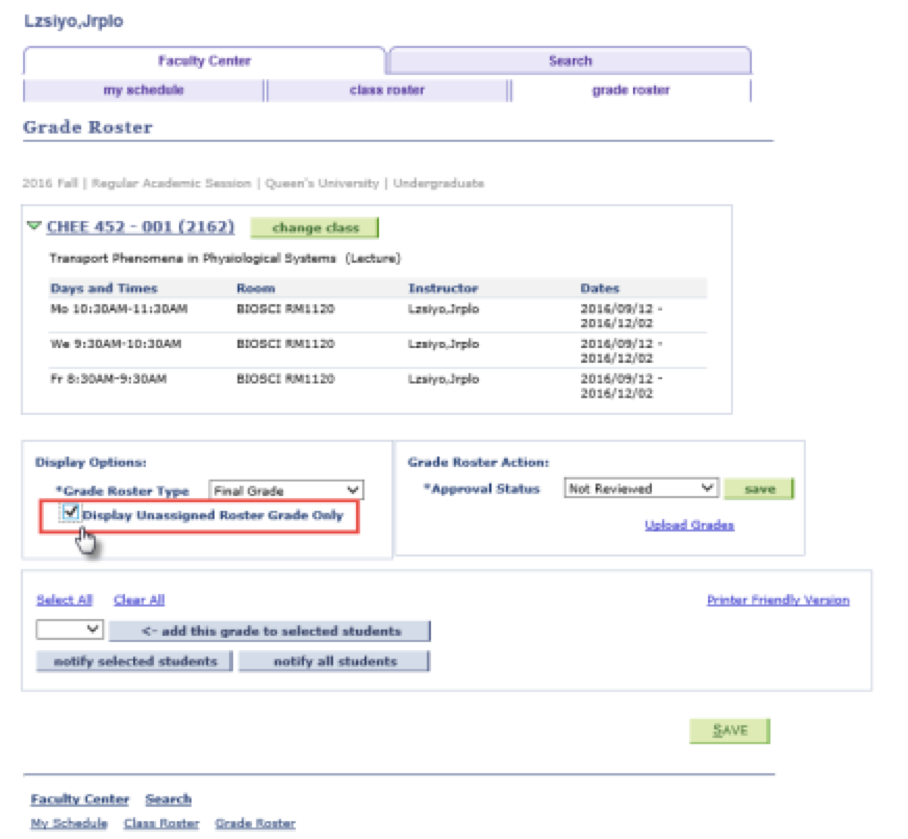
- To assist you in managing your grade list, you can check the box Display Unassigned Roster Grades Only
- This will hide any Student ID’s which have had marks assigned to them, providing you with a shorter list of students and the ability to ensure that all students have received a mark
- In this example, once the check box is checked, there is no list of students because all have receive a mark
- Once you are finished entering all of the student’s grades, change the Approval Status to Ready for Review. Click the Save button
- Note: Instructors will not be able to enter those grades that are available only upon student appeal (e.g. CR, Aegrotat) through the Faculty Centre
- To enter grades for other classes, click on My Schedule tab and repeat the process above for the other classes for which you are providing marks
- If you want to use the Spreadsheet Upload Process, click on the Upload Grades link. This will take you to the Load Grade Roster process which is detailed in the Spreadsheet Upload Process training dropdown
- Note: If you are using the Spreadsheet Upload Process, ensure that your spreadsheet is in the required format for uploading
This process will demonstrate how to enter marks directly into the Grade Roster.
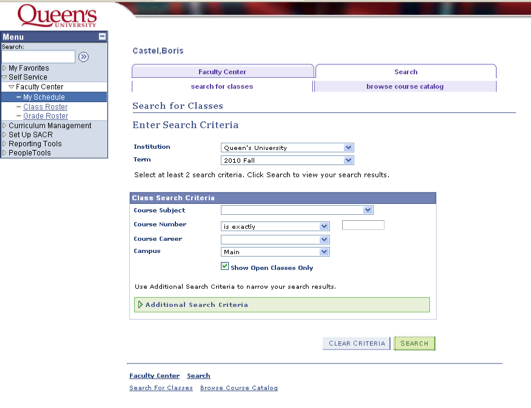
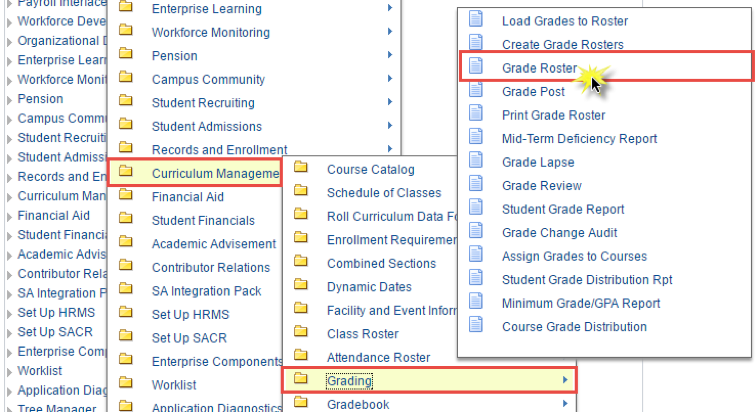
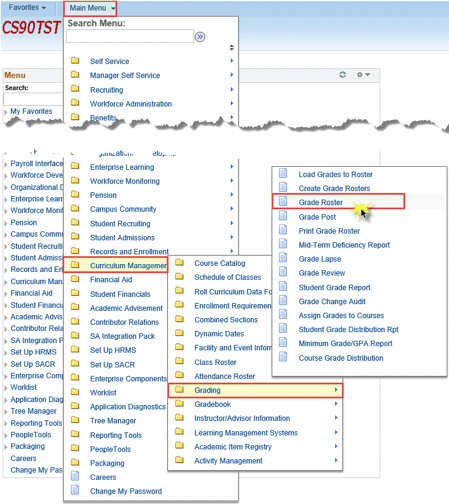
- Begin by clicking on the Main Menu and follow the navigation:
Main Menu > Curriculum Management > Grading > Grade Roster
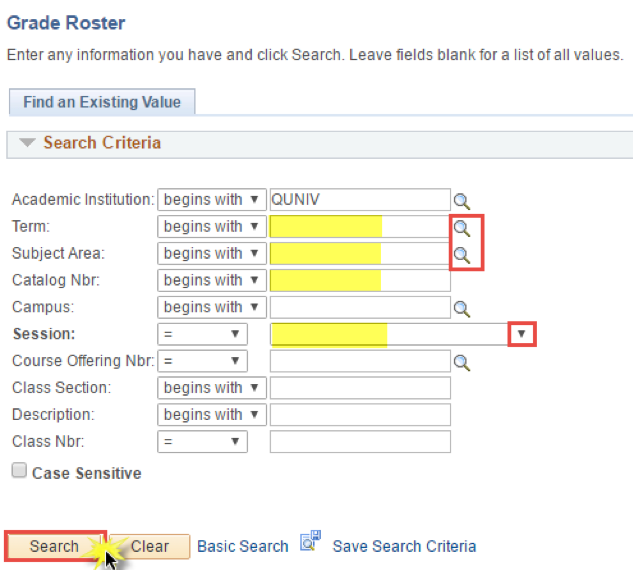
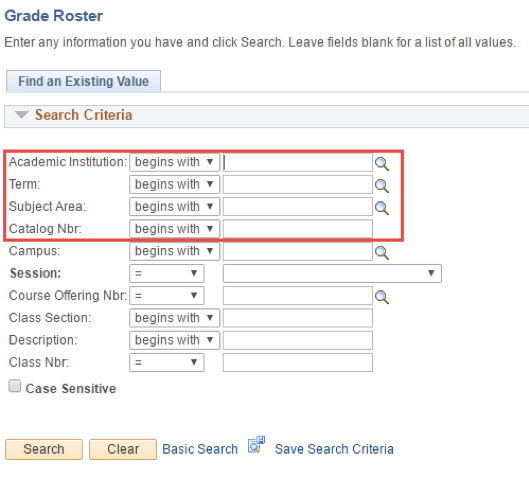
- On the Grade Roster search page, the following fields will be required:
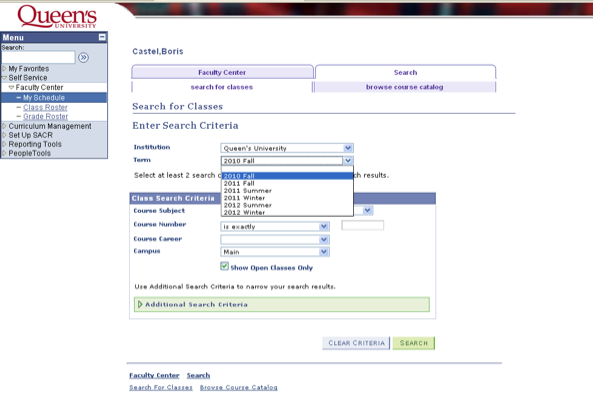
- Term: Enter the Term or select a Term using the Look Up Tool
- Subject Area: Enter the Subject Area or use the Look Up Tool to select the Subject Area
- Catalog Number: Enter the Catalog Number. (Note: if you do not know the Class Number, you may use the other search fields to search for the class)
- Session: Use the Dropdown list to select the Session
Click the Search button.
- In this example, we enter the following information into these fields:
- Term: 2169
- Subject Area: CIVL
- Catalog Nbr: 200
- Session: Regular Academic Session
Click the Search button.
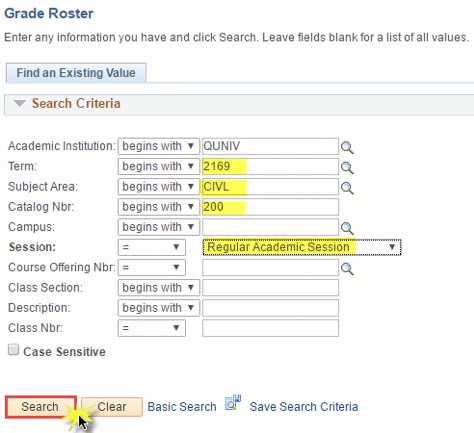
- After clicking the Search button, the Search Results display on the Grade Roster search page
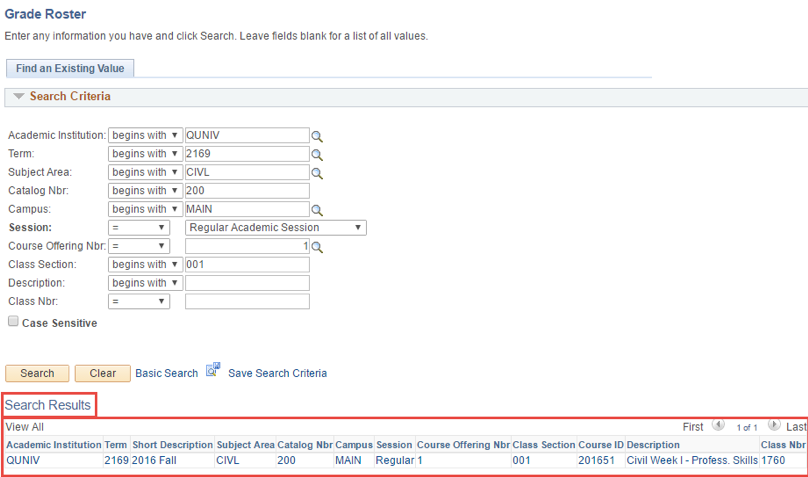
- Click on one of the fields to display the Grade Roster page

- On the Grade Roster tab is where you will verify your course information
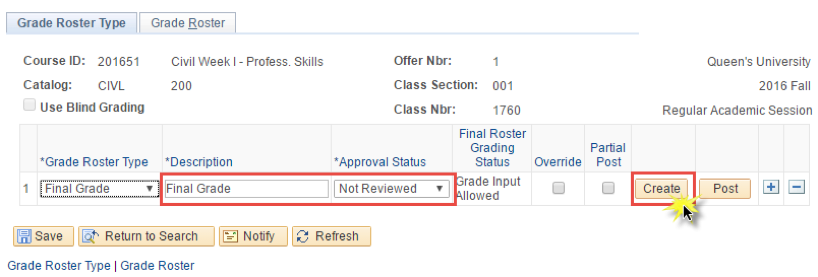
- Grade Roster Type: choose either Final Grade or Mid-Year Grade
- Approved Status: Leave the status to “Not Reviewed” while entering grades
- Create button: Click on this button to invoke a background process that creates the Grade Roster and takes you, when complete, to the Grade Roster page
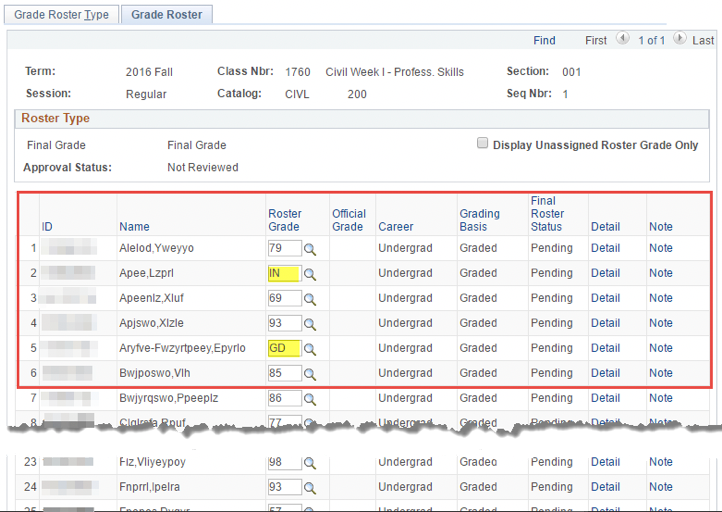
- On the Grade Roster page, there is a list of students actively enrolled in the course. Verify this list prior to entering marks for each student
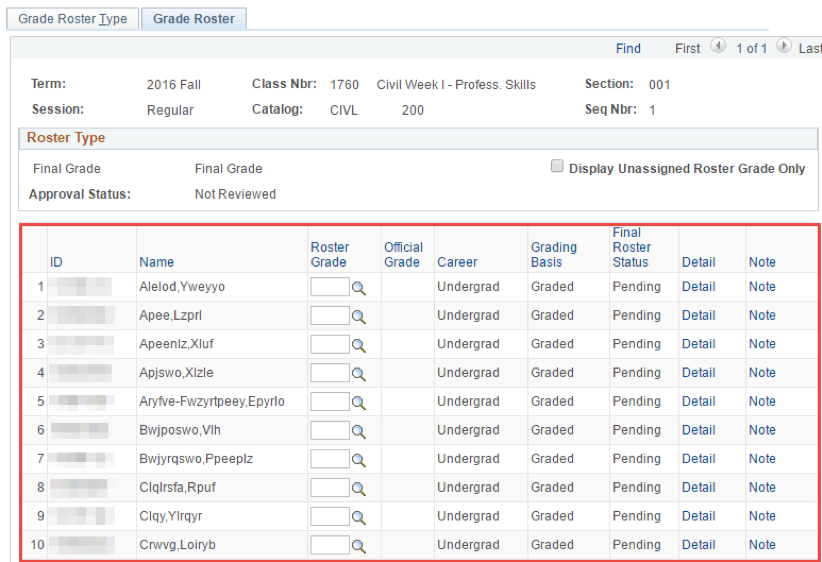
- Enter the student mark/grade for the course in the Roster Grade field
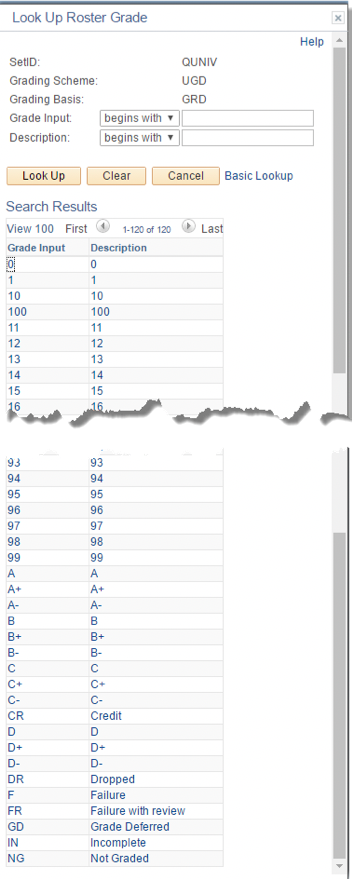
- Please take note of all marks available to you in this field by using the Look Up Tool
- Clicking on the Look Up Tool will open a Look Up Roster Grade window. You will notice that both numeric and alpha marking schemes are enabled, as well as the Non-Evaluated grades
- Enter the student mark for the course in the Roster Grade field
- This is where you can also enter “IN” for Incomplete or “GD” for Grade Deferred
- Note: If the “IN “selection is made, the system will automatically add a deadline date of 120 days from the last date in the term you are entering marks for, as an indicator in the system to lapse the mark to an “F”
- Once you have entered all of the marks for the course, click on the Grade Roster Type tab
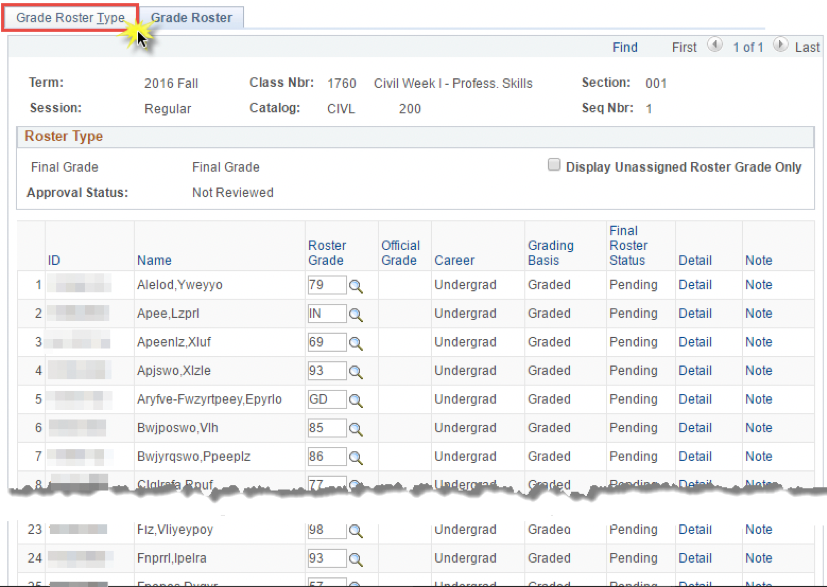
- On the Grade Roster Type page, click on the Approved Status dropdown list arrow and select the option of “Ready for Review” from the dropdown list
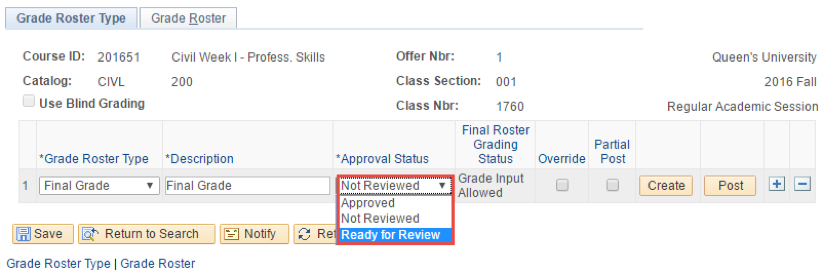
- Click the Save button
- After clicking the Save button, you are finished with the Grade Entry process. Back on the Grade Roster tab, you will see the grades displayed in the Roster Grade and Converted Roster Grade fields
The Grade Entry Status Report can be produced using an on-demand process.
Once complete, the Status Report can be provided to Department Heads to inform them of which course grades are ready for approval and which are still outstanding.
- Begin by clicking on the Main Menu and follow the navigation:
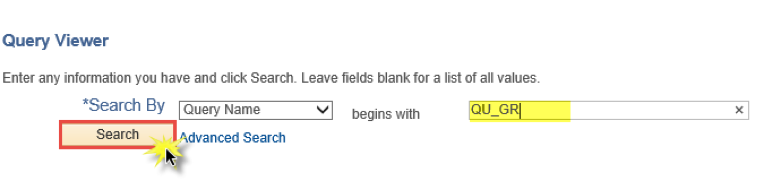
Reporting Tools > Query > Query Viewer
- On the Query Viewer page, enter the Query Name or partial name in the search field
- In this example, we enter QU_GR
- Click the Search button
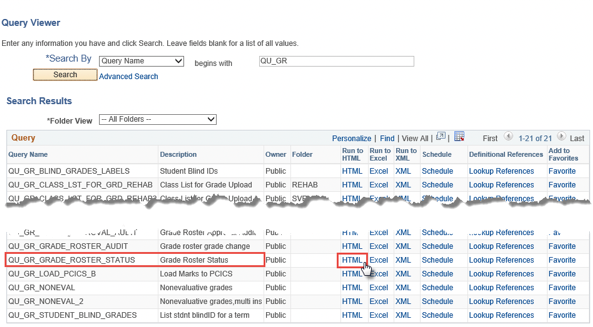
- The Grade Roster Status Report is a query that needs to be run to verify the status of all marks
- Once you identify the query that you want, select the output type of either HTML, Excel, or Schedule link
- In this example, we will select HTML for the query QU_GR_GRADE_ROSTER_STATUS
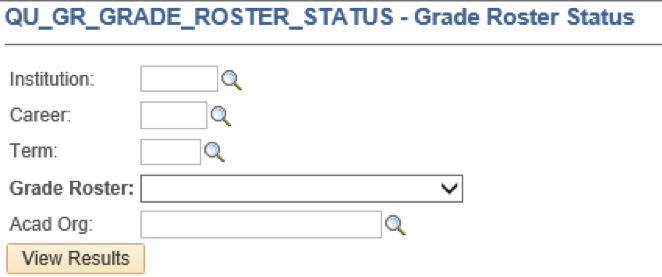
- The Criteria page will display. On this page you will have to fill in the criteria in order to run the Grade Entry Status Report. Enter information into the following fields:
- Institution – QUNIV
- Career – GRAD, UGRD, DIST, NONC
- Term – Select from the list when using the Look Up Tool or, enter the term code if known
- Grade Roster – Enter the Grade Roster Type of Final Grade, Mid-Term Grade or Mid-Year Grade
- Acad Org – Select from the Academic Organization list when using the Look Up Tool or enter the Department if known
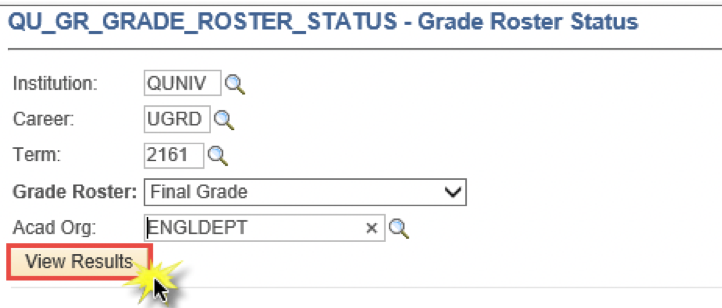
- In this example we enter the following information into the Criteria page fields:
- Institution – QUNIV
- Career –UGRD
- Term – 2161
- Grade Roster – Final Grade
- Acad Org – ENGLDEPT
Click the View Results icon
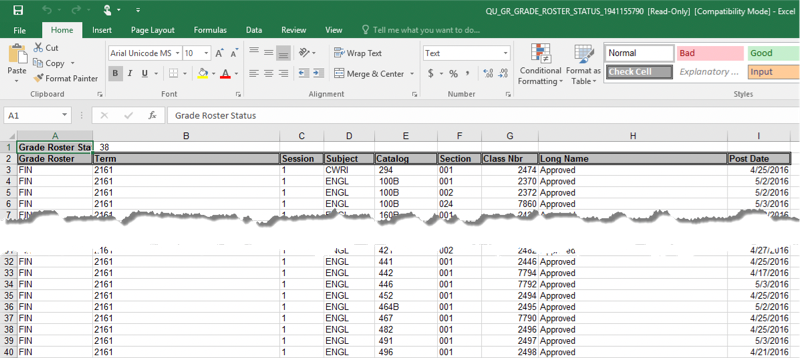
- The report data appears in the window below the Criteria fields
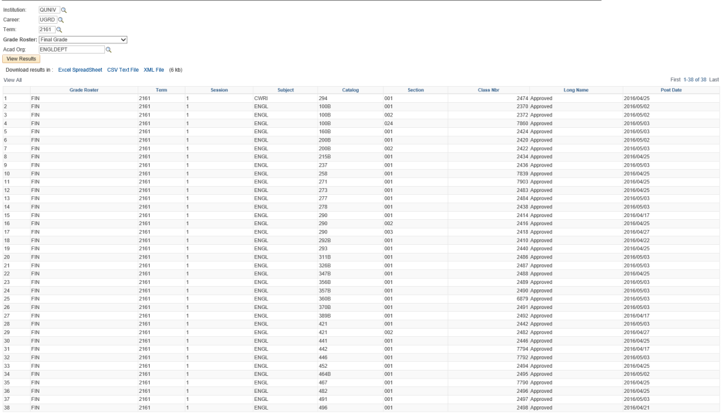
- You can also download the results to an Excel Spreadsheet and save it to your desired drive location. To sort the data, use the tools available in Microsoft Excel
Department Heads will review the grades and set the Grade Roster to Approved. Once approved, they have the option to post the grades.
A Grade Entry Status report can be run by the OUR, Faculty Offices, or Departments to manage the timely entry and approval of grades.
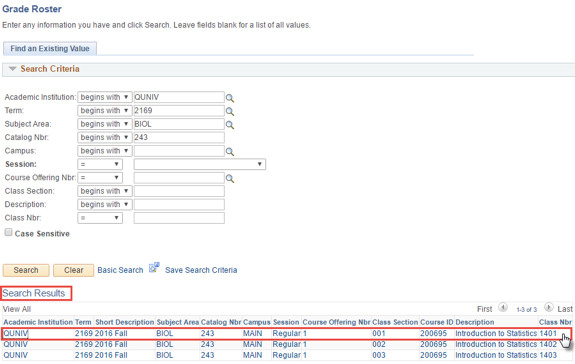
- The navigation to the Grade Roster is:
Main Menu > Curriculum Management > Grading > Grade Roster
- On the Grade Roster page, enter information into the following fields:
- Academic Institution – QUNIV
- Term – Select the Term using the Look Up Tool
- Subject Area – Select the Subject Area using the Look Up Tool
- Catalog Number – Select the Catalog Number using the Look Up Tool
- For this example, the information that we will enter into the fields on the Grade Roster page are as follows:
- Academic Institution – QUNIV
- Term – 2169
- Subject Area – BIOL
- Catalog Number – 243
Click the Search button

- To access the Grade Roster pages, click on any of the links in the row of the course that you want to view
- When the page appears,
- Check to see if the “Approval Status” field is set to “Ready to Review.” If it is,
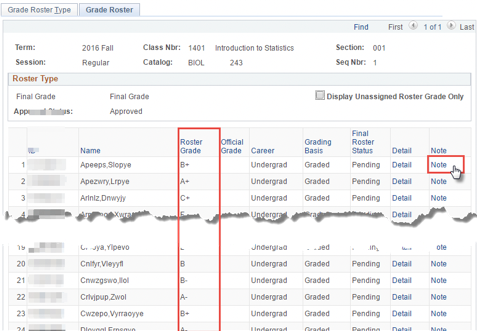
- Click on the Grade Roster tab
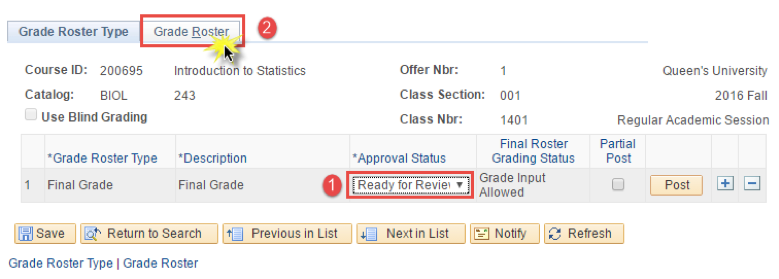
- On the Grade Roster page, you can see and review the marks assigned to each student. The transcript ‘Note’ function is not used
- Once your review is complete, you can click on the Grade Roster Type tab to return to that page
- Change the Approval Status to “Approved”
- Click on the Save button
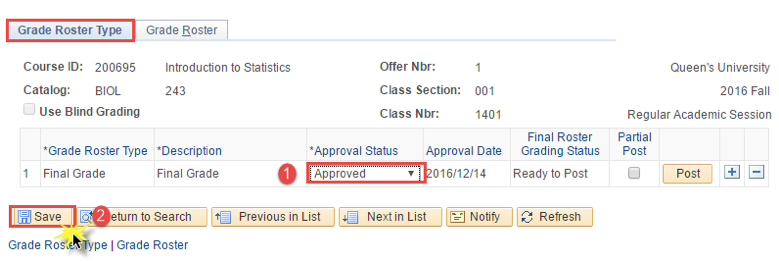
- If you want to Post these grades immediately,
- Click on the Post button and
- Click on the Save button
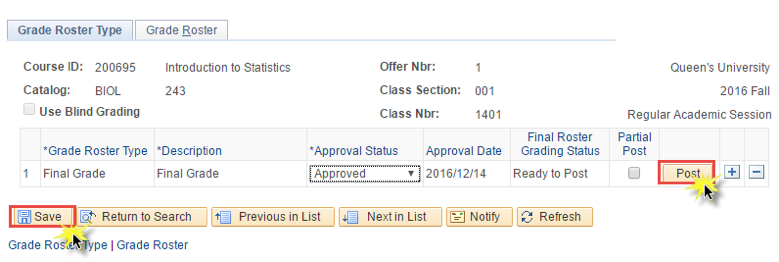
- Note: Once they are posted, students will be able to view their grades in SOLUS, the Student Centre
- Otherwise, the OUR will run a batch process nightly throughout the grading period to post all grades on grade rosters with the Approval Status of “Approved”
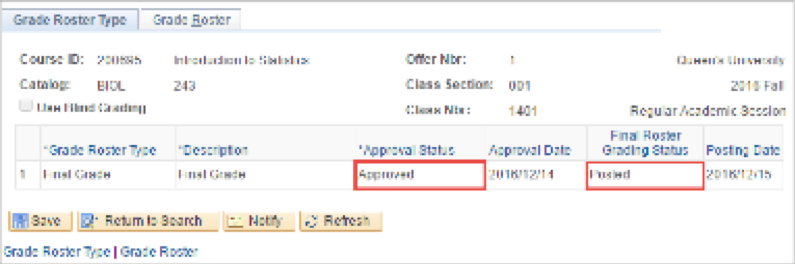
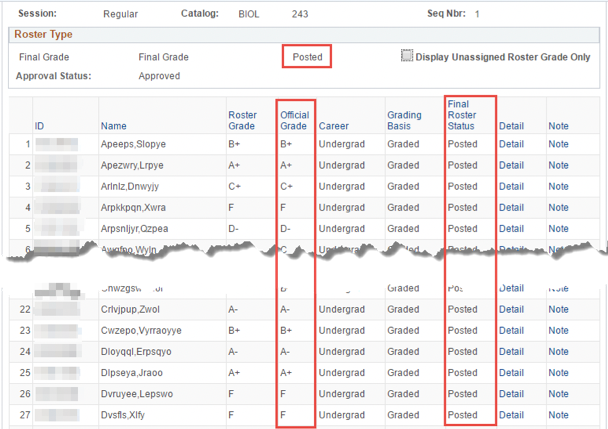
After the grades are posted, the Final Roster Status will display as Posted and the grades will appear in the Official Grade column.
Staff in Departments, Faculty Offices, and the OUR will view student grades for a variety of reasons. These include:
- Grade Specialists responsible for administering processes required to support evaluation of student performance in classes
- Registration Officers responsible for assisting students with enrolment in programs, plans, and courses will view grades
- Departmental Advisors responsible for making academic decisions related to student acceptance in programs and plans, and enrolment in courses
- Grade Assistants responsible for assisting instructors with the administration of their classes will view student grades
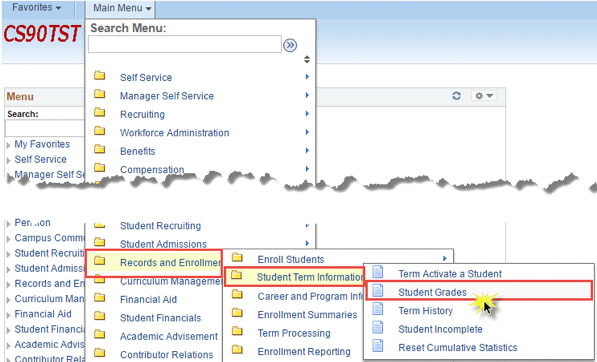
- Begin by clicking on the Main Menu and follow the navigation:
Records & Enrollment > Student Term Information > Student Grades
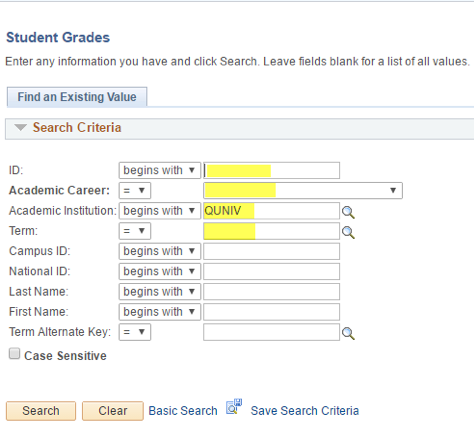
- On the Student Grades page, enter information into the following fields:
- Student ID
- Academic Career – Grad, Undergrad or Non-Credit
- Academic Institution – QUNIV
- Term – Enter a Term Code or click on the Look Up Tool and select from the list of valid values that appear
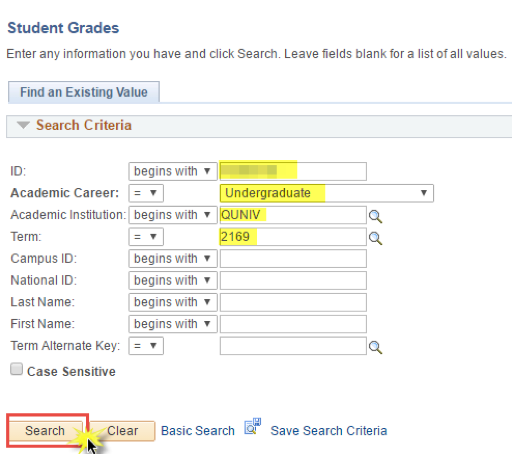
- In this example we have filled in the fields as follows:
- Student ID - 00000000
- Academic Career - Undergraduate
- Academic Institution - QUNIV
- Term – 2169
Click the Search button
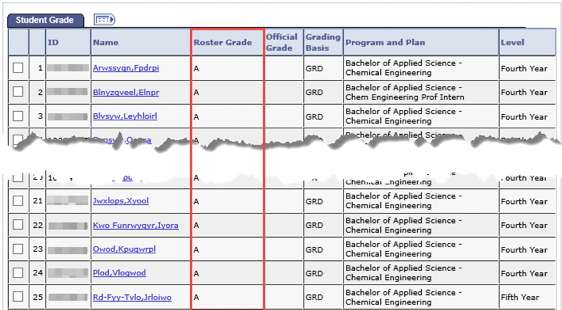
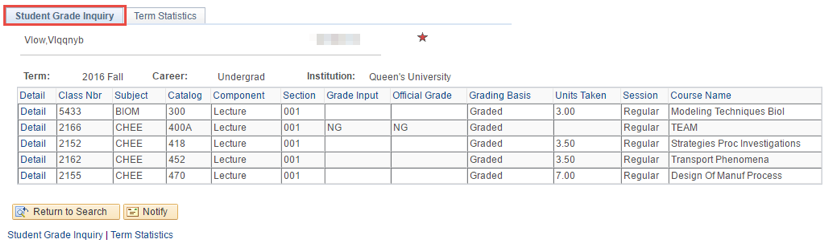
- On the Student Grade Inquiry page, you will see all courses and marks for the student
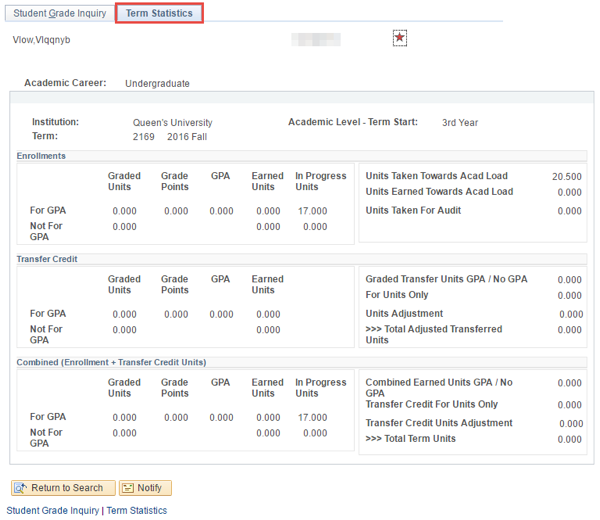
- This is the Term Statistics page
System Support
In order for the Office of the University Registrar to ensure that every issue is recorded and directed to the most appropriate person for follow-up in a timely manner, all support requests should be made directly to the PeopleSoft Student System Support Centre by using the online form.
This "one-window" model of support allows us to provide the most efficient service we can to the entire Queen's community. It offers a better coordinated method of issue tracking, with the following benefits:
- Every support issue is centrally recorded for follow-up in our online issue tracking system, known as iTrack
- Your issue is directed to the most appropriate person for response; and
- The high volume of support requests is managed in the most efficient way, ensuring that you get the help you need as quickly as possible
PeopleSoft Student Systems Access Request Form (Security)
PeopleSoft Student Support Issue Tracking Form (iTrack)
Contacting the PeopleSoft Student System Support Centre Process
- Please fill out the online form with as much detail as possible, and submit it
- Your issue will be recorded in iTrack and you will receive an email assigning an Issue Number for future reference
- The issue is automatically assigned to the expert within the Registrar's Office who is best equipped to resolve the issue
- If your problem cannot be resolved at this level, it will be transferred to a staff member who has further expertise in the PeopleSoft system and/or the business area related to your issue
Blank Page on Term Activate a Student Page
When a student applies for a career, a blank page is created in Records and Enrolment > Student Term Information > Term Activate a Student.
This blank page will remain until the student is matriculated. Because the page is blank, it may seem that there is a problem with the record, but this is normal.
It may seem even more confusing if the student has already been accepted to Queen's (as, for example, an Undergraduate).
When that student applies to a Graduate career, the blank page will appear as the first record, again making it seem like there is a problem.
If the student is never accepted as a Grad Student, that page will always remain there.
Distinguishing Courses by Program when Auditing a Transcript of a Dual Degree Student
The courses are not distinguished by program on a transcript. The transcript simply displays all courses taken in a term.
To see which courses are attached to one of multiple degree programs, go to the Enrolment Summary page (Records and Enrolment > Enrolment Summaries > Enrolment Summary), put in the student number and term, and the courses listed will show the applicable Academic Program.
Setting User Defaults to Pre-Populate Chosen Fields
There are many processes in PeopleSoft that may be repeated several times, each time requiring the input of standard fields.
Where the same value is being inputted into a given field for numerous processes, you can pre-populate these areas using your user default settings (PDF, 73.5 KB).