 Human Rights & Equity Office
Why make videos accessible?
Making videos accessible usually means adding some sort of text equivalent of spoken words through captions, transcripts, or description of the audio. Captions are usually used for individuals who cannot hear the audio it also benefits non-native speakers, users with audio muted or viewers watching a video with poor quality audio.
For education purposes, if a lecture is recorded and put on the web, having captions or transcripts allows everyone to read what is being said or discussed in class. This can provide better comprehension, material review, and information processing for all students with different learning styles.
Legislation
Ontario Regulation 191/11, section 14:
- By January 1, 2014, new internet websites and web content on those sites must conform with WCAG 2.0 Level A.
- As of January 1, 2021, all internet websites and web content must conform with WCAG 2.0 Level AA, other than, success criteria 1.2.4 Captions (Live), and success criteria 1.2.5 Audio Descriptions (Pre-recorded).
WCAG 2.0 Guideline 1.2.1 - "An alternative for time-based media is provided that presents equivalent information for prerecorded audio-only content."
WCAG 2.0 Guideline 1.2.2 - "Captions are provided for all prerecorded audio content in synchronized media, except when the media is a media alternative for text and is clearly labelled as such."
Captioning Basics
Closed vs. Open Captions
Most people are familiar with closed captioning. Closed Captions provide a text equivalent of the audio and can be turned on or off. Most TV’s include the technology to turn on or off closed captions for programming viewed by persons who are deaf or hard of hearing. It is also useful in noisy environments like restaurants and bars.
Open Captions look and display the same information as closed captions except they cannot be turned off. They are a permanent part of the video and are always displayed much like subtitles in a foreign language film.
Transcripts
Transcripts allow anyone that cannot access content from web audio or video to read a text transcript instead. Transcripts do not have to be verbatim accounts of the spoken word in a video but they can contain additional descriptions, explanations, or comments that may be beneficial. Transcripts allow deaf/blind users to get content through the use of refreshable Braille and other devices. For most web video, both captions and a text transcript should be provided.
You can make your own transcripts using speech recognition software such as Dragon Naturally Speaking or speech-to-text built-in to Windows or Mac OSX. The results should be reviewed for errors, especially when low-quality audio or unusual words are used.
More information on Audio Transcripts
Audio Description
Audio descriptions are intended for users with visual disabilities. They provide additional information about what is visible on the screen (e.g. describes non-verbal actions in a program). They are extremely useful on the web if visual content in web video provides important content not available through the audio alone.
Accessible Web-based Videos
Captioning a video on the web involved embedding a file that contains time synchronized text along with the video. On the web, the primary multimedia technologies are Microsoft's Windows Media Player, Apple's Quicktime, RealNetwork's RealPlayer, and Macromedia Flash. Each media player handles captions differently.
To achieve WCAG 2.0 Level A compliance, you need to include either a descriptive text transcript or an audio description (WCAG 2.0 1.2.3). On your webpage, you should take the completed transcript of your captions and add descriptive text that relates what else is going in the video (e.g. actions, body language, scene changes, etc.). Then add a “Transcript” link directly below the video on your web page, and have it link to a separate HTML page containing the transcript.
To provide transcripts and captions you will find you will either have to:
- Create your own (using MS Stream or Panopto);
- Edit the automated captions and transcripts (in the case of videos uploaded to Panopto or YouTube);
- Or out-source to service.
1. Creating Your Own Captions
The technology involved to create automatic captions for videos for your website and online classes has improved over the last few years and involves using systems employing some sort of voice recognition. This method is used by YouTube, Microsoft Stream, and Panopto etc. It is important to note that captions using this method are not 100% accurate and depends on audio quality, if speaker is wearing a mic, more than one speaker, if the speaker has an accent etc. Voice recognition technology will often have difficulties transcribing names, specific terminology (e.g. medical, legal) and acronyms. A good method for adding captions by educators is to add automatic captions to your videos and then editing those captions to improve their accuracy. Below is a method using a) MS Stream, b) Panopto (Queen's Video Streaming Service) and c) Amara to add and edit the captions.
a. Microsoft Stream
Microsoft Stream is an enterprise video service where you can upload, view, and share videos across Queen's Office 365. You can share recordings of classes, meetings, presentations, training sessions, or other videos. Videos can be uploaded on their own and shared individually, or to a chosen group or channel for members to have access to. Microsoft Stream is part of the Office 365 suite of cloud-based services available to all current students, staff and faculty of Queen's University with an active Queen's NetID@queensu.ca email account.
MS Stream has the ability to add automatic captions to uploaded videos. Please note: if virtual meetings using Teams are recorded by the meeting's organizer, the recorded videos are automatically transferred to the meeting organizer's Stream account.
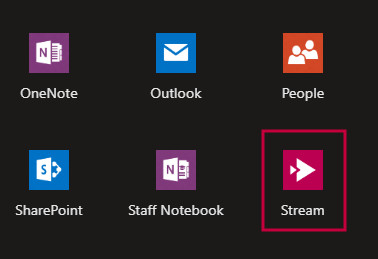
To access MS Stream, log into Office 365 using your Net ID and password and selecting the Stream icon.
Once Stream opens, to upload a video, simply drag and drop the file or select 'Browse' to find the file.

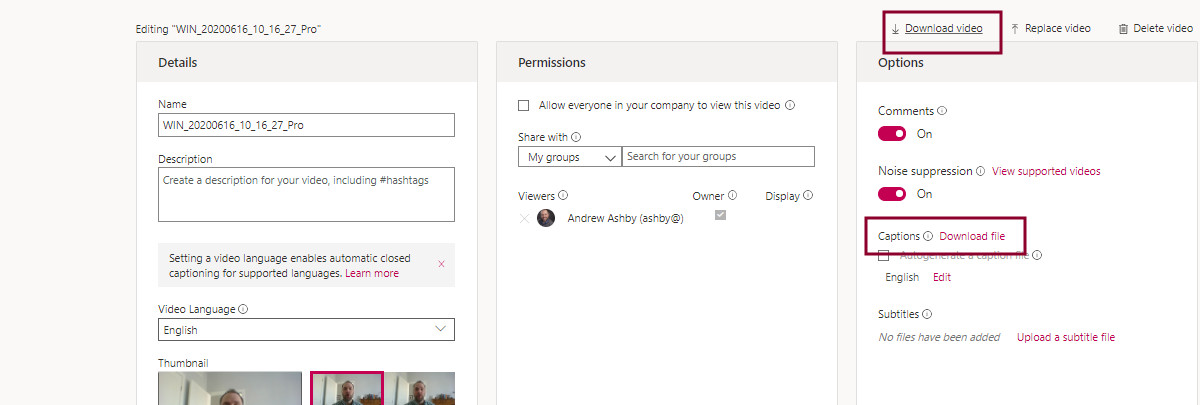
Once the video is uploaded/published, select 'Videos' and then the Pencil icon to update the video details of the video you wish to caption.

Under the 'Details' section on the left, select the video language from the drop-down list. Under the 'Options' section on the right-hand side, check the box next to 'Autogenerate a caption file'. Once the file has been created, select 'Download file' to download the caption file. Select 'Download video' to begin download.
b. Panopto
Panopto was released in 2022 and replaces Ensemble. Login to Panopto: https://queensu.ca.panopto.com/. Learn how to use the application review the support resources from Panopto or Panopto for Instructors created by Queen's University.
2. Editing Captions using YouTube
YouTube can create machine-generated captions automatically. However, the resulting captions may be inaccurate depending on several factors such as audio quality, background noise, or number of speakers.
YouTube also provides a transcript link enabling the viewer to read all the captions in one place. But a transcript of just the captions is not sufficient so you need to add descriptive text (e.g. actions, body language, scene changes, etc)
Editing YouTube’s Automated Captions
When you upload a video to YouTube you may use automatically generated captioning to automatically make captions available. However, the quality of the captions may vary from video to video.
Using YouTube’s caption editor you can correct and clean-up your captions that are automatically generated or captions you have uploaded separately. YouTube’s caption editor allows you to:
- Correct misspellings and remove “like” and “umms”.
- Correct the pacing by shifting words to the next or preceding caption to ensure complete phrases never bridge two captions (i.e. nouns and verbs are connected to their modifiers, and prepositional phrases are not separated)
- Delete blank time segments. It’s best to select the timer on your full-sentence caption and increase the time to run for the duration of the full sentence. The idea is to steal time from pauses to fit in the full text, in situations where it’s difficult to get all the words in… but not to go as far as to replace pauses that are part of “the story”.
Adding Descriptive Transcripts to YouTube
- On the YouTube video page, go to the video’s transcript by selecting the “Transcript” icon and copy and paste it to a text file (e.g. Word);
- Remove/delete the timecodes. Alternatively, you may download the .srt file from YouTube’s caption editor, and remove the timecodes using the free software Aegisub for Windows, OS X, or UNIX;
- Search and replace any extra hard-returns and replace all line endings with single spaces;
- Insert any descriptive text. This can be copy/pasted from scripts if available. E.g. “The woman quietly enters the room and turns on the light”;
- Insert the resulting text into a separate web page on your website. Create a “Transcript” link below the embedded video that links to that web page. Alternatively, if you have room or a short video, you may copy the transcript text and put it below the video (e.g. Health Canada: Reducing Radon in Your Home).
Making your own transcript
Using Voice Recognition
Frequently, people or departments develop scripts to be used in their videos. These scripts already provide the text for a caption or transcript. If you need to create a transcript from scratch you may wish to investigate using voice recognition software. One of the most used is Dragon Naturally Speaking , even the Windows and Mac OSX operating systems have built-in voice recognition. Unfortunately, speech recognition does not offer 100% accuracy and some editing or training with the product may be required.
Speech recognition works best when the system is familiar or trained with one speaker's voice. It does not work well with two or more people having a conversation as the software cannot distinguish between multiple voices. Voice recognition software may also have a difficultly with accurately transcribing certain words like medical or engineering terms. Another drawback is these systems can be easily stymied when a speaker has an accent.
When these conditions exist, the general results of creating a transcript may be poor and usable. Even correcting the files may be more time consuming than creating a transcription from scratch.
3. Out-Source Captioning Services (cost involved)
You may decide to leave it up to the professionals to make caption videos for you. The cost companies charge usually depends on the length of the video and the requested turn-around time. Companies usually charge per minute of video and higher fees quicker turn-around times.