
The holiday season has a way of drawing us back to small rituals anchored in cozy nostalgia: songs hummed without thinking, decorations pulled from a well-worn box, and the smell of freshly baked cookies wafting from the kitchen.
For generations of Queen’s alumni, these traditions have travelled with them from residence kitchens and student apartments to homes of their own. Whether baked as study-session pick-me-ups, treats left out for Santa, or simply to have a sweet bite after shovelling on a snowy winter day, these cookies are a central part of holiday menus for Queen’s graduates. This collection brings together recipes shared by alumni spanning decades and faculties. Some are treasured family hand-me-downs, perfected long before their contributors ever set foot on campus. Others were born in student kitchens with limited counter space and improvised tools. All share a common thread: they are tried, tested, and will be baked again this December.
There are drop cookies, slice-and-bake cookies, and rolled-and-cut cookies to make your own. Let their simplicity shine or decorate them as intricately as you’d like. Conveniently, all these cookie doughs can be kept in the refrigerator – wrapped tightly or in an airtight container – until you’re ready to fire up the oven, for up to a week.
Think of this assortment as a holiday cookie tin assembled by the Queen’s alumni family: familiar, sweet, and meant for sharing.
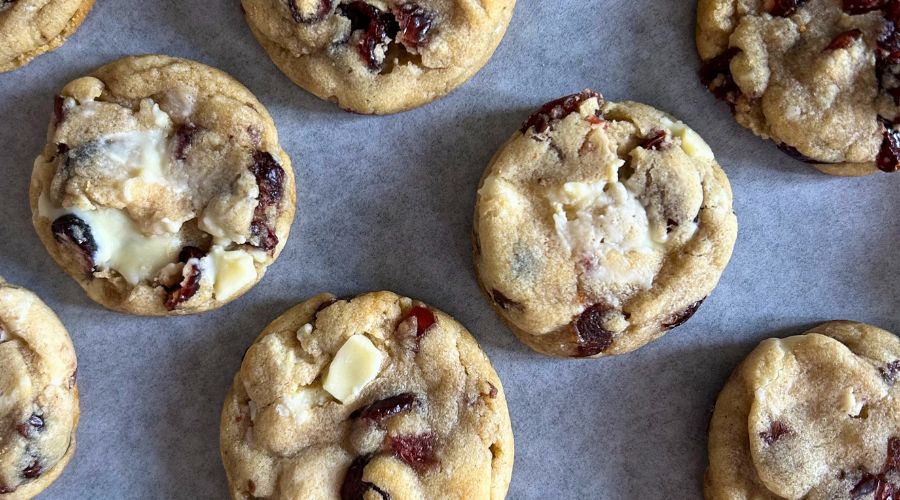
RECIPE 1: Cranberry White Chocolate Chip Cookies
For Queen’s University’s sesquicentennial anniversary in 1991, Cheryl Johnston, Artsci’01, coordinated a cookbook featuring more than 500 recipes submitted by Queen’s alumni and students.
“It sold very well,” says Johnston.
Because email was not yet widely used at the time, she recalls receiving every recipe by mail. Her own contribution was this recipe for cranberry white chocolate chip cookies. The cookbook was a project of the Brockville Branch of the Queen’s Alumni Association.
After graduating from the Kingston General Hospital School of Nursing in 1970, Johnston returned to Queen’s in 1993 to complete a BA in psychology while continuing to work in nursing.
Johnston is part of a Queen’s family: her father, aunt, uncle, sister, husband, son, and several cousins all attended the university.
Each year, when the Queen’s Bands play in Brockville’s Santa Claus parade, the Brockville Branch of the Alumni Association prepares a reception with cookies and squares made from the recipes in the cookbook. Studded with red cranberries and flecks of white chocolate, these cookies look festive by nature.
|
|---|
| ½ cup / 115 grams butter, at room temperature |
| ½ cup / 106 grams brown sugar |
| ½ cup / 126 grams white sugar |
| 1 tablespoon vanilla |
| 1 egg |
| 1 ½ cups / 245 grams all-purpose flour |
| 1 ½ teaspoon baking soda |
| ½ teaspoon baking powder |
| 1 ¼ cups / 165 grams dried unsweetened cranberries |
| 1 ¼ cups / 203 grams white chocolate chip or cream cheese chips |
Directions
- Preheat oven to 375°F. Line three baking sheets with parchment paper.
- In a stand mixer or with a handheld mixer, beat sugar and butter until creamed and fluffy.
- Add egg and vanilla and beat until the colour lightens.
- In a separate bowl, combine flour, baking soda, and baking powder. Add flour mixture to butter mixture and combine well.
- Add the cranberries and white chocolate chips and mix until just combined.
- Scoop in tablespoon sized mounds and place 12 cookies on each sheet.
- Bake for 8-10 minutes.
- Let cool for at least 10 minutes on the baking sheet before moving to a cookie rack to cool completely.
- Store in a covered container. These cookies freeze well.
RECIPE 2: Nanna’s Ice Box Cookies

Betty Butterworth, Arts’64 – still known by her nickname “Butter” to anyone who met her in residence on Adelaide 1 – shared a family recipe that goes back more than a century. Her mother, Dorothy Hammond, first began making these ice box cookies in the 1920s when her own mother became ill and Hammond took on cooking for the family, long before she became known as Nanna to future generations.
Butterworth studied history and political science at Queen’s before going on to teach in Ottawa and Nairobi, travel through Europe and hitchhike across Africa, and eventually work for the provincial government. Most of her career was spent in language training, adult literacy, and immigrant services.
In recent years, Betty reconnected with some of her fellow “Addie 1” first-year students from 1960. They continue to catch up over video calls as a group every few months.
This ice box cookie was the singular Christmas cookie from her childhood, and though she has seen similar recipes online, none quite match her mother’s.
“They’re very handy to make. The fact that you can put them in a roll, and slice them… there’s no fuss,” she explains.
The result is a buttery cookie that’s almost as easy to make as it is to enjoy.
|
|---|
| 1 cup / 226 grams butter at room temperature |
| ½ cup / 106 grams brown sugar |
| ½ cup / 126 grams white sugar |
| 1 egg |
| 1 teaspoon vanilla extract |
| 2 ½ cups / 330 grams all-purpose flour |
| ½ teaspoon salt |
| ½ teaspoon baking soda |
| ½ cup chopped walnuts |
Directions
- In a medium bowl with a hand mixer or a stand mixer, cream the butter and the brown and white sugar together until lightened and fluffy.
- Add the egg and vanilla, and continue to cream mixture.
- In a separate bowl, sift together dry ingredients. And slowly mix them into the butter and sugar mixture.
- Add the chopped walnuts and mix until just combined.
- Roll the two into two logs approximately 1.5 - 2 inches in diameter. Wrap well in parchment paper or plastic wrap, and chill dough for at least four hours, or up to one week.
- When ready to bake, preheat the oven to 400°F and line baking sheets with parchment paper.
- Cut logs into thin slices (approximate ¼ inch) and place cookies two inches apart on the baking sheets.
- Bake for 10 minutes, until cookies have become a very light golden-brown.
- Let cookies cool on baking sheets for a few minutes, then move cookies to the cooling rack to cool completely.
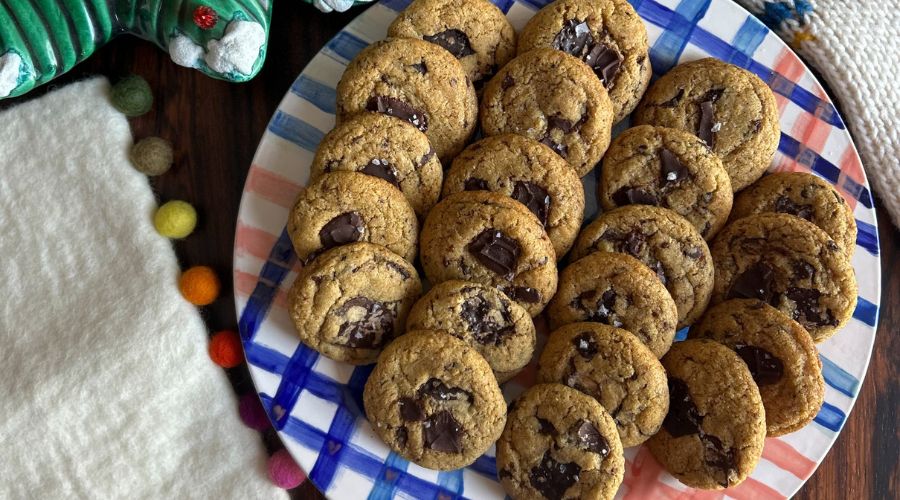
RECIPE 3: Olive Oil Chocolate Chip Cookies
If there are skeptics about using olive oil in a chocolate chip cookie recipe, Katherine Bruzzese (née Gross), ConEd’11, Ed’12, is looking to change hearts and minds.
“While it may seem odd at first, it gives these cookies a fruity and earthy note,” she explains. “Once you’ve tried it, these are sure to be in your rotation.”
Bruzzese now leads a high-school English department and has continued to do additional teaching qualification courses through Queen’s since graduating. With two young children accompanying her in the kitchen these days, it’s a slightly different scene, but these cookies bring her back to fond memories of making cookies in a stovetop pan when the residence oven wouldn’t work or baking a big batch to give to friends before exams.
The flavours from the olive oil really do shine through in these cookies once baked, so be sure to pick a good-quality oil to work with. (As a bonus, these cookies happen to be a decadent dairy-free option to accommodate that dietary restriction this holiday season.)
“They really are the bomb,” Bruzzese chuckles.
|
|---|
| ¾ cups / 145 grams brown sugar |
| 1 large egg |
| 1 teaspoon pure vanilla extract |
| 1⁄2 teaspoon fine sea salt and more to sprinkle on top after baking |
| 1⁄2 cup / 105 millilitres olive oil |
| 1 teaspoon baking soda |
| 1 1⁄2 cups / 200 grams all-purpose flour |
| 1 cup / 150 grams dark chocolate chips (you can use milk chocolate or semisweet if you prefer) |
Directions
- In a medium sized bowl, whisk together the sugar, vanilla, and oil until incorporated. It should be shiny and glossy.
- Whisk in the egg until just combined.
- Mix the dry ingredients in a separate bowl.
- Add the dry ingredients to the wet ingredients by gently folding to combine.
- Fold in the chocolate chips and mix until just combined.
- Cover the bowl tightly (or scoop dough into an airtight container) and put it in the fridge overnight. Since the olive oil is wet, the flour needs time to absorb it, and the gluten needs time to rest. Trust me, the time is worth it for how decadent these cookies will be.
- Preheat the oven to 350°F.
- Scoop the cookies into balls to your desired size on baking sheets lined with parchment paper.
- Bake for 9-12 minutes until the edges are golden.
- Remove from the oven and sprinkle each cookie with a bit of sea salt to make them extra special.
- Let cool on the pan for a few minutes, then transfer to a rack to finish cooling.
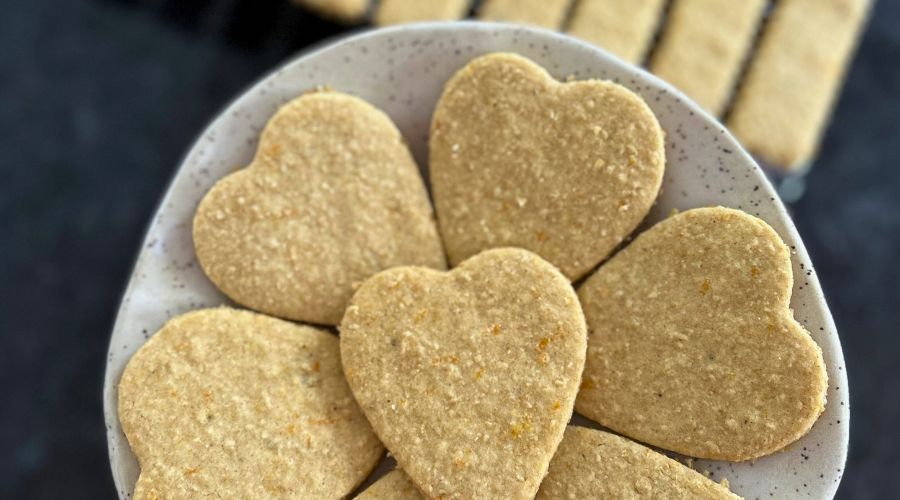
RECIPE 4: Orange Cardamom Cookies
“When money was tight during school, I'd make cookie baskets for friends at Christmas and these were always the ones that got the biggest reaction,” Dawn Smeaton (née Moravec), Com’00, recalls.
Initially inspired by a housemate who would make oatmeal cookies as gifts, Smeaton took to baking in their little kitchen off campus.
“It was a big house for me and my four roommates, but the kitchen was tiny,” she reminisces. “There was about one square foot of counter space.”
Once the dough is rolled out, it can either be cut into straightforward rectangles with a handy pizza cutter, or with any cookie cutter for a variety of shapes.
Nowadays, Smeaton lives in Nova Scotia near the ocean and hosts an annual Christmas cookie party, making dough and cookies in advance for guests to roll out and decorate as they choose.
“It’s a nice alternative or addition to classic gingerbread,” she explains, noting that the orange and cardamom combination is different enough to be interesting, but still feels seasonal.
|
|---|
| 320 grams all-purpose flour |
| 1 teaspoon ground ginger |
| Handful of crushed cardamom pods, seeds only (use approximately 12 cardamom pods or ½ - 1 teaspoon of cardamom powder) |
| ½ teaspoon baking powder |
| ½ teaspoon sea salt |
| 170 grams unsalted butter, at room temperature |
| 140 grams granulated sugar |
| 2 tablespoons freshly grated orange zest (from about two large navel oranges) |
| 2 teaspoons vanilla extract |
| 1 large egg, at room temperature |
Directions
- In a medium bowl, whisk together flour, ginger, ground cardamom seeds, baking powder, and salt.
- In a separate large bowl using an electric mixer on medium speed, beat together butter, granulated sugar, orange zest, vanilla extract, and egg. Add flour mixture to butter mixture and beat until just combined.
- Set a 12-by-16-inch sheet of parchment paper on a work surface. Set the dough on top and cover with another piece of parchment. Roll dough into an even ¼-inch-thick rectangle, squaring off the edges. Set the dough, still sandwiched in parchment, on a rimmed baking sheet and refrigerate until very cold and firm, about 30 minutes.
Or: Pat dough into a round disc, and cover tightly in plastic wrap. Refrigerate for the 30 minutes or until ready to bake. - Heat oven to 350°F. Line two baking sheets with parchment paper.
- Pull the dough from the fridge, and, working quickly, cut dough using a ruler and pizza cutter into 1-by-2 1⁄2-inch rectangles. If dough is still cold, separate rectangles and place on prepared baking sheets ¼ inch apart. If the dough has gotten warm, chill (or freeze) it until cold before baking.
Or if dough is wrapped, unrolled: Roll dough out to ¼-inch-thick and cut, either with a ruler and a pizza cutter, or with desired cookie cutters. - Bake, rotating halfway through, until golden brown, 10 to 12 minutes.
- Transfer cookies to a rack to cool completely, about 30 minutes.
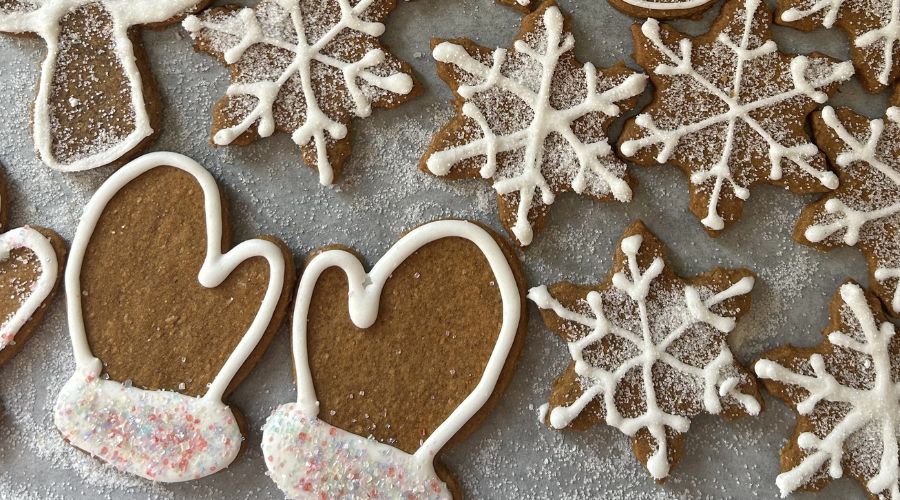
RECIPE 5: Piparkoogid – Vanaema’s Estonian Gingerbread Cookies
This recipe for Vanaema’s (Estonian for grandmother) gingerbread has been in Wendy Cronkwright’s, BNSc’97, family for four generations.
Gingerbread is a staple in Estonian Christmas traditions and would always be on the table in December. As the first-generation Canadian of her family, Cronkwright has kept this Baltic tradition going strong and continues to make these cookies annually with her own children.
Describing baking as a lifelong interest, Cronkwright remembers making these for fellow students and even her now-husband, who had never tasted better cookies. “They are what convinced my husband to marry me,” she laughs.
This gingerbread is meant to be soft, not crunchy. “It’s partly by design of the recipe and partly by personal preference,” Cronkwright explains of the texture, noting that it’s part of their appeal.
Once rolled out, Wendy likes to cut the cookies with simple and traditional seasonal shapes. They are often nature-inspired, and Wendy lists favourites like mushrooms, trees, or acorns.
No matter the shape, these nostalgic cookies are sure to be crowd-pleasers.
|
|---|
| 1 cup / 250 grams shortening |
| 1 cup / 200 grams sugar |
| 1 egg |
| 1 cup / 330 millilitres molasses |
| 2 tablespoon vinegar |
| 5 cups / 685 grams all-purpose flour |
| 1 ½ teaspoon baking soda |
| ½ teaspoon salt |
| 2 teaspoon ginger |
| 1 teaspoon cinnamon |
| 1 teaspoon cloves |
Directions
- In the bowl of a stand mixer or with a handheld mixer and a medium bowl, thoroughly cream shortening with sugar.
- Stir in egg, molasses, and vinegar. Beat well.
- Sift together the dry ingredients. Stir into molasses mixture.
- Divide dough into two balls and pat into flattened discs, wrap in plastic wrap, and chill for two to three hours or overnight in the fridge to let flavours develop.
- When ready, remove dough discs one at a time and let warm up slightly so it is easier to roll out the dough.
- Using a lightly floured rolling pin on a floured surface, roll dough out to approximately ½ inch thick.
- Cut out holiday shapes using festive cookie cutters and transfer to baking sheet lined with parchment paper. Bake at 375˚F.
- Adjust baking time depending on size of cut out cookies: approximately four minutes for small cookies, and five minutes for larger ones.
- Cookies will be soft and remain so if stored while warm in an airtight container.
RECIPE 6: Mary’s Shortbread Cookies
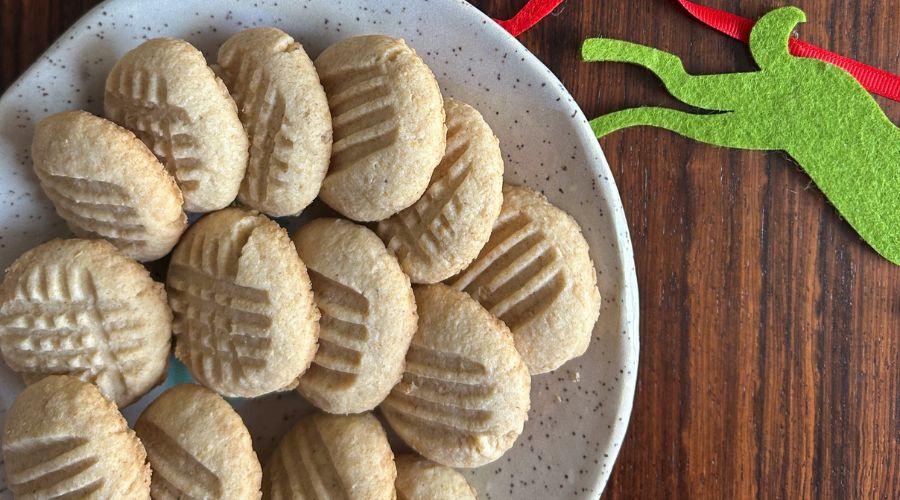
With three adult children, Mary Cuthbert (née Majoros), Arts’71, used to spend all her spare time preparing an array of desserts for their arrival over the holidays.
“I would knock myself out each Christmas making a fine assortment of cookies,” she recalls.
Until finally, one year, her son suggested that she take the pressure off all the baking and simply focus on his favourite: a classic shortbread.
Luckily, it’s a favourite of Cuthbert’s, too. “I bake very few desserts now, but shortbread gets me every time,” she chuckles.
Cuthbert and her husband both grew up in Kingston, and though her career as a kindergarten teacher took her away from her hometown, they still make it back to Queen’s for occasional visits; the couple attended the Homecoming football game this year.
Her shortbread method is straightforward – she likes to blend the cubed butter into the dry ingredients with the back of the spoon.
“Just keep going and trust the process,” she says, noting that it's a good workout if done by hand, though an electric mixer works too.
With shortbread now the star of the show for her family’s holidays, Cuthbert makes plenty to share, with a tin to go for each of her kids.
“Everyone is happy!” she says.
|
|---|
| ½ cup / 75 grams cornstarch |
| ½ cup / 70 grams icing sugar |
| 1 cup / 170 grams all-purpose flour |
| ¾ cup / 180 grams butter |
Directions
- Sift corn starch, icing sugar, and flour together.
- Blend in butter with a spoon, mixing until a soft, smooth dough forms.
- Shape dough into 1-inch balls, and place about 1 ½ inches apart on an ungreased cookie sheet. (If the dough is too soft to work with, cover and let chill in the fridge for one hour.)
- Flatten dough balls with a lightly floured fork.
- Bake at 300˚F for 20-25 minutes, until the cookies’ edges are just lightly browned.
Did you make any of these cookies yourself? We’d love to see your creations! Tag us in your stories on Instagram and Facebook.