 Human Rights & Equity Office
Why make documents accessible?
Making accessible documents ensures that they are usable by the widest range of users, but also ensures your document is easier to edit and navigate. It is important to make these changes to Word documents to accommodate a variety of disabilities. For example, many people with visual disabilities use screen readers which read aloud information on the screen such as text or image descriptions provided through alternative text (Alt Text).
If you plan, format, and structure your document correctly in the beginning, it will ensure the file is not only accessible but can also be converted into a variety of different alternate formats (e.g. PDF or braille) while retaining its accessibility features.
Legislation
As of January 1, 2013, Ontario Regulation 191/11, section 15: requirement to provide educational or training resources or materials in an accessible format, if notification of need is given.
If posting document online - By January 1, 2014, Ontario Regulation 191/11, section 14: new internet websites and web content on those sites must conform with WCAG 2.0 Level A and by January 1, 2021, all internet websites and web content must conform with WCAG 2.0 Level AA.
As of January 1, 2015, Ontario Regulation 191/11, section 12: requirement to provide, upon request, accessible formats and communication supports.
What are Accessible PDF files?
Usually, accessible PDF files are “tagged” documents. Tags are hidden accessible elements that provide structure for screen readers.
PDF files are usually created from applications such as Microsoft Word or PowerPoint but there are many more. Creating accessible PDF files depends on the accessibility of the original document like the use of headings, alt text for images and colour contrast etc. for example. Please view tutorials for Creating Accessible Word Documents for Word, or Mac, Creating Accessible PowerPoint Presentations Word, or Mac for more information.
Although you can create PDF files using several programs, it is best practice to use Adobe Acrobat Professional in conjuncture to evaluate, repair, and enhance the accessibility of existing PDF files.
Best Practice
Even though MS Word has the ability to create tagged PDF natively (i.e. File >> Save as >> PDF):
- PDF files should not be used as the sole source of information on your website and you should consider using a PDF in the first place. Whenever possible, the information should also be contained on the webpage itself, in an accessible Word Document or post the PDF file alongside the Word document to minimize accessibility issues.
The method used to create the best results using Microsoft Word or PowerPoint files:
- Create an accessible document with headings, alternate text, etc. Please view other tutorials in the Accessibility Hub for detailed information on achieving this.
- Install Adobe Acrobat Professional available for faculty and staff ONLY.
Create a Tagged PDF file using MS Word
Using Word Windows
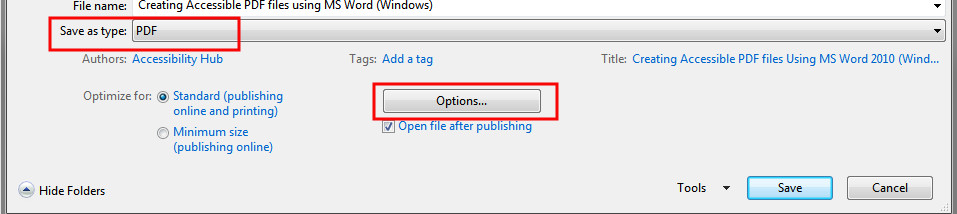
- Click File > Save As and choose where you want the file to be saved.
- In the Save As dialog box, choose PDF in the Save as type list.
- Click Options
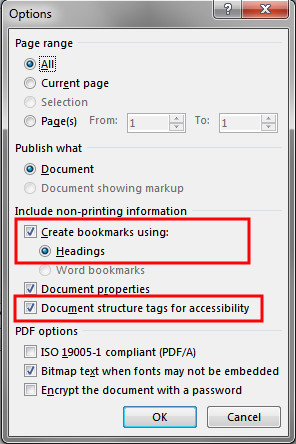
This opens a new dialogue window. With the Options dialogue open, check Document structure tags for accessibility and check Create bookmarks using and the Headings option.
Using Word for Mac
Using MS Word for Mac 2016, it is now possible to save your Word document as a tagged PDF.
- Select File > Save As (or press Command+Shift+S), type the file name in the Save As text box, and then choose where you want the file to be saved.
- In the Save As dialog, go to the File Format drop down box. Use the Down Arrow to browse through file types, and select PDF.
- Select the radio button "Best for electronic distribution and accessibility (uses Microsoft online service)." This ensures the PDF is tagged.
- Select Save.
Using Adobe Acrobat Professional
Now that you have a saved PDF file, you need to ensure the tagging and reading order allow for proper accessibility. As previously mentioned, Adobe Acrobat Professional is used to evaluate, repair, and enhance the accessibility of existing PDF files. The software is available for departments, faculty, staff, and students.
Tags
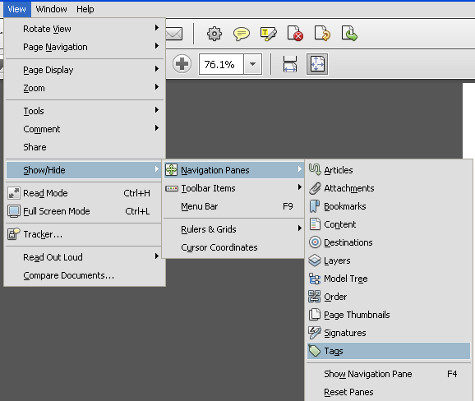
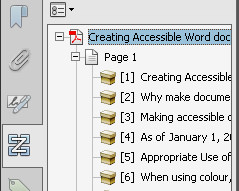
One step of checking the accessibility of the document is to view the tags. The Tags pane can be opened by selecting View, then Show/Hide, then Navigation Panes, then Tags.
Within the Tags pane, you may view, reorder, rename, modify, delete, and create tags.
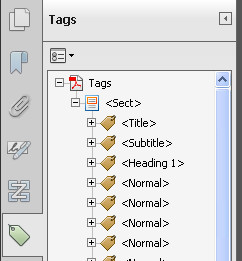
By selecting each tag in the list, the corresponding content in the document will be highlighted (if not, check Highlight Content from the Options menu ![]() )
)
Add tags to an untagged document
Tags may be added to an untagged document, choose Tools from the right-hand menu, select Accessibility, then Add Tags to Document.
TouchUp Reading Order
With this tool, the user can add and edit PDF tags and view the reading order of elements on the page. It is important to note that this method should not take the place of using the Tags pane. Certain tags, such as lists, are only available in the Tags pane.
To use the tool, select Tools from the right-hand menu, then Accessibility, then TouchUp Reading Order.
You will notice a couple of things. First, all the content of your document will be enclosed by various numbered boxes. These boxes represent a tag and the number corresponds with the tag number in the Order pane (more information in the next section). Secondly, the TouchUp Reading Order window will also open.

The window has groups of buttons so you can edit and add tags to any numbered block of text in your document or selected text/objects of your choice.
Order Pane
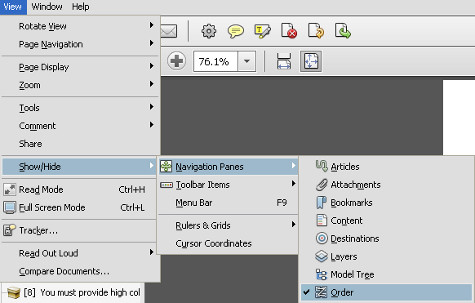
The Order pane allows you to change the reading order of the content on the page so it matches the visual reading order. To open the Order pane, select View, then Show/Hide, then Navigation Panes, then Order.
The Order pane divides the document into pages and every element is ordered into the reading order. This makes changing the tags and reading order much easier by simply drag-and-drop the elements into the desired order.
Checking Accessibility
Adobe Acrobat Professional X can run an Accessibility Full Check. This can be a good tool to ensure that nothing was overlooked. Run the full check by, selecting Tools in the right-hand column, then Advanced, then Accessibility, then Full Check. This action opens another window. On the bottom right-hand side select Start Checking. This will generate a report of accessibility errors and tell you how to fix them.
Action Wizard
The Create Accessible PDFs” Action Wizard in Acrobat X is a tool to ensure that you don't miss any steps while making your document accessible. To run the wizard, select the Tools in the right-hand column, then Action Wizard, then Create Accessible PDFs.
Read Out Loud
Read Out Loud is a built-in voice synthesizer that is available in Adobe Reader and Acrobat that reads the content of a PDF document out loud to you. You can get a good idea of what screen reader users encounter.
PAC
For more in-depth accessibility testing of your PDF files, we recommend using PDF-Accessibility-Checker PAC 2024 sometimes just called PAC. PAC provides very thorough testing and a detailed report of any issues.