Site Administrators, Publishers, and Editors can create the following content types:
Create a "Basic page"
- In the Administration menu at the top of the page, click "Shortcuts"
- Click "Add basic page"
- The Create Basic Page screen will open
- In the Title box, enter a name for the page. This title will be used as the page's main heading, as well as the URL. It will also be used as the menu link title, but can be changed
- In the Body section, enter the contents of your page or insert a paragraph type
- When finished, look to the right-hand side of the page
- In the Menu Settings area, check the box beside Provide a menu link
- The Menu link title is the same as what you placed in the Title box at the top of the page. You can change this, but remember to keep it short as it will be on a menu
- (Optional) Add a Description to the page. This will be visible when moused over in the navigation menu of your site
- From the Parent item drop-down, choose the page you want to become the parent of the new page. If you select the main menu, your page will become a tab
- If the weight is left as the default, 0, and there is more than one page with a weight of 0, they will be sorted alphabetically
- Click the "Save" button. A draft of your page will be saved.
Create a "Homepage"
A website's front page may be created using a Basic page content type.
Alternately, a front page can be created using the Homepage content type, which offers all the options of a Basic page but offers some additional options.
Important: any site should only have one page that uses the Homepage content type, set to the front page.
To add a front page using the Homepage content type:
- Go to Content > Add content
- Select "Homepage"
-
- In the Title box, enter a name for the page. This title will be used as the page's main heading, as well as the URL. It will also be used as the menu link title, but can be changed.
- Optional: use the "Hide Title" checkbox to hide the page title on the homepage
- Optional: in addition to the Slider paragraph, you can add a Site Branding paragraph to the homepage
- In the Body section, enter the contents of your page or insert a paragraph type
- When finished, look to the right-hand side of the page
- Click the "Save" button. A draft of your page will be saved.
- To set your Homepage content type to act as your front page, submit a request to IT Services.
Homepage example with Site Branding
Create an "Article" (i.e. a news item)
Unlike the previous version of WebPublish, in WebPublish 3.0, you don't need tags for your news because it's a separate content type from the basic page. Just by creating a News Article you're setting that page up to be used in a variety of contexts.
- In the Administration menu at the top of the page, click "Shortcuts"
- Click "Add article"
- The Create Article screen will open
- In the Title box, enter a name for the page. This title will be used as the page's main heading, as well as the URL. It will also be used as the menu link title, but can be changed
- (Optional) Enter a Subtitle for your article
- (Optional) Enter a Byline for your article. This is displayed at the top of the page as well as on the aggregator page
- In the Body section, enter the contents of your page
- (Optional) Modify the Published Date
- (Optional) Enter a Short Title for your page
- (Optional) Enter a Teaser for your article. This is displayed on the News Feed Block as well as the aggregator page
- (Optional) Add a Featured Image. This is displayed on the News Feed Block as well as the aggregator page
- You can upload a picture directly to the News Article, or you can upload/use an image from the file browser. It is recommended that you upload all images to the file browser so they can be easily reused on your site
- Drag the crosshairs to the focus of the image. This will help keep focus when WebPublish automatically resizes the image
- Add alternative text to the image
- When finished, scroll to the top right-hand side of the page
- (Optional) Add Link Text. This is displayed in the News Feed Block and will link users back to the article. Link text for each article should be unique.
- (Optional) Add Article Tags. Article tags can be created by following the instructions in our Taxonomy tutorial and adding terms to the Tags vocabulary. These tags can be used to filter the results that display in your News Feed Block.
- Click the "Save" button. A draft of your page will be saved
Create an "Event"
Unlike the previous version of WebPublish, in WebPublish 3.0, you don't need tags for your events because it's a separate content type from the basic page. Just by creating an Event page you're setting that page up to be used in a variety of contexts.
- In the Administration menu at the top of the page, click "Shortcuts"
- Click "Add event"
- The Create Event screen will open
- In the Title box, enter a name for the page. This title will be used as the page's main heading, as well as the URL. It will also be used as the menu link title, but can be changed
- In the Body section, enter the contents of your page
- Add the start and end dates and times of the event. This is displayed on the Events Feed Block as well as the aggregator page and the event page itself. You can optionally select if this is an all day event.
- (Optional) Add a location. This is displayed on the Events Feed Block as well as the aggregator page and the event page itself
- (Optional) Add a location URL for an online meeting. If this field is used, the location in step 5 will be the link text.
- (Optional) Add a Hero Image. This is displayed at the top of the event page and acts as a partial background for the event information.
- Drag the crosshairs to the focus on the image. This will help keep focus when WebPublish automatically resized the image
- Add alternative text to the image
- (Optional) Add a Featured Image. This is displayed on the Events Feed Block as well as the aggregator page
- You can upload a picture directly to the Event, or you can upload/use an image from the file browser. It is recommended that you upload all images to the file browser so they can be easily reused on your site
- Drag the crosshairs to the focus of the image. This will help keep focus when WebPublish automatically resizes the image
- Add alternative text to the image
- (Optional) Add a Teaser. This is displayed on the Events Feed Block as well as the aggregator page
- (Optional) Add Link Text. This is displayed on the Events Feed Block as well as the aggregator page. It is recommended that each event have unique link text.
- (Optional) Add Event Categories. You can add event categories for your event by following the instructions on the Taxonomy tutorial and adding terms to the Events vocabulary. You can use these categories to filter the results displayed in the Events Feed Block.
- Click the "Save" button. A draft of your page will be saved
View the tutorial on Publishing/Unpublishing Content to learn more about moderation states and make your page live.
Create a "People Directory Entry"
- In the Administration menu at the top of the page, click Content, then select "Add Content"
- Click "Add People Directory Entry"
- The Create People Directory screen will open
- In the Display Name field, enter the full name of the individual for whom you are creating a profile. This name will appear in the searchable directory page
- (Optional) Add a Photo. This is displayed on the individual profile page and the searchable directory page
- You can upload a picture directly to the People Directory Entry, or you can upload/use an image from the file browser. It is recommended that you upload all images to the file browser so they can be easily reused on your site
- Drag the crosshairs to the focus of the image. This will help keep focus when WebPublish automatically resizes the image
- Add alternative text to the image
- (Optional) Add a First name: This will be combined with the given name and used as the main title for the individual profile page
- (Optional) Add a Last Name: This will be combined with the surname and used as the main title for the individual profile page
- (Optional) Add a Position / job title: This will be displayed on both the individual profile page and the searchable directory page
- (Optional) Add a Pronoun, Designation, etc.: This will be displayed on the searchable directory page
- Add a Department: This will be displayed on the individual profile page and the searchable directory page
- (Optional) Add a Faculty: This will be displayed on the individual profile page and the searchable directory page
- (Optional) Add a Department: This will be displayed on both the individual profile page and the searchable directory page.
- (Optional) Add a School: This will be displayed on the individual profile page
- (Optional) Add a Unit: This will be displayed on the individual profile page
- (Optional) Add an Email: This will be displayed on the individual profile page and the searchable directory page
- (Optional) Add a Phone Number: This will be displayed on the individual profile page and the searchable directory page
- (Optional) Add an Office Location: This will be displayed on the individual profile page and the searchable directory page
- (Optional) Add Office Hours: This will be displayed on the individual profile page and the searchable directory page
- (Optional) Add an Affiliation: If your site administrator has setup affiliations, you can check the ones that apply to this profile. Affiliations will not be displayed on the individual profile page or the searchable directory page, however users will be able to use them to filter their searchable directory results. Affiliations can be added by following the Taxonomy tutorial and adding terms to the Affiliation vocabulary
- (Optional) Add a Website. If you would like to link the user's profile to their individual website, add the URL and Link text you'd like to display in the Website field. This will appear in both the individual user profile and the aggregated people directory view
- (Optional) Add a Short Description: This will be displayed on the searchable directory page
- (Optional) Add information about the individual: This will be displayed on the individual profile page
- Click the "Save" button. A draft of your page will be saved. Note: your entry will not be displayed on the searchable directory page until it is published.
Create a "Course"
Note: Before creating a course, you should populate the Term and Course Type vocabularies. See the Taxonomy documentation.
- In the Administration menu at the top of the page, click Content, then select "Add Content"
- Click "Course"
- Add a title to the course. This should be the full name of the course (not the course code).
- (Optional) Add a Teaser: The teaser will be used on the course aggregation page.
- Add a photo to the course.
- Add the Course Units.
- Add the Hours Per Week.
- (Optional) Add a Button Link and Link Text: This can be a link related to the course.
- Add Course Delivery.
- Add the course code (Note: this will become the URL of the page)
- Select the Course Type.
- Select the Course Term.
- (Optional) Add a Course Description.
- (Optional) Add Course Learning Outcomes.
- (Optional) Add Course Assessments.
- Note: to remove Course Assessments, click the three vertical dots beside "Course Assessment..." and then Remove.
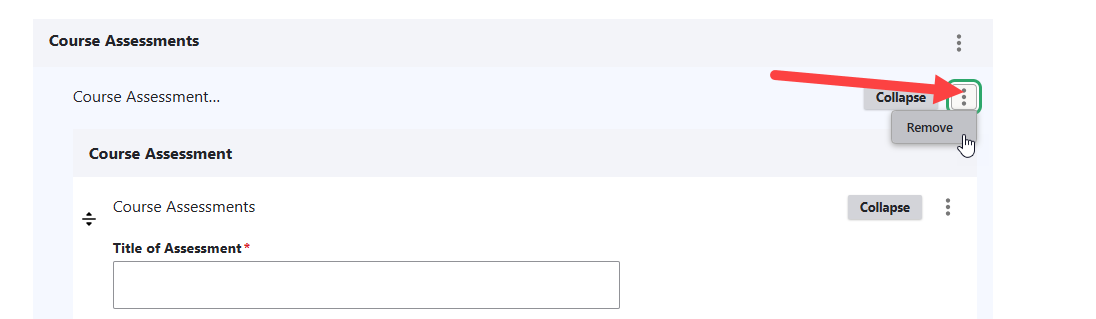
- Note: to remove Course Assessments, click the three vertical dots beside "Course Assessment..." and then Remove.
- (Optional) Add an Extra Body: Use this to add more information about a course that isn't covered by the preset fields available.
- Add Course Prerequisites: Create a bulleted list for all the course prerequisites. If there aren't any, leave the default value of "None."
- Add Course Exclusions: Put each exclusion inside it's own paragraph tag. If there aren't any, put "None."
- Add Course One-Way Exclusions: If there are no exclusions, put "N/A" or "None."
- (Optional) Add Learning Tracks: This text can be a link.
- (Optional) Add Course Competencies: Use a bulleted list.
- (Optional) Add a Course Delivery Method: Use a bulleted list.
- Add Course Materials: List the course materials in a bulleted list. If there isn't any, put "None."
- Click the "Save" button. A draft of your page will be saved. Note: your course will not be displayed on the searchable course directory until it is published.
View the tutorial on Publishing/Unpublishing Content to learn more about moderation states and make your page live.