View the example page to see this paragraph-type in action.
Guidelines for use
- This block is always used at 100% width of the page container (not the browser window).
- If the heading and description fields are filled in, then the links will stack into two columns. If the heading and description fields are left empty, then the links will go to a 4 width column layout.
- You can put an unlimited amount of links.
- Links will display in order from left to right in the same order they are input into the editor window. If a row has no more room to display links (depending on the users screen size) the links will break to a new line.
- Use this paragraph to add links to other pages that relate to this content.
- Try not to mix internal site links with links out to other sites in the same link set paragraph.
- Though the number of links is unlimited, a giant list starts to pose usability issues - i.e. a long list can be hard to sift though. If you have more than 10-12 items in a list, introduce categories/headings to break your content into separate lists.
- Impose a logical or intuitive order on your list items, such as listing chronologically, alphabetically or by order of importance.
- Keep list text concise.
Elements
Heading: An optional <h2> heading (required when "Description" text field is filled). Maximum character count: 100.
Description: Optional <p> paragraph text. Maximum character count: 500
Icon: Optional. Uses a Font Awesome icon picker tool.
List item and link: Maximum character count:80
Most websites contain a large amount of information. Lists help you organize that information so that it is more easily consumed. Anywhere you find a list of items within a paragraph, think about how that part of the paragraph can be re-written and formatted as list.
In most cases you will simply use the list tool in the WYSIWYG editor area.
Use of this Link Set paragraph is most appropriate for high level links that aid in navigation. For example, a list set might be used to lead readers to content sections on the same page -- i.e. using links and anchors
Links will stack on mobile.
How to implement
-
Create a Basic Page.
-
Scroll down to the Paragraphs section, click the drop-down arrow, and click "Add Link Set".

-
Proceed to the Overview of a Link Set section of this guide below.
-
Once you've added your Link Set content, choose your publishing options and click Save at the bottom of the page.
Overview of a Link Set
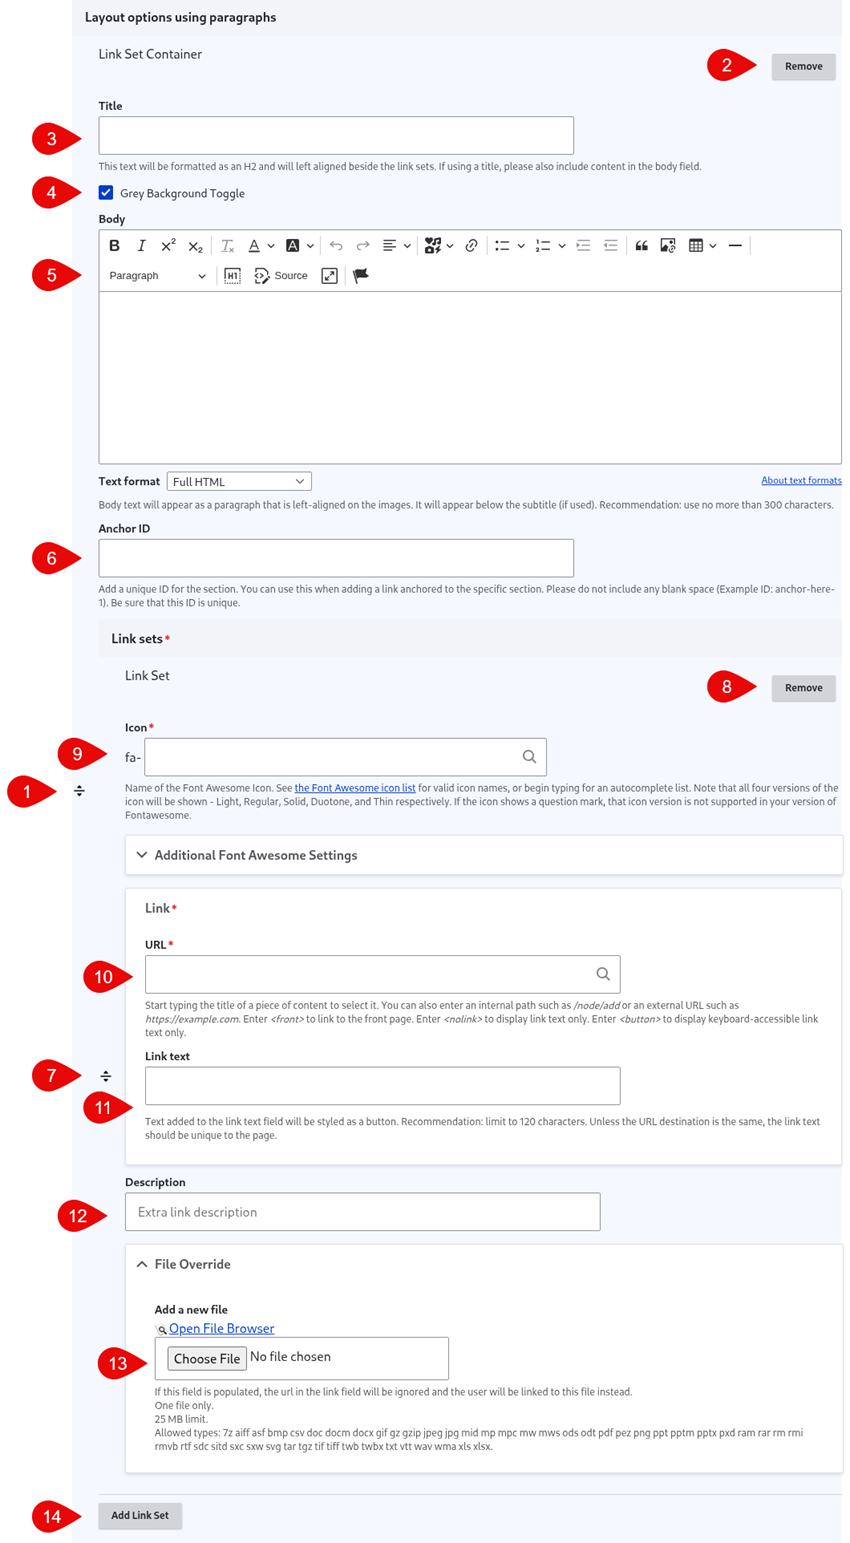
- Click and drag the crosshairs handle to rearrange your paragraphs.
- Remove this entire paragraph.
- (Optional) Title - this title appears to the left of the links. The Title field becomes mandatory once something has been entered in the Body field. Restricted to 100 characters
- Grey Background Toggle - if this option is unchecked, the divider will appear on a white background. If it is checked, it will appear with a grey background. Only use the grey background if you are adding a divider between two paragraphs that also use a grey background.
- (Optional) Body - this body appears to the left of the links. Restricted to 500 characters
- (Optional) Anchor ID - add a unique ID if you'd like to link to this specific section of the paragraph from another location
- Click and drag the crosshairs handle to rearrange your collapsible areas.
- Remove this individual link set.
- Icon – start searching for an icon from the Font Awesome gallery, or enter the icon name if you know it.
- URL – add the link. If you will be uploading a file, enter <nolink> in this field - it will be overridden when you select your file in the File Override field.
- Link text – should be unique on the page. Restricted to 80 characters.
- File Override - add a file if you would like the link set to link to a file instead of a URL
- You can either upload a file directory to the page, or open the file browser to upload the file to the site's central file repository. It is recommended that you open the file browser to upload, so that you can reuse the image in the future.
- If you are opting to use the File Override, you'll still need to fill in the URL field - we recommend adding <nolink>
- Add another link set.